6.45. 7Shifts Integration
In this document it will be explained how to set up 7shifts Integration with SambaPOS.
1. Before Installation
1.1. Hardware, Operating System and SambaPOS Requirements
- Windows 10 or above Windows Operating System,
- The latest version of Microsoft SQL Server,
- SambaPOS 5.7.26 or above version. Should be started with these configurations.
1.2. About 7shifts Integration License
You need to purchase a license by using SambaPOS CP website.
Important Note:
Your 7shifts Integration License and SambaPOS V5 Pro license have to be defined under the same email address on our CP website.
2. Windows Server Settings
2.1. Server Features
Server Operating System: Windows 10 or higher Operating System and the latest version of Microsoft SQL Server
Server Hardware: Minimum Intel i5 10th Gen CPU, 8 GB of Ram, 120 GB or higher SSD Harddisk
2.2. Database Features
Latest Microsoft® SQL Server® Express With Management
SQL Server Download Link
SQL Server Setup Document Link
2.3. Windows Firewall Settings
You need to configure your firewall services as explained in the SQL Server Setup document.
Note: If you don’t have MSSQL database, please visit the link to configure settings
https://kb.sambapos.com/2-1-3-sql-express-server-setup/?lang=en
Control Panel > System and Security > Windows Firewall > Turn Windows Firewall on or off > Turn off Windows Firewall for Private Network Settings and Public Network Settings
2.4. MSSQL TCP/IP Ports
Go to SQL Server Configuration Manager and “Enable” TCP/IP Sharing to connect MSSQL Database from clients.
– Right Click My Computer > Manage > Services and Applications > SQL Server Configuration Manager > SQL Server Network Configuration > Protocol For MSSQLSERVER > TCPIP > Enabled
3. SambaPOS License Check and Message Server Settings
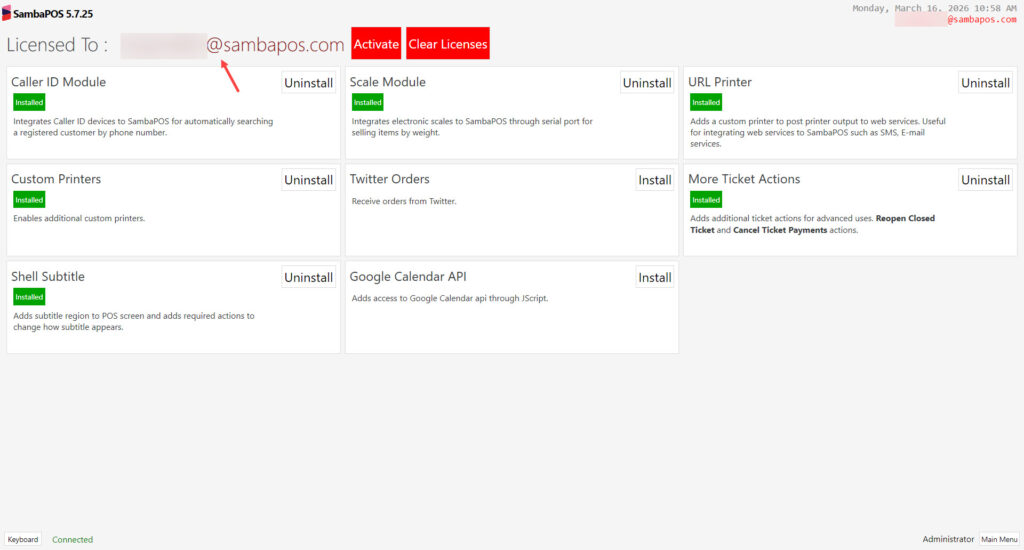
3.1. SambaPOS License Activation Check
Check the SambaPOS Main License status.
3.2. Message Server Settings
3.2.1. SambaPOS Message Server Controls and Settings
Online Order Module uses SambaPOS Message Server for communication. You might be using SambaPOS Message Server with default settings. If you don’t use Message Server or if using it with different settings than default in this case you have to configure necessary settings by following below explanations.
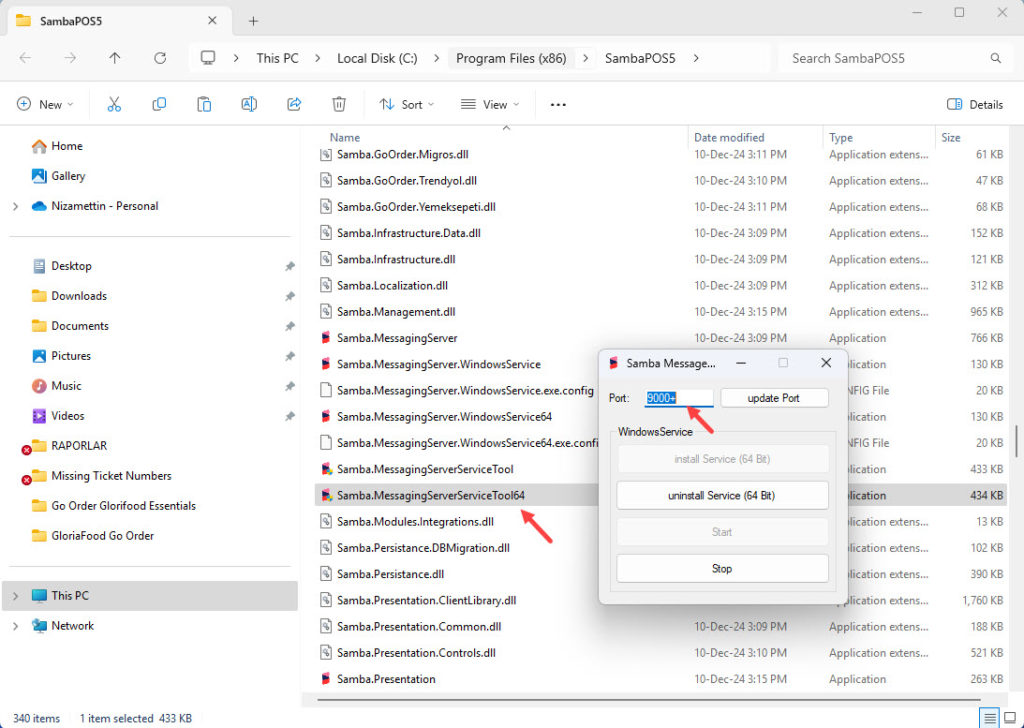
To configure Message Server Settings, execute “Samba.MessagingServerServiceTool.exe” file which is located in the directory that SambaPOS is installed.
Port: 9000+
Note: Port has to be 9000+ By checking image below you can see how it is supposed to be simply configured and also notice that it has to be on Start status.
3.2.2. SambaPOS Manage Message Server Settings
Message Server settings are supposed to be configured also in SambaPOS by following the settings above. Go to Manage > Settings > Local Settings > Message Server, in here perform the mentioned settings and click on SAVE button.
Message Server Name: http://main_computer_name (Name of SambaPOS V5 installed main computer)
or http://123.123.123.123 (IP address of SambaPOS V5 installed computer)
Message Server Port: 9000
Auto Start Message Client: [X] (Has to be selected)
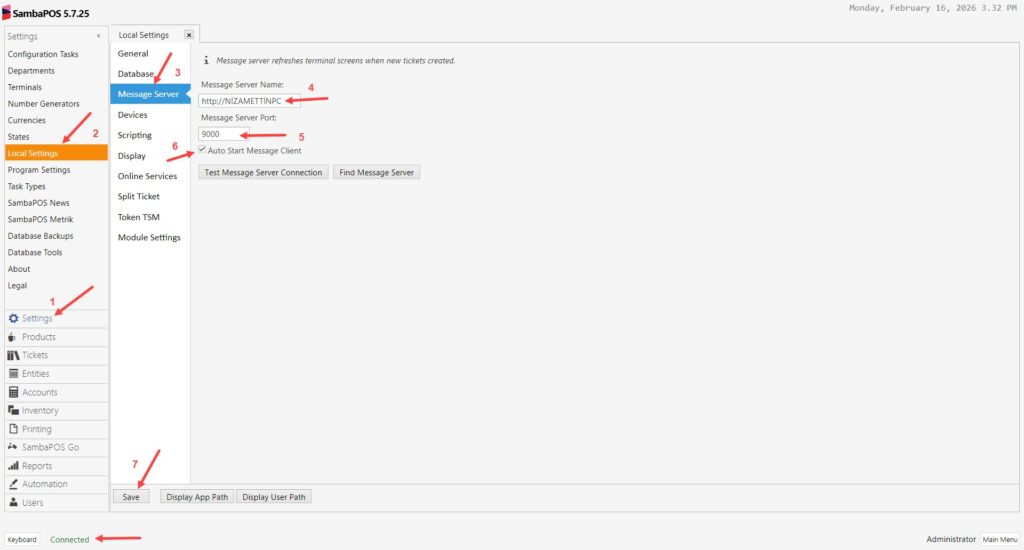
After completing necessary editings, click on Save buton.
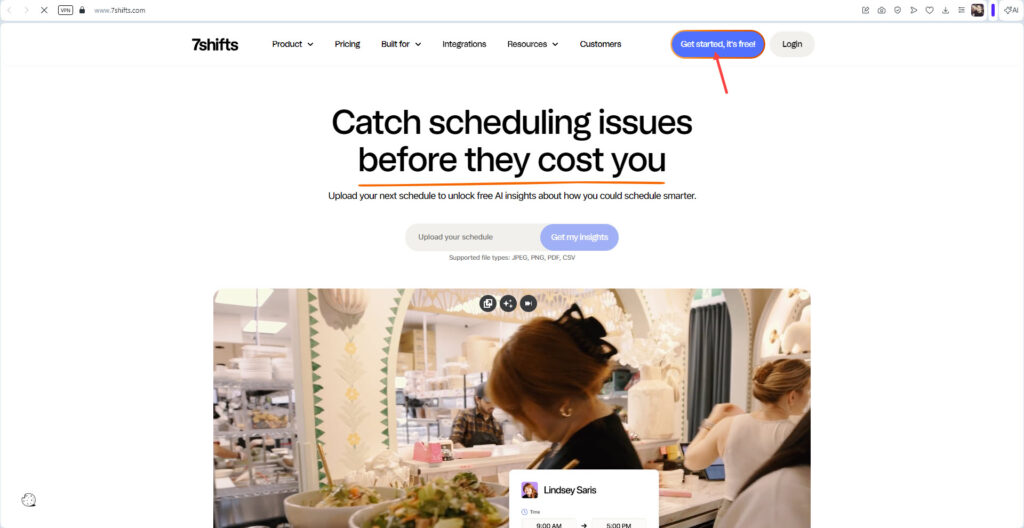
4. Registering on http://7shifts.com
Go to http://7shifts.comand register by clicking on Get Started button.
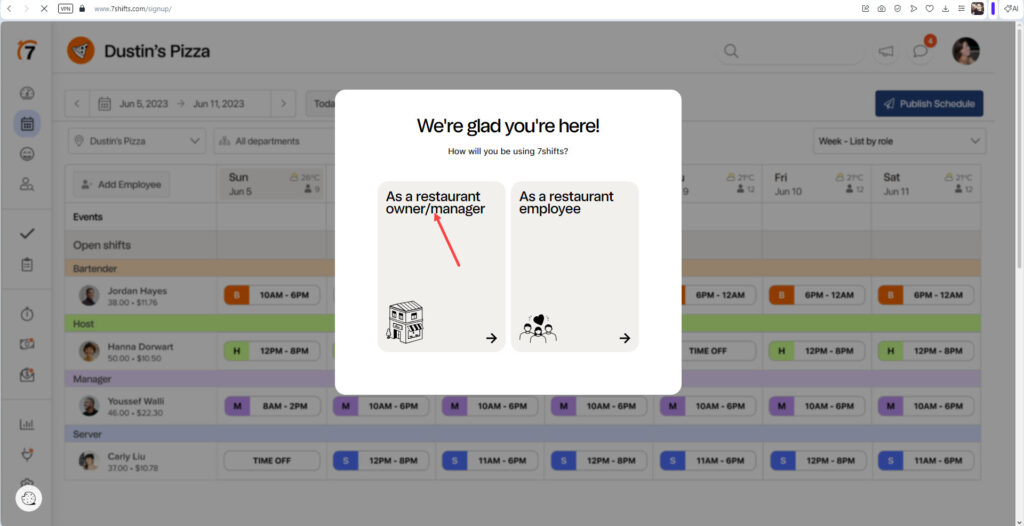
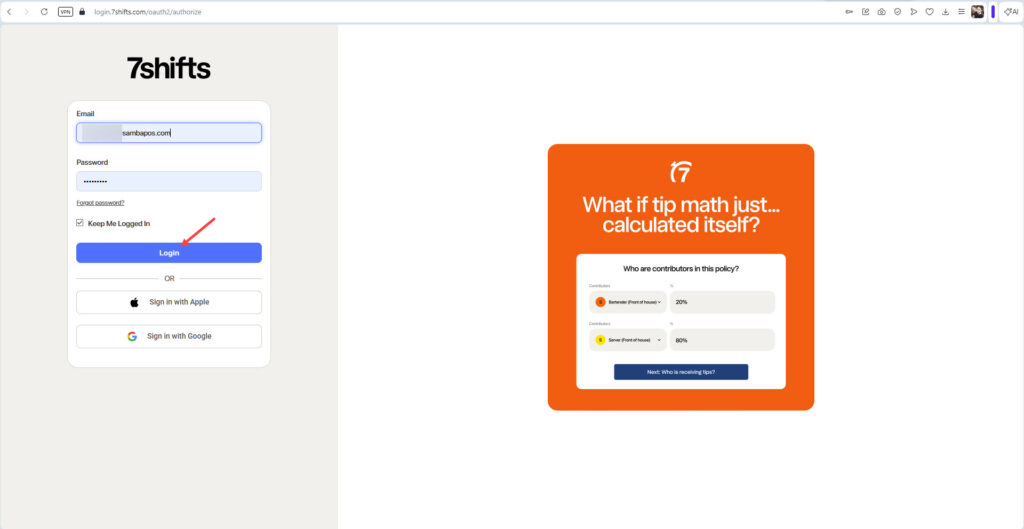
5. Logging on 7shifts.com
After registering you need to Login on http://7shifts.com
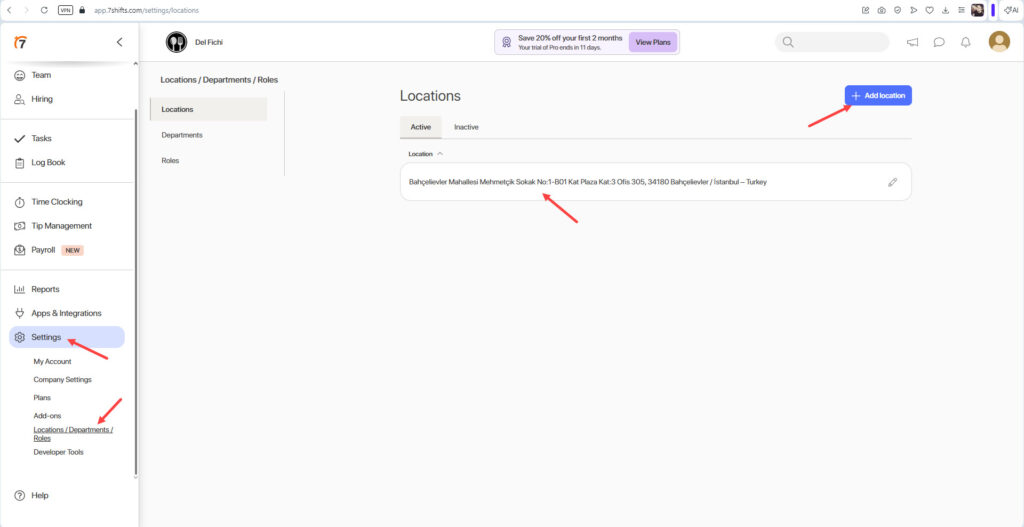
Once you logged in you need to define Location from Settings > Locations / Departments / Roles part;
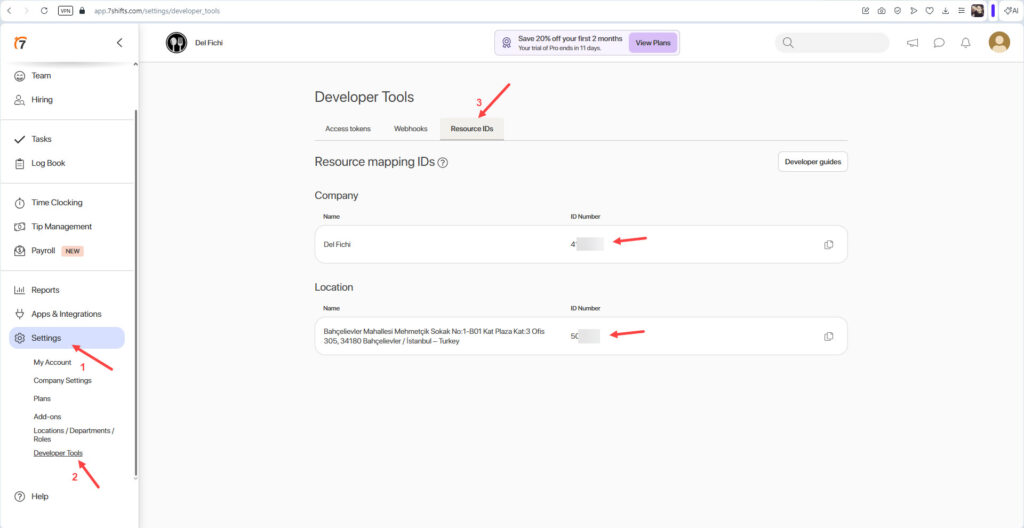
6. Getting Company and Location ID’s on 7shifts.com
After defining the Location you will be able to see Company and Location ID’s under Settings > Developer Tools part;
7. Adding Company ID Location ID and Company GUID on One Portal
7.1. Installing SambaPOS One Setup File on Computer
Download the SambaPOS One program from here and install it on your computer.
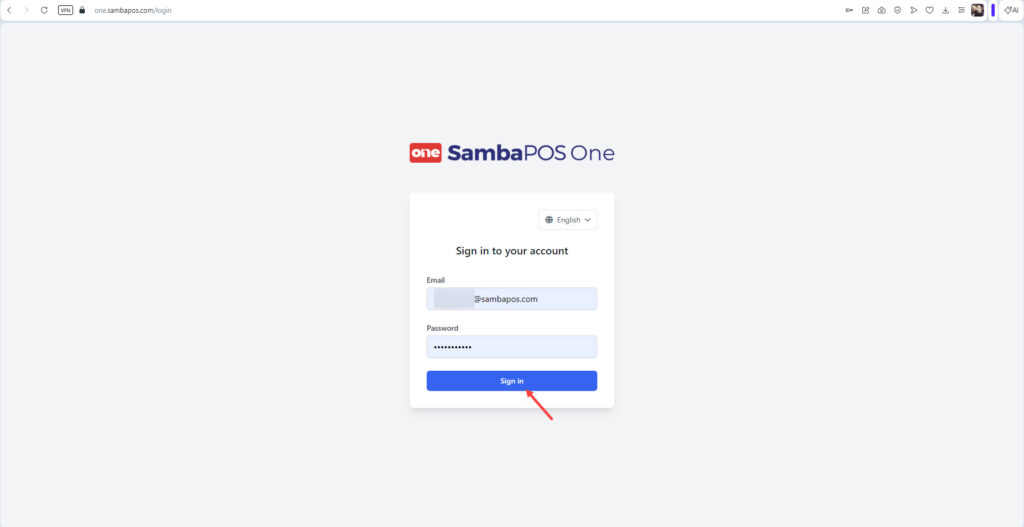
7.2. Signing in to SambaPOS One Portal
Go to https://one.sambapos.com sign in there with your SambaPOS V5 Pro license email address and password.
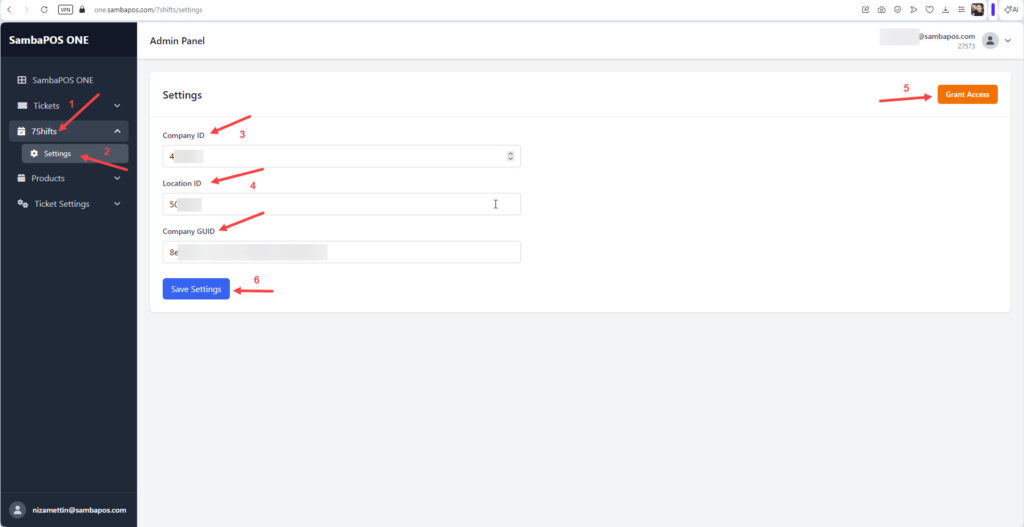
7.3. Adding Company and Location ID’s on SambaPOS One Portal
After you logged in on SambaPOS Portal insert the Company and Location ID’s to 7shifts > Settings part;
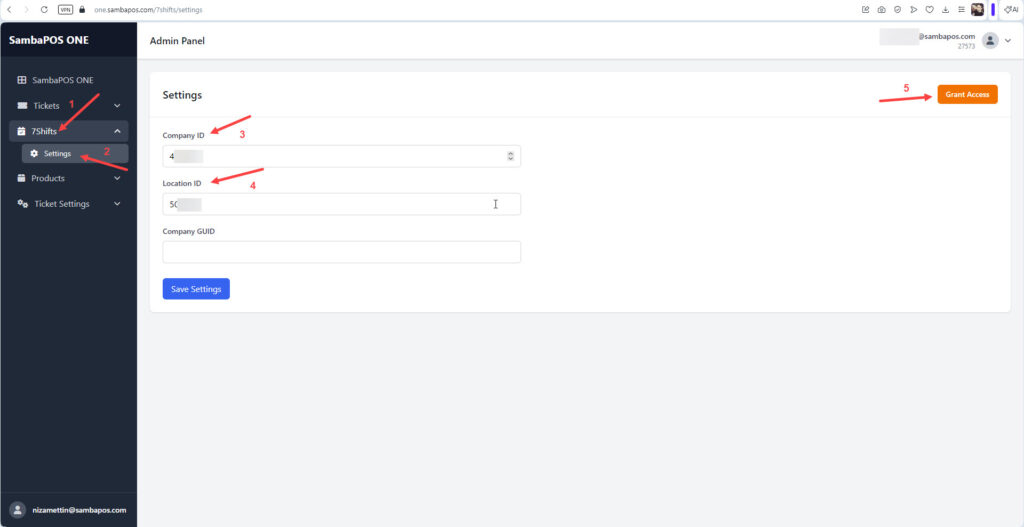
After entering the Company and Location ID’s click on Grant Access button which will create your Company GUID and it will ask for you to Grant SambaPOS;
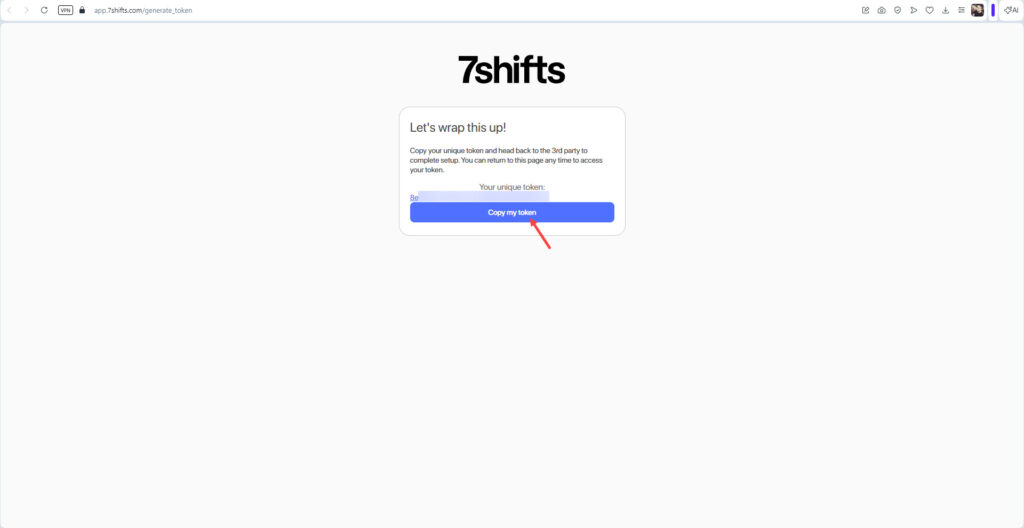
After getting the Company GUID enter it to the 7shifts > Settings Company GUID field and click on Save Settings button;
8. Adding Company and Location ID’s on SambaPOS
Main Menu > Manage > Settings > Program Settings > SambaPOS 7shifts Integration > Enter the ID’s accordingly and click on Enable 7shifts Integration button.
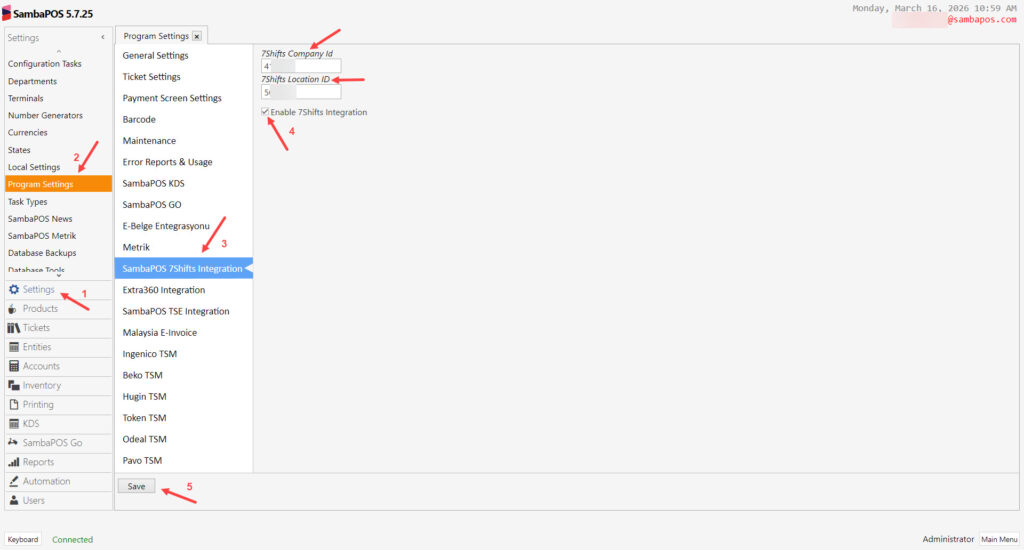
After completing necessary editings, click on Save buton.
NOTE:
After enabling 7shifts Integration on SambaPOS, you need to shut SambaPOS Down completely and restart it.
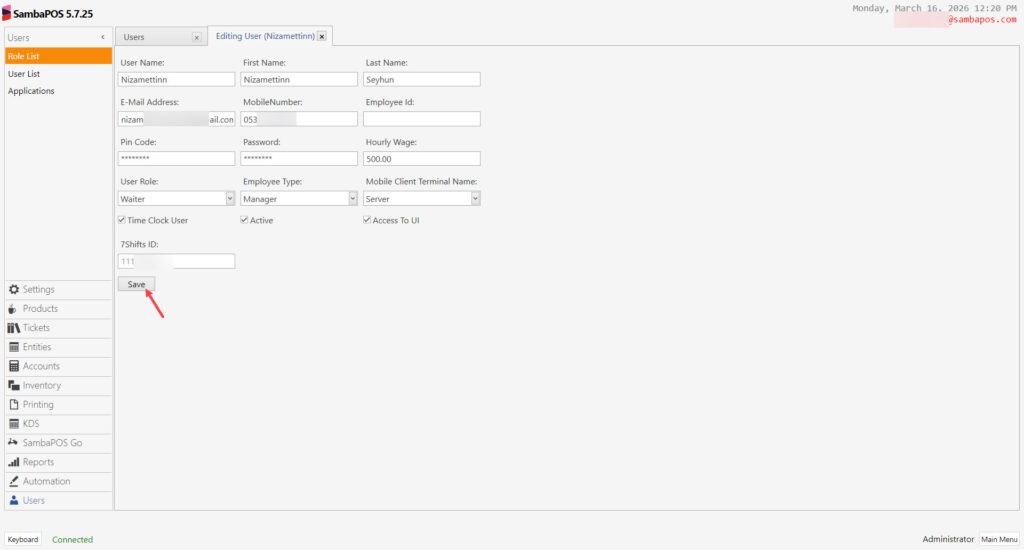
9. User Sync to 7shifts on SambaPOS
Main Menu > Manage > Users > User List > Select User > Fill all the necessary fields (Email Address and Phone is mandatory) > Click on SYNC button and then click on Save.

10. Time Clock Module Settings on SambaPOS
10.1. Adding Time Clock Module on SambaPOS
You can add the Time Clock Module settings by checking this document
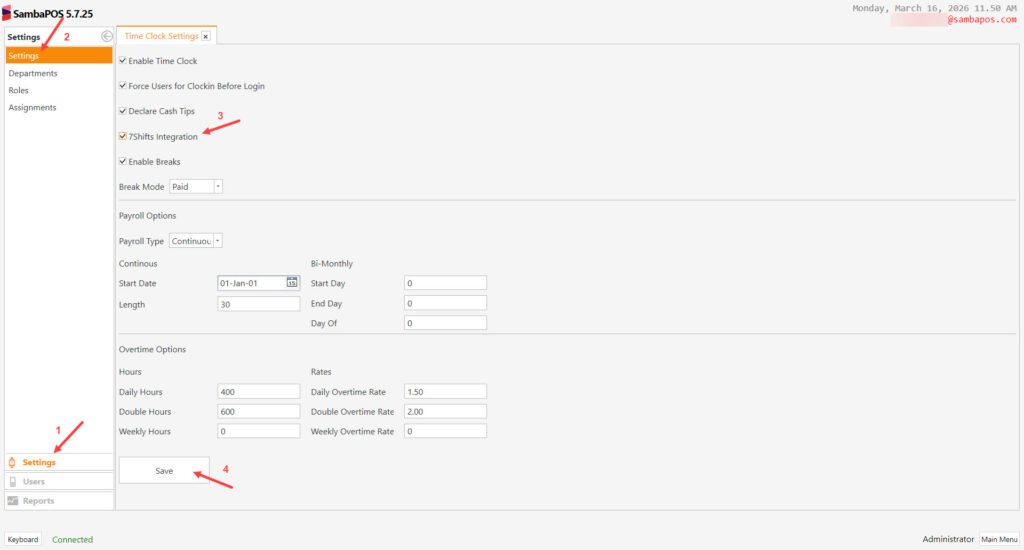
10.2. Enabling 7shifts Integration on Time Clock Settings
Main Menu > Time Clock > Settings > Settings > Enable 7shifts Integration here, fill the required fields and click on Save button.
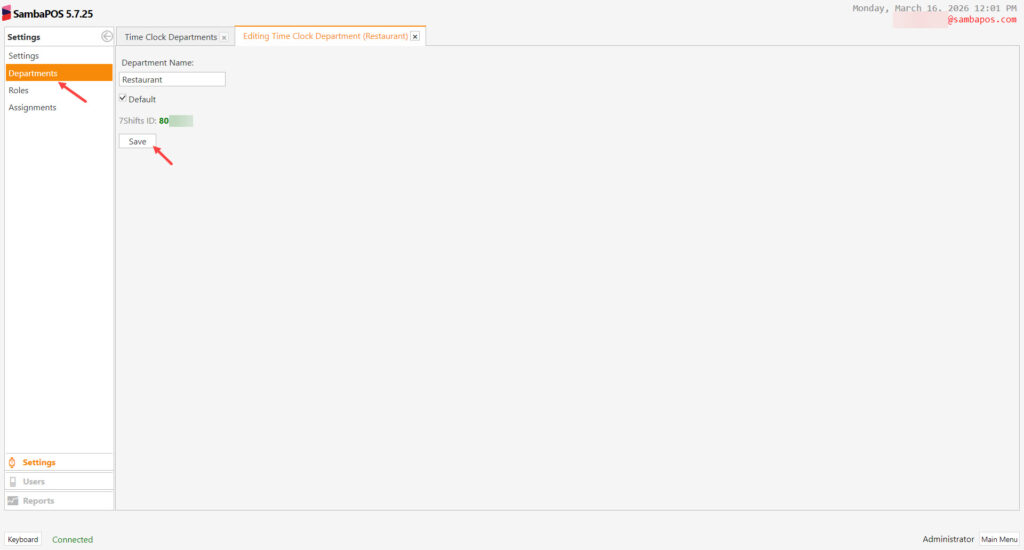
10.3. Syncing Department for 7shifts Integration on Time Clock Settings
Main Menu > Time Clock > Settings > Departments > Click on click Sync to 7shifts button and then click on Save button.
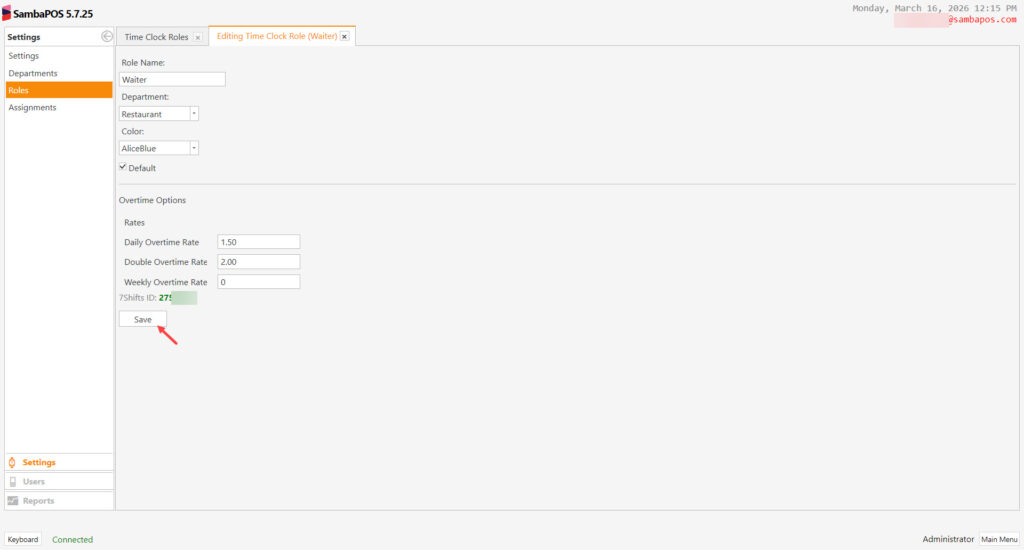
10.4. Syncing Roles for 7shifts Integration on Time Clock Settings
Main Menu > Time Clock > Settings > Roles > Click on click Sync to 7shifts button and then click on Save button.
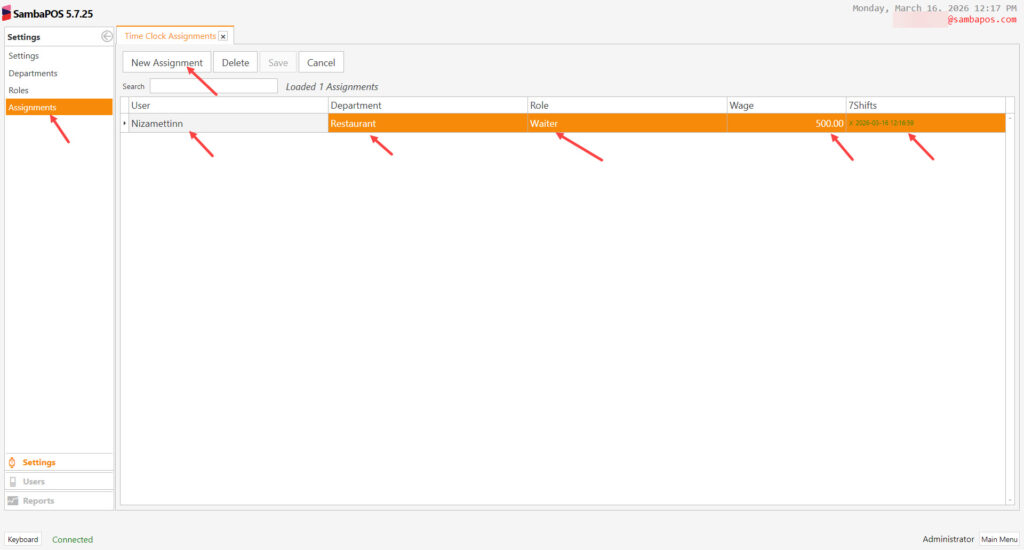
10.5. Assignments for 7shifts Integration on Time Clock Settings
Main Menu > Time Clock > Settings >Assignments > Click on New Assignments button and then select the related parts accordingly.
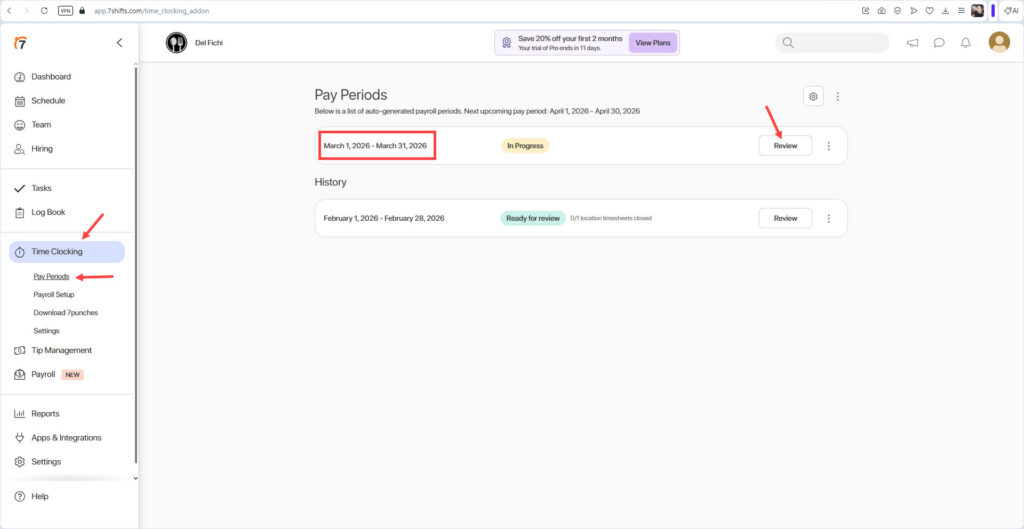
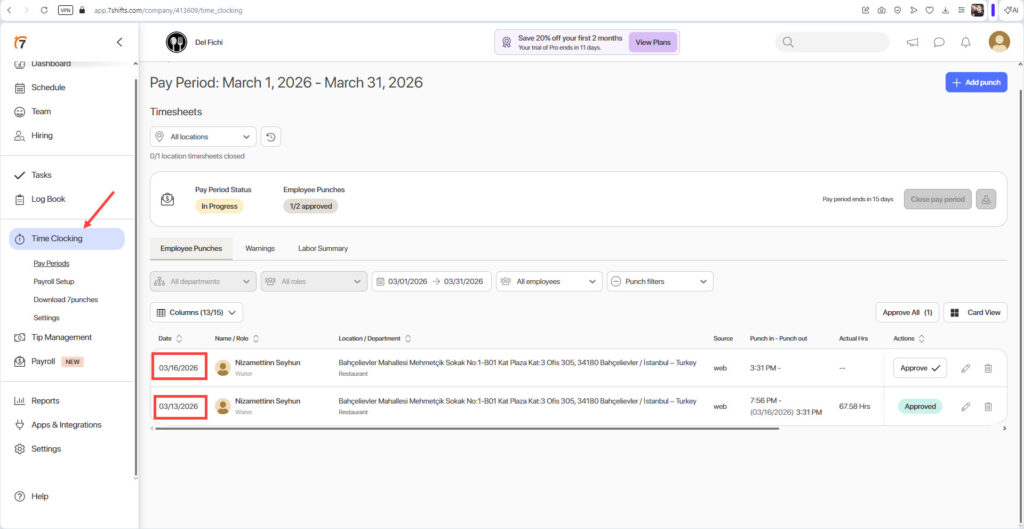
11. Displaying Clock In Clock Out Data on 7shifts Panel
Clock In and Clock Out data will reflect to the 7shifts side under Time Clocking > Pay Periods > Review;
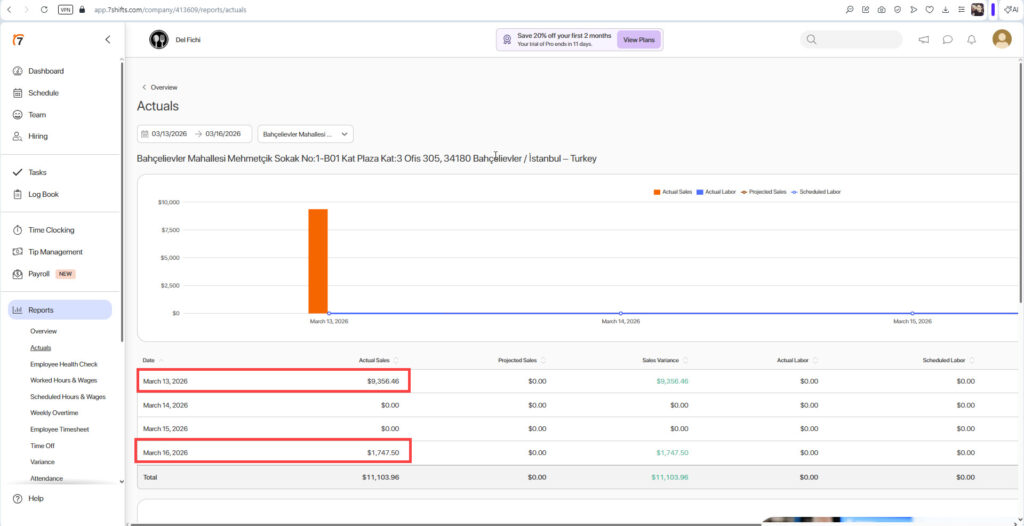
12. Displaying Sales Data on 7shifts Panel
Sales data will reflect to the 7shifts side under Reports > Actuals part;