6.25. How to Integrate SambaPOS With Jetrik?
In this document it will be explained how to integrate SambaPOS with Jetrik.
1. Settings to Handle on SambaPOS
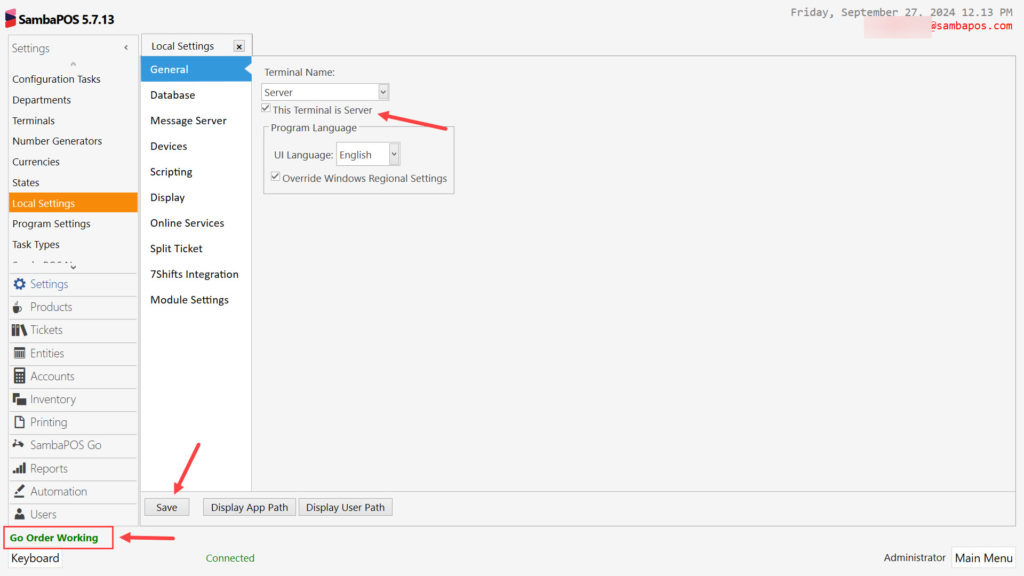
1.0. Determining Server PC For All Go Orders
Since all orders received via Go Order will work on a special Entity Screen, they can work on different users/terminals you want.
However, the computer on which new order alerts will be sent must be selected.
When this setting is selected, the green Go Order Working text will also appear on the program status bar (lower left corner in SambaPOS).
Main Menu > Manage > Settings > Local Settings > General > Select This Terminal is box and click on Save.
IMPORTANT NOTE: Possible reasons for displaying the Go Order Working phrase as Go Order Not Working;
- SambaPOS Licensing might not be done
- Jetrik Integration License might not be purchased
- There might not be a proper internet connection
1.1. Setup of SambaPOS Advanced Delivery Service Configuration
You can skip this stage if you already have Advanced Delivery Service Configuration on your SambaPOS. If you don’t have it then you can apply the document here.
1.2. Adding Jetrik Discount Calculation Template
1.2.1. Adding Jetrik Discount Account
Main Menu > Manage > Accounts > Accounts > Here click on Add Account.
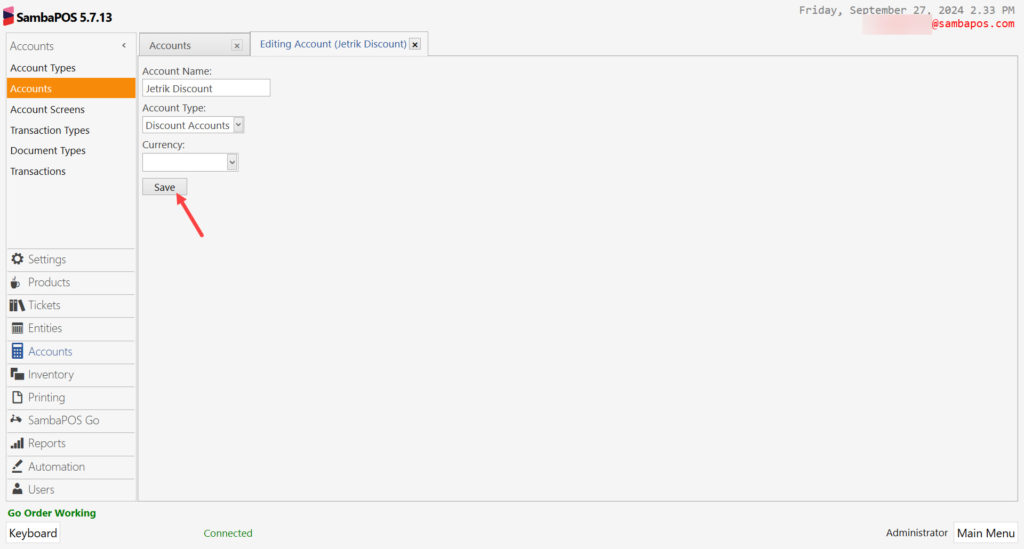
Account Name: Jetrik Discount
Account Type: Discount Accounts
After completing necessary editings, click on Save button.
1.2.2. Adding Jetrik Discount Account Transaction Type
Main Menu > Manage > Accounts > Account Transaction Types > Here click on Add Account Transaction Type.
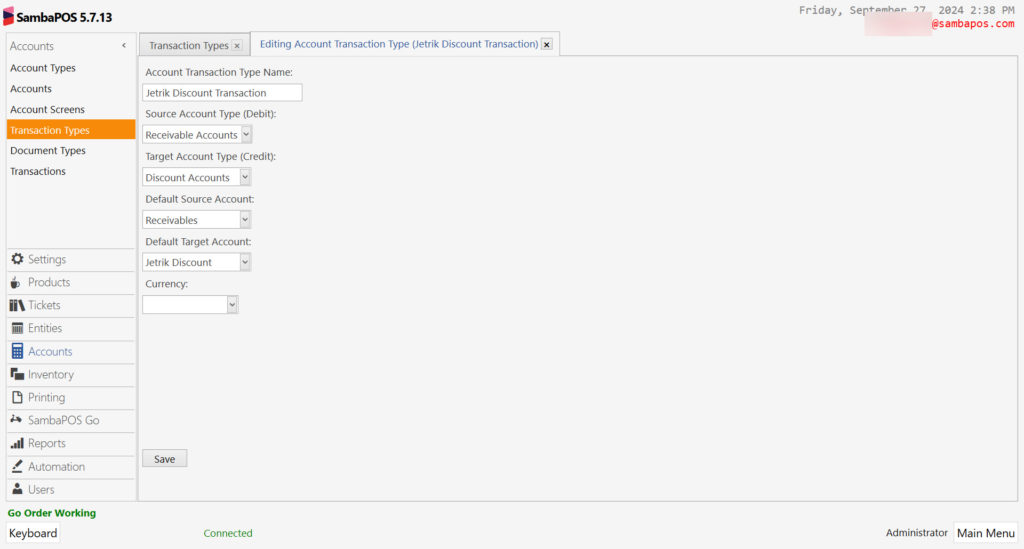
Account Transaction Type Name: Jetrik Discount Transaction
Source Account Type (Debit): Receivable Accounts
Target Account Type (Credit): Discount Accounts
Default Source Account:Receivables
Default Trget Account:Jetrik Discount
After completing necessary editings, click on Save button.
1.2.3. Adding Jetrik Discount Calculation Type
Main Menu > Manage > Tickets > Calculation Types > Here, click on Add Calculation Type.
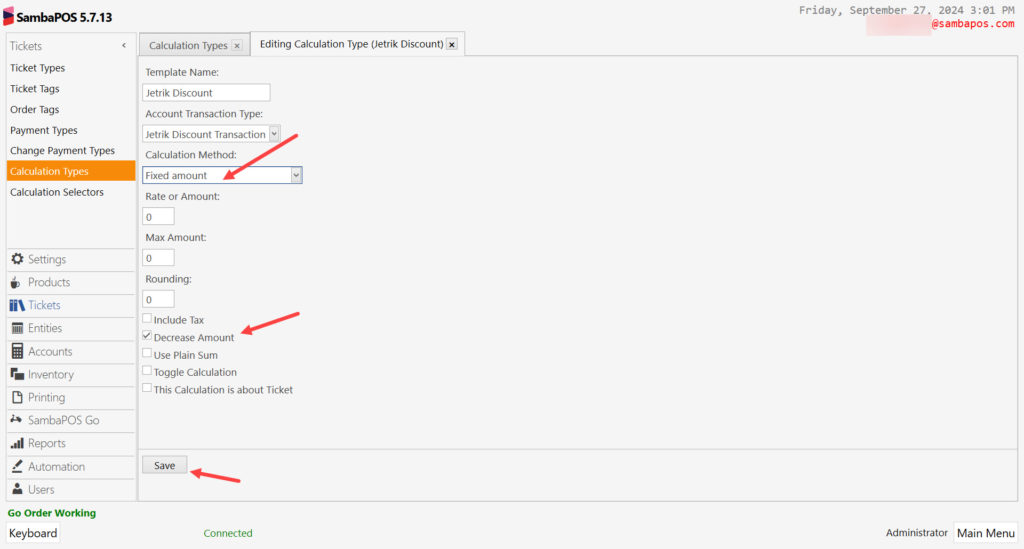
Template Name: Jetrik Discount
Account Transaction Type: Jetrik Discount Transaction
Calculation Method: Fixed Amount
Decrase Amount: This box must be selected.
After completing necessary editings, click on Save button.
1.2.4. Adding Jetrik Account Calculation Selector
Main Menu > Manage > Tickets > Calculation Selectors >Here, click on Add Calculation Selector.
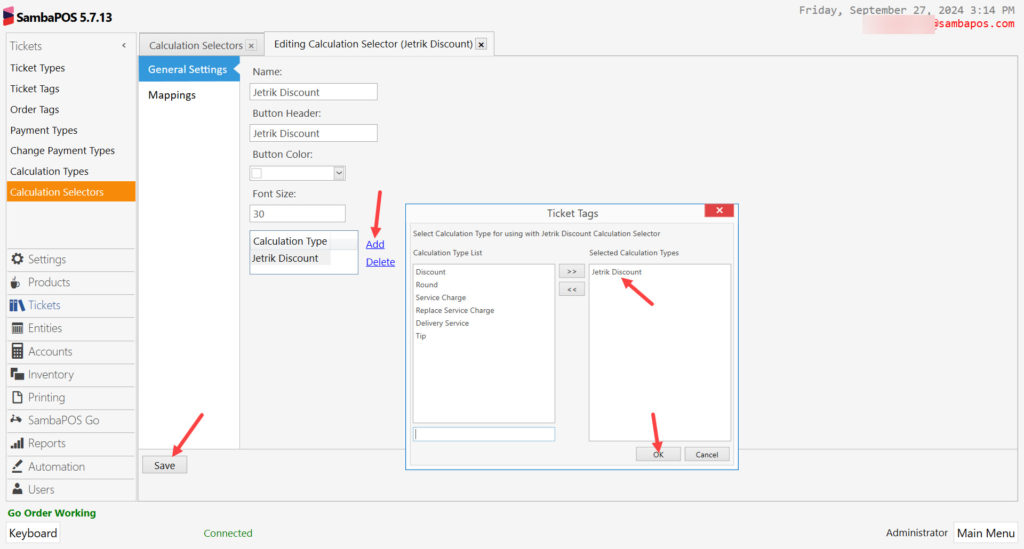
Name: Jetrik Discount
Button Header: Jetrik Discount
Calculation Type: Here, click on Add and select Jetrik Discount.
After completing necessary editings, click on Save button.
1.3. GO Order Jetrik Settings
1.3.1. Go Order Jetrik Settings
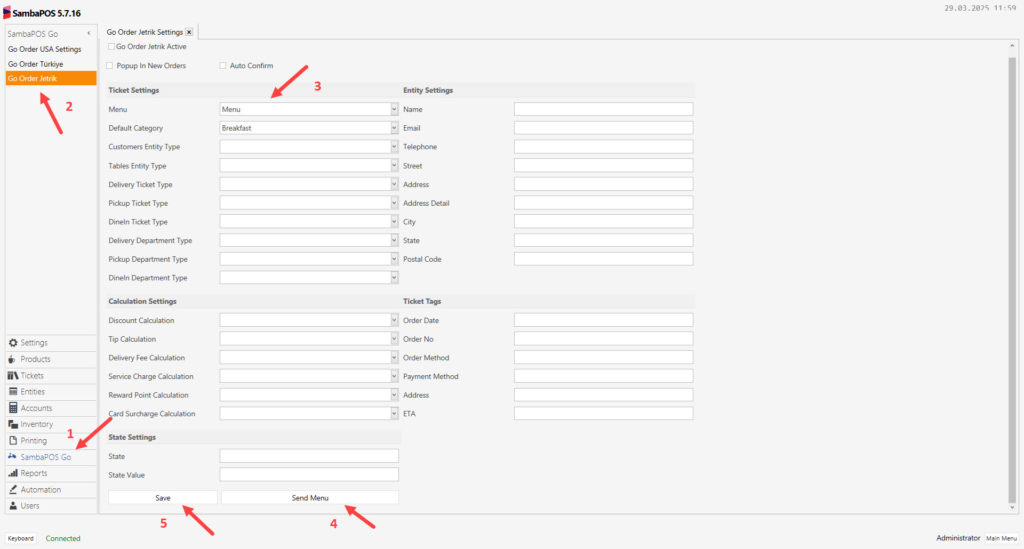
Main Menu > Manage > SambaPOS GO > GO Order Jetrik > GO Order Jetrik Settings > Handle the settings according to your needs > Click on Send Menu button > Click on Save button.
Go Order Active: Must be selected.
Popup In New Orders: Select if you want to display popup when you receive a new order from Jetrik.
Auto Confirm: Select if you want to confirm the orders directly.
1.3.1.a. Ticket Settings
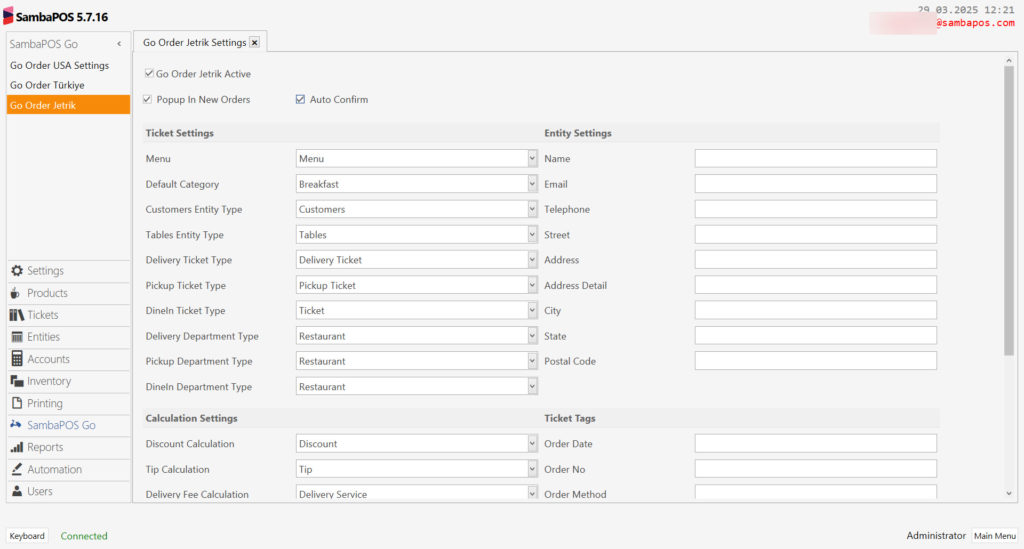
Menu: Select the Menu you want to use.
Default Category:This is the field where you select which category the product will be transferred to by default when an order for a product that is in your Jetrik menu but not in SambaPOS comes in.
Customers Entity Type: Select it as Customers. (Your Customers Entity Type)
Tables Entity Type: Select it as Tables. (Your Tables Entity Type)
Delivery Ticket Type: Select the Ticket Type that you use for Delivery Service. (Your Delivery Service Ticket Type)
Pickup Ticket Type: Select the Ticket Type that you use for Pickup. (Your Pickup Ticket Type)
Dine In Ticket Type: Select the Ticket Type that you use for Dine In. (Your Dine In Service Ticket Type)
Delivery Department Type: Select the Department Type that you use for Delivery. (Your Delivery Service Department Type)
Pickup Department Type: Select the Department Type that you use for Pickup. (Your Pickup Service Department Type)
Dine In Department Type: Select the Department Type that you use for Dine In. (Your Dine In Service Department Type)
1.3.1.b. Calculation Settings
Fill the related fields accordingly.

1.3.1.c. State Settings
The initial status of the ticket to be created is determined here.
For example:
State: Delivery
State Value: Waiting
After completing necessary editings, click on Save button.
1.3.2. Adding Jetrik Entity Screen
Main Menu > Manage > Entities > Entity Screens > Here, click on Add Entity Screen.
General Settings Section;
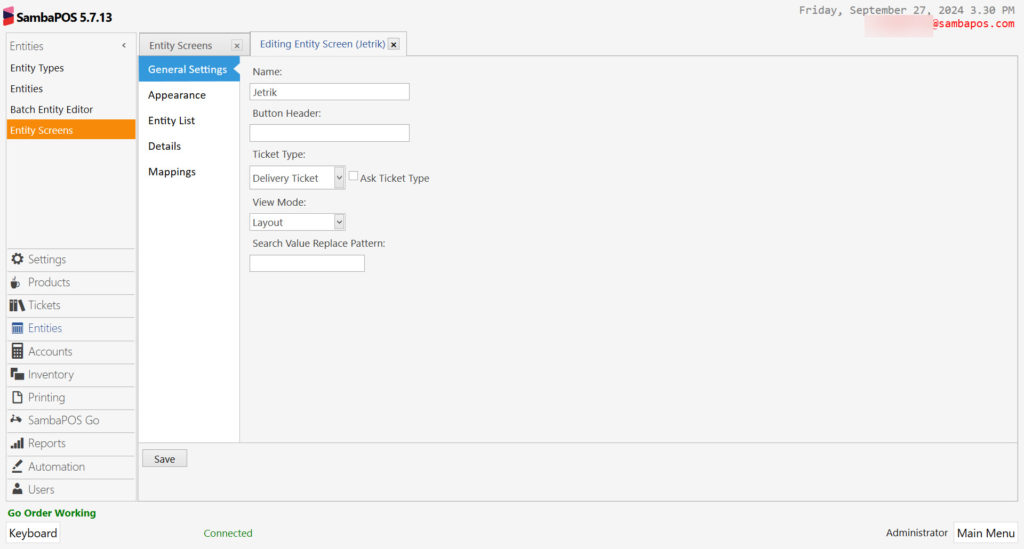
Name: Jetrik
Button Header: Jetrik
Ticket Type: Delivery Ticket
View Mode: Layout
Entity List Section;
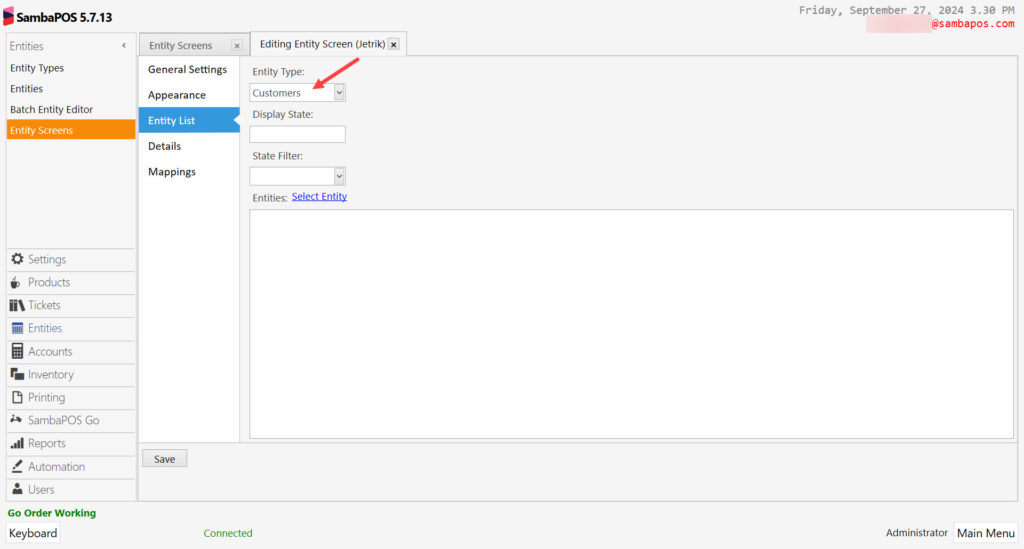
Entity Type: Customers
Mappings Section;
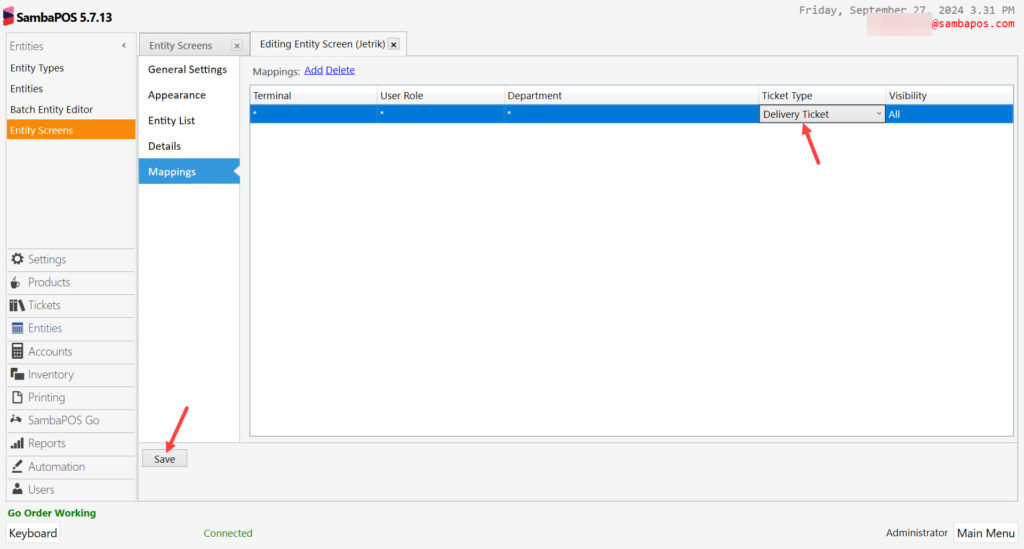
Here, add a row by clicking on Add and click on Save button.
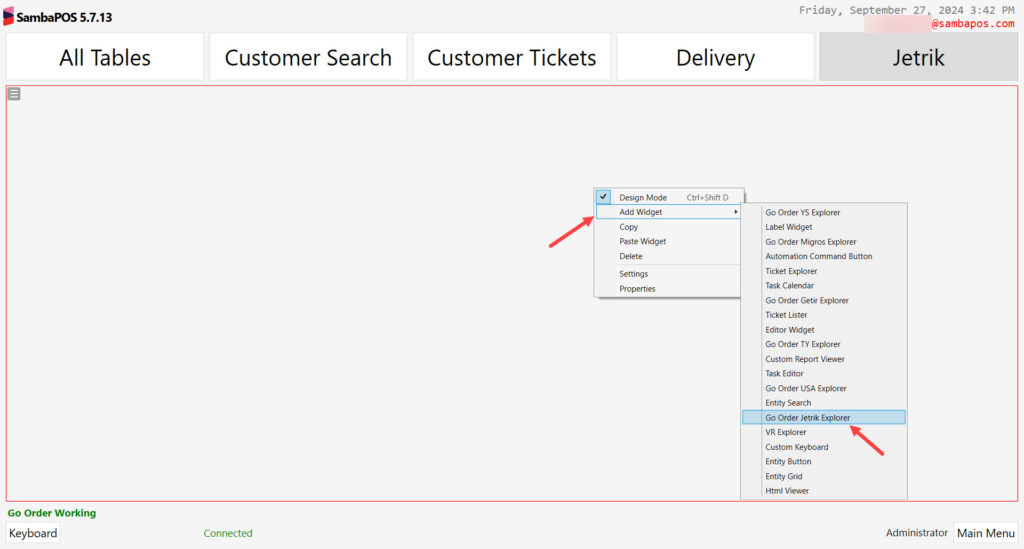
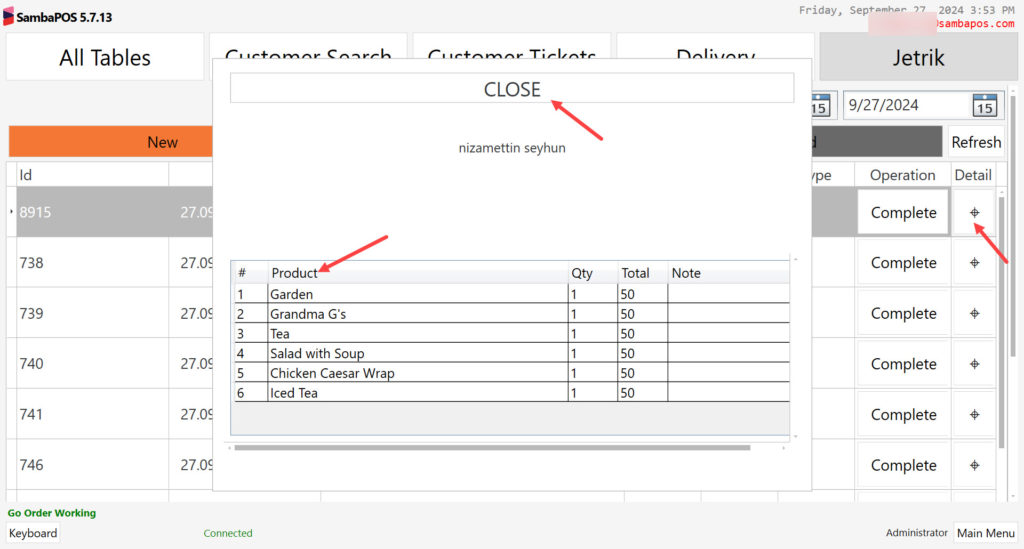
1.3.3. Editing Jetrik Entity Screen Settings
Main Menu > POS > Jetrik Entity Screen > In here activate design mode by right clicking of mouse.
Red line of the frame indicates that design mode is activated.
After activating design mode, click on Add Widget > Go Order Jetrik Explorer and position it on the screen by using mouse and editing tool.
After Adding Go Order Jetrik Explorer Widget click on the button shown in the below image to adjust it on the screen.
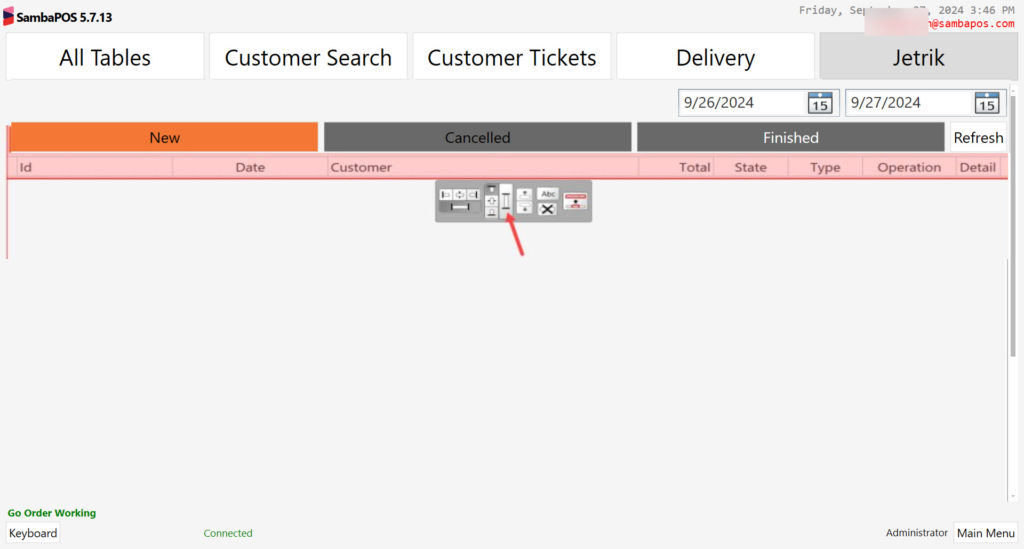
– In order to save the changes that you made you need to close the design mode by right clicking on mouse and select the Design Mode again.
– After completing these operations, you need to completely shut SambaPOS down once by exiting the PIN entry screen.
1.4. Important Notes
NOTE 1: If the names of the products coming from Jetrik and the products in SambaPOS are different, these products are added to the category you specified as the Default Category in the step 1.3.1. Go Order Jetrik Settings of this document.
NOT 2: These products, which are added to the default category in SambaPOS, must be added to the relevant Print Jobs and sent to the printers.
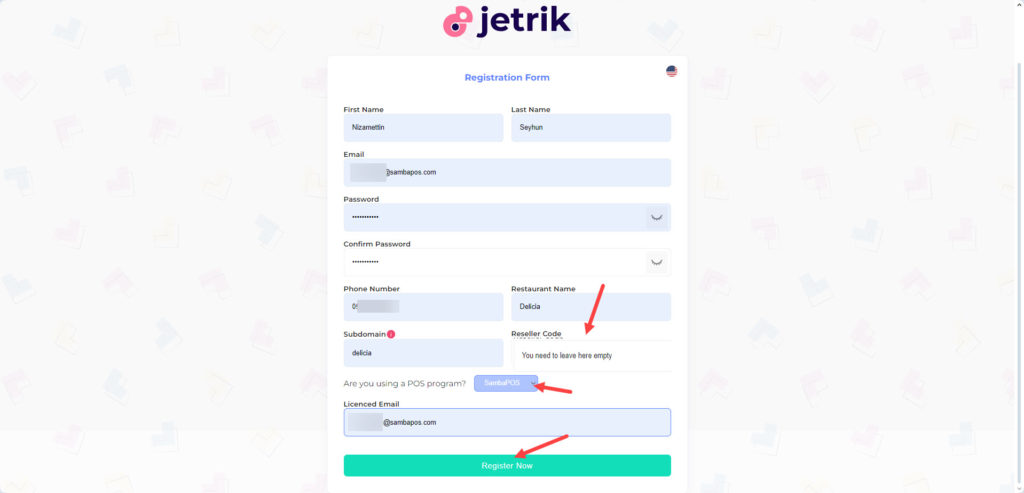
2. Registering on reg.jetrik.com
3. Settings To Be Done on panel.jetrik.com
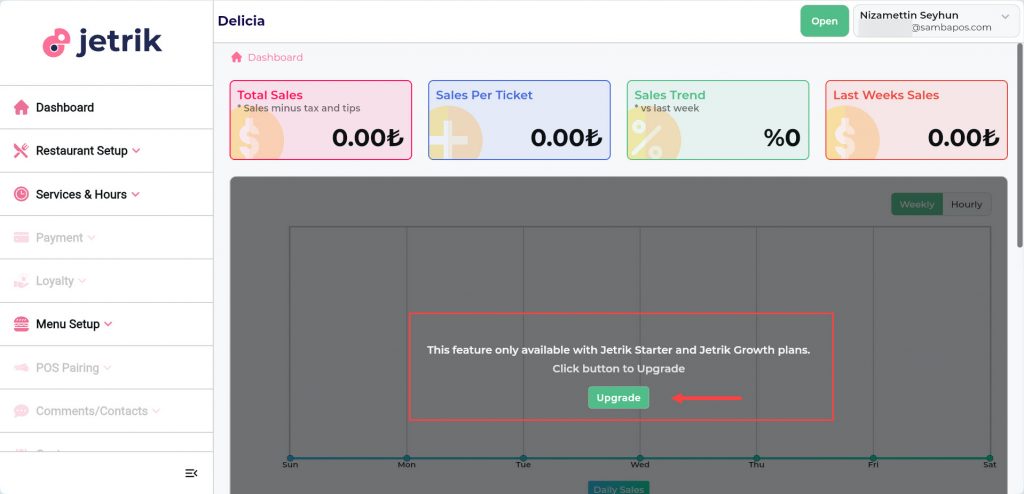
3.1. Dashboard
In here, you can set your restaurant as Open-Closed, change theme-language-password settings by clicking on your name which is located on the top right corner.
The data flow on the home page is not available in the Jetrik QR Menu package, but is only available in the Jetrik Starter and Jetrik Growth packages.
3.2. Restaurant Setup
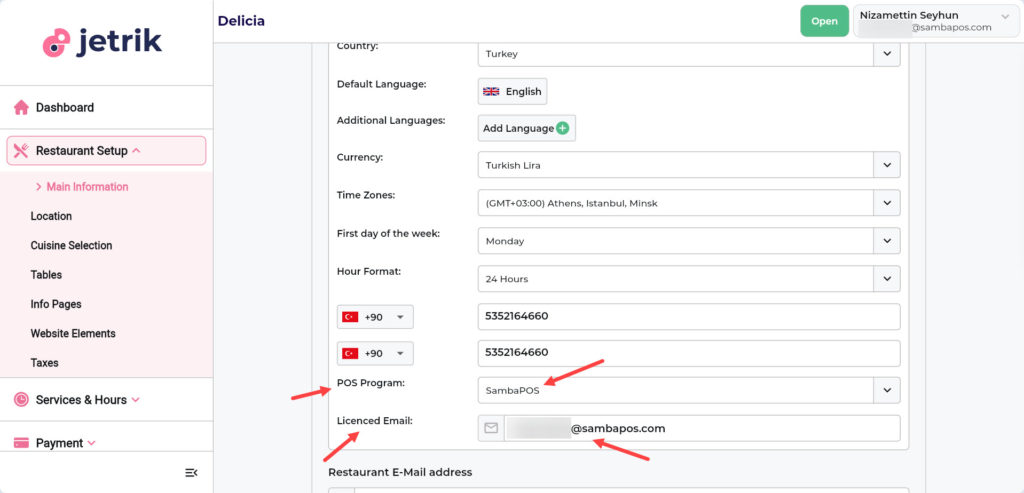
3.2.1. Main Information Screen
On this screen you can set how your restaurant’s name and image will be displayed on the website and on the app.
You can also view, download and copy the QR Code that will display your menu from here.
You can select the base language for your Jetrik Panel from the Default Language section.
If you have products in more than one language, you can set them in the Additional Languages section.
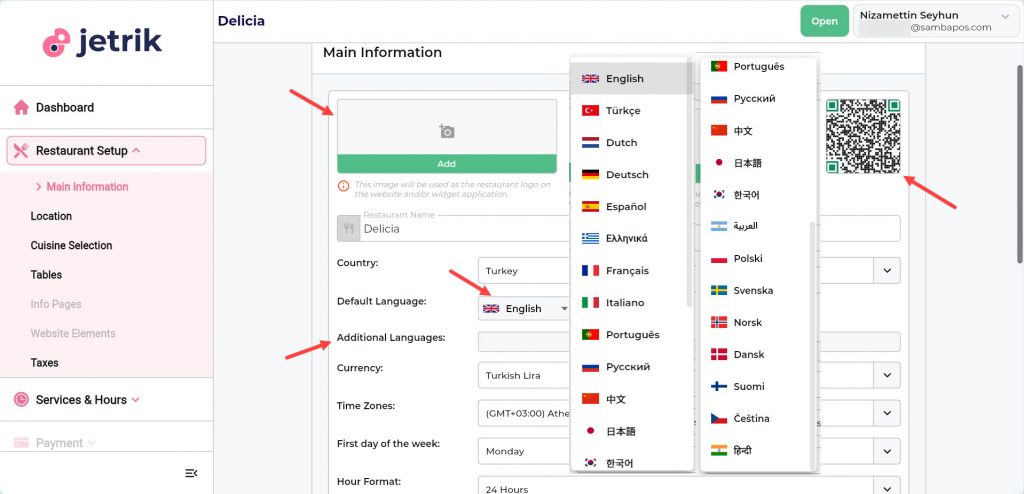
POS Program: SambaPOS
Licensed Email: Type your SambaPOS V5 Pro License email address here.
3.2.2. Location Screen
You can insert your restaurant’s location information.

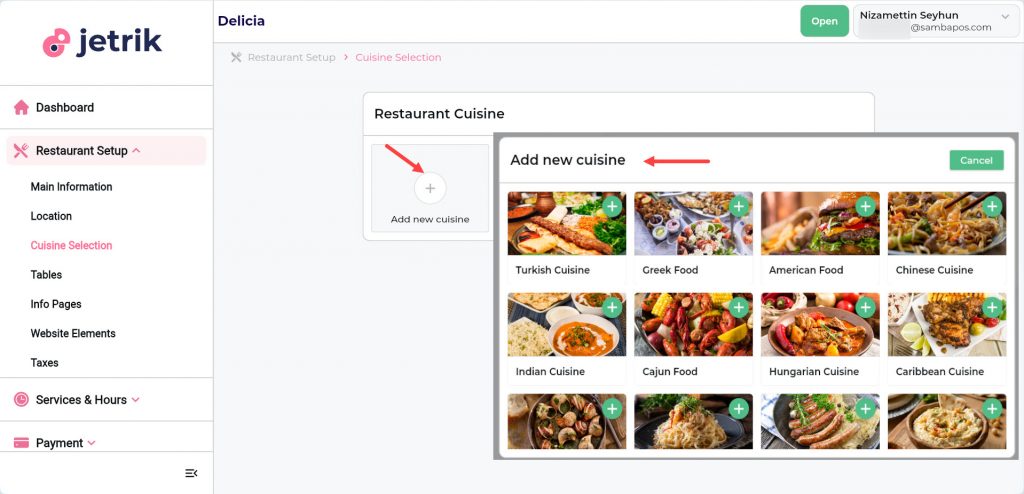
3.2.3. Cuisine Selection Screen
On this screen you can select the Cuisine Types that you offer for your customers.
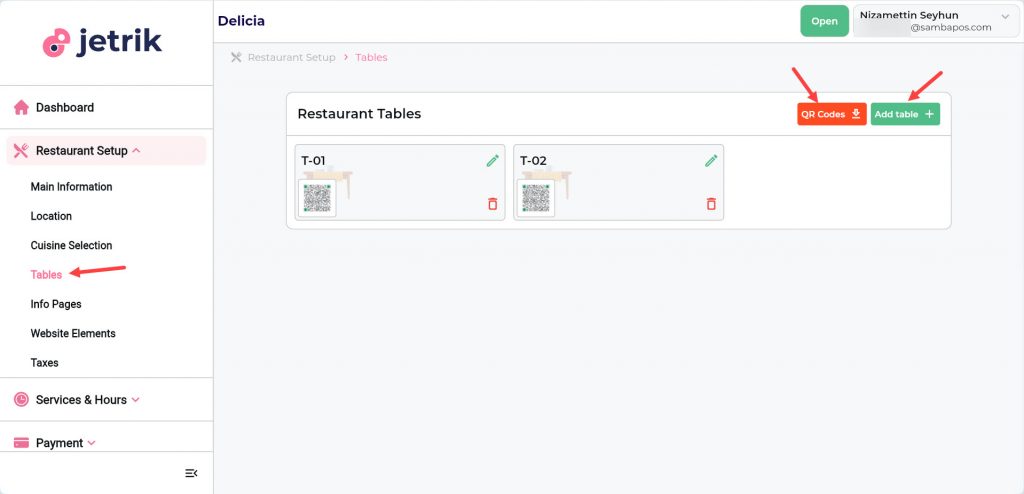
3.2.4. Tables Screen
On this screen you can download the QR Codes for your tables and add new tables.
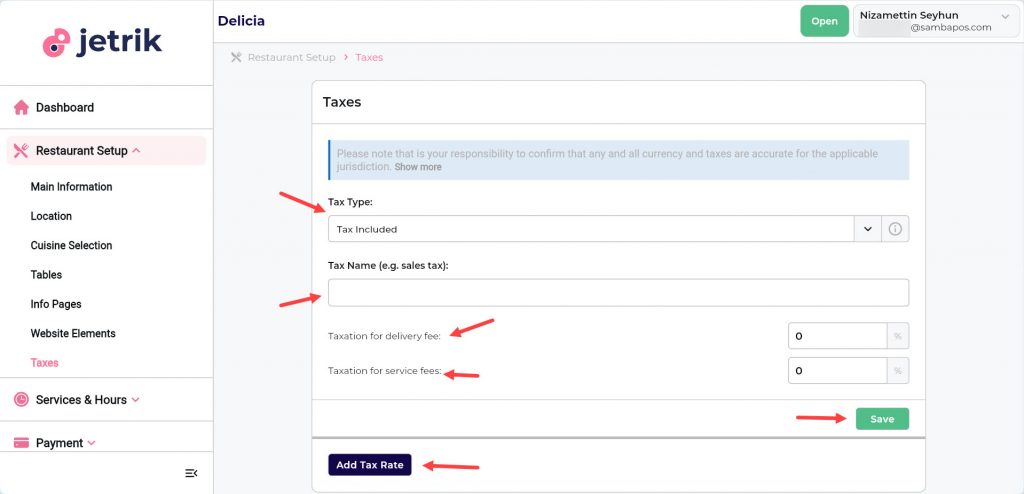
3.2.5. Taxes Screen
On this screen you can set Tax and Service Charges.
3.3. Services and Hours
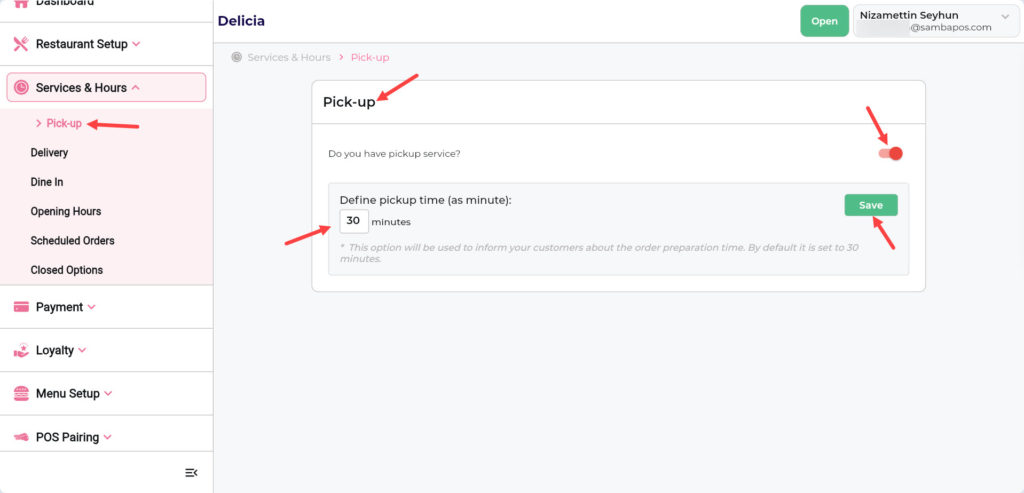
3.3.1. Pickup Screen
If your restaurant offers Pickup Service, you can handle the settings from here.
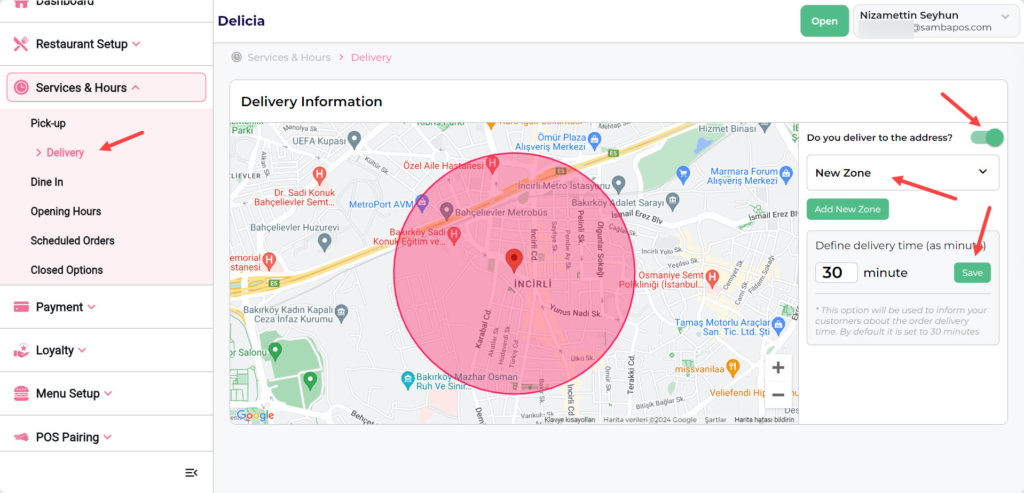
3.3.2. Delivery Screen
If your restaurant offers Delivery Service, you can handle the settings from here.
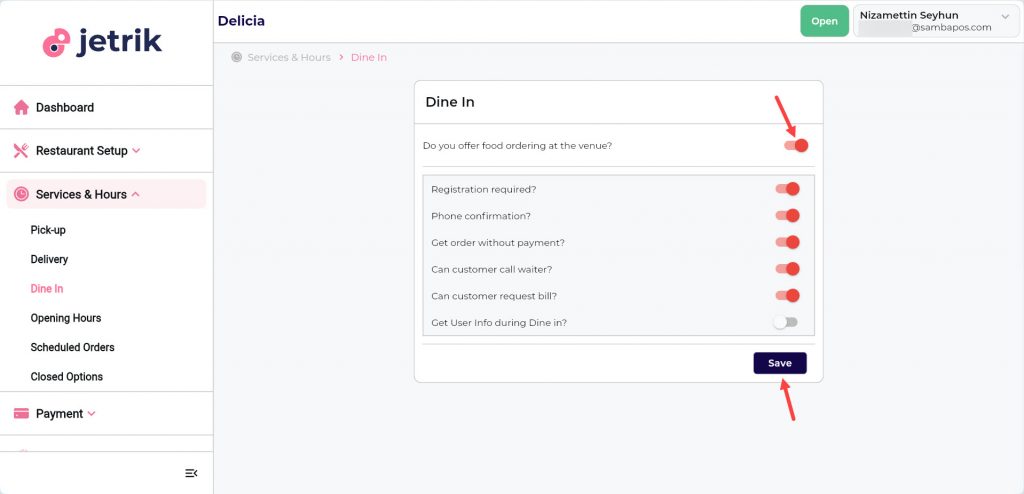
3.3.3. Dine In Screen
If your restaurant offers Dine In Service, you can handle the settings from here.
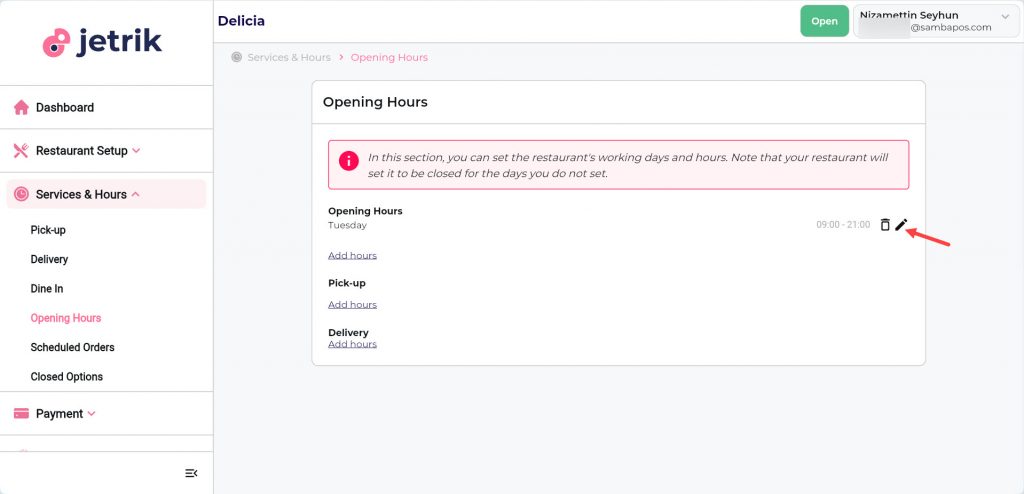
3.3.4. Opening Hours Screen
You can handle Opening Hours settings of your restaurant from here.
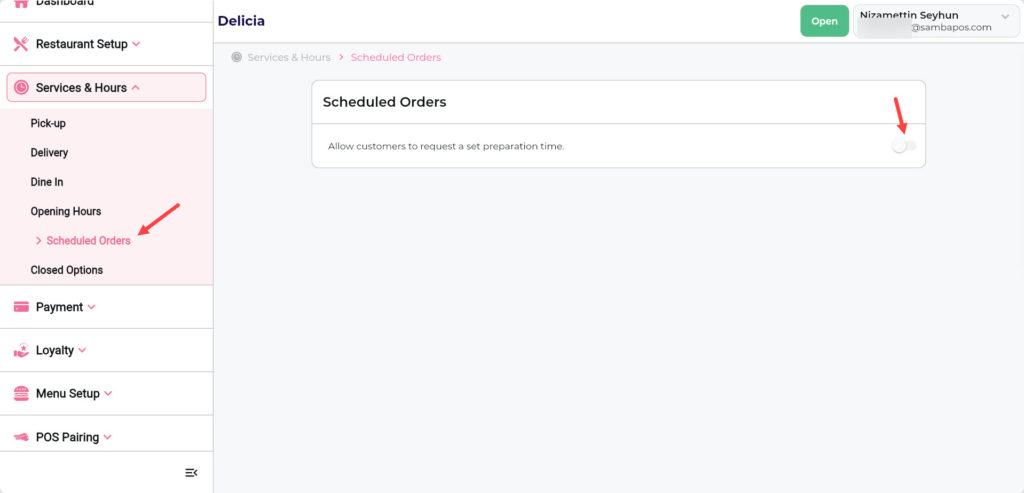
3.3.5. Scheduled Orders Screen
If you offer your customers the ability to place Planned Orders, you can make the relevant settings here.
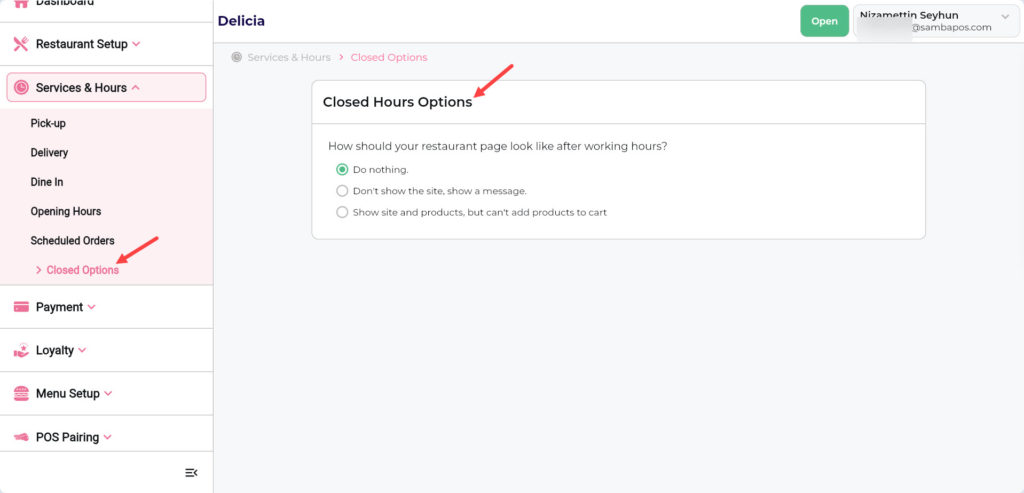
3.3.6. Scheduled Orders Screen
You can adjust the settings here for how your restaurant will appear outside of business hours.
3.4. Payment
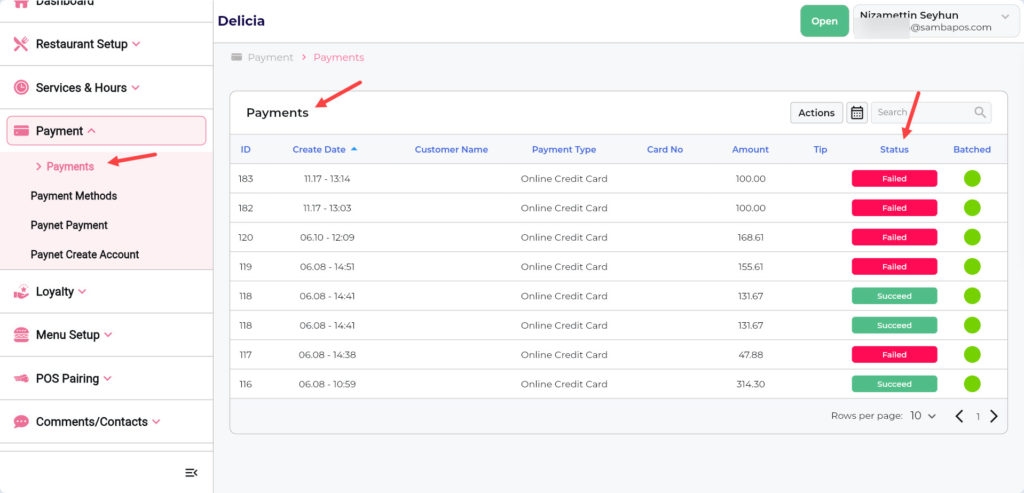
3.4.1. Payments Screen
You can track your payments for your orders from this screen.
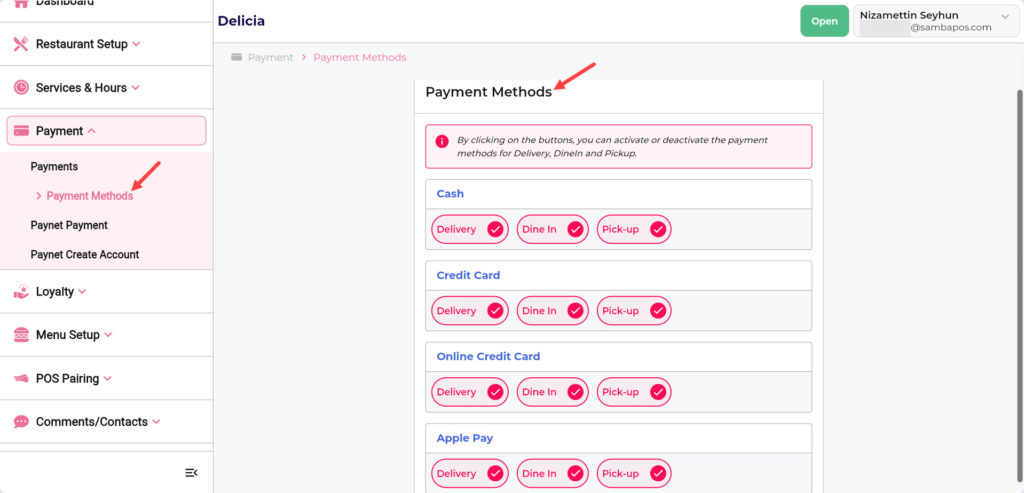
3.4.2. Payment Methods Screen
You can set the payment methods that can be used for your orders from this screen.
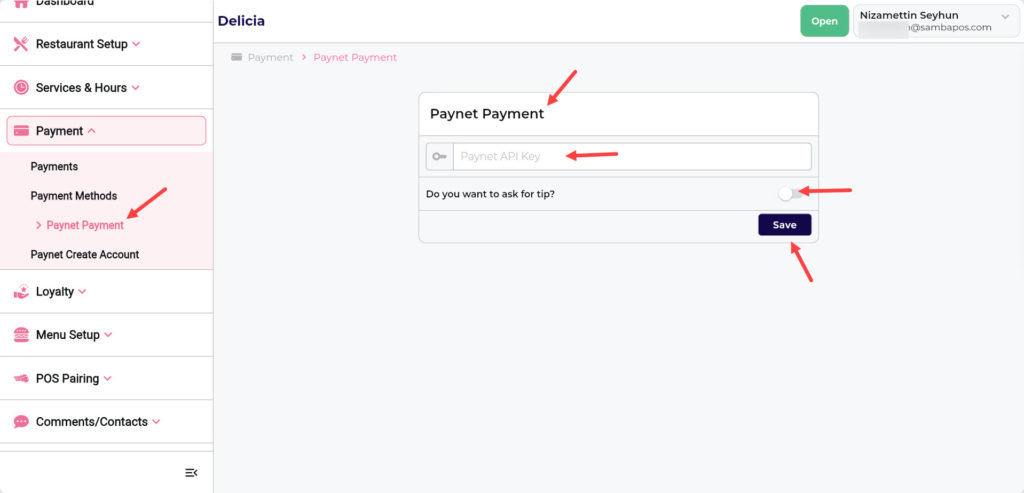
3.4.3. Paynet Payment Screen
If you want to use the Paynet Payment option for your orders, you can activate it from this screen.
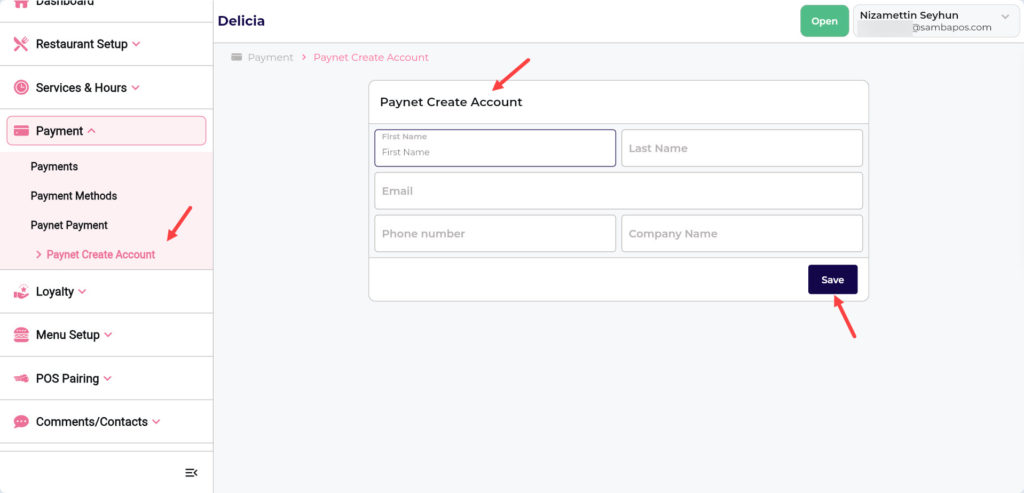
3.4.4. Paynet Create Account Sreen
If you want to use the Paynet Payment option for your orders, you can create an account from this screen.
3.5. Loyalty
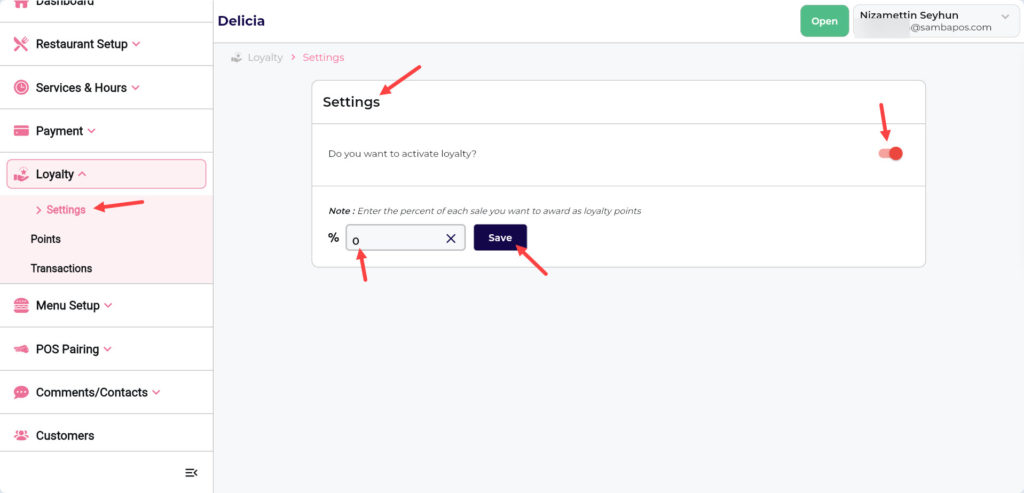
3.5.1. Settings Screen
You can activate the Reward option for your restaurant here.
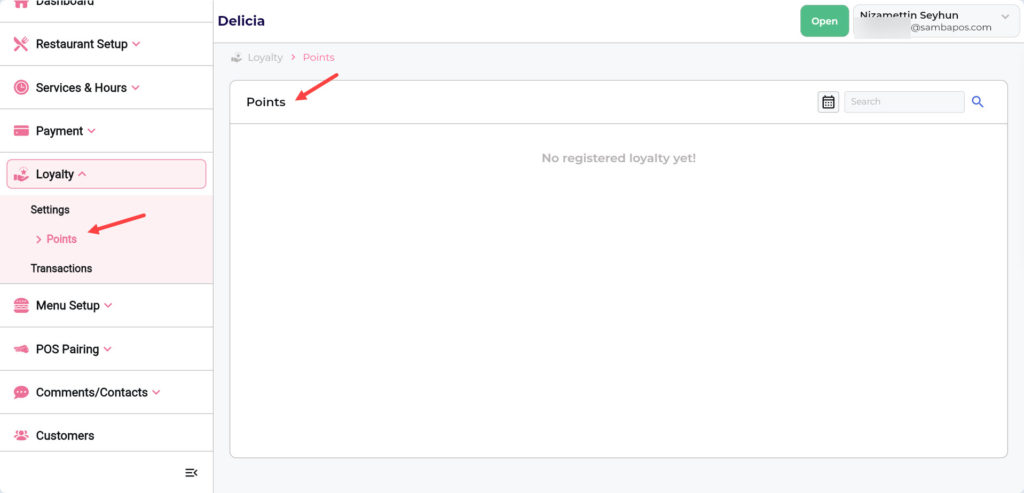
3.5.2. Points Screen
You can follow your customer’s Points status here.
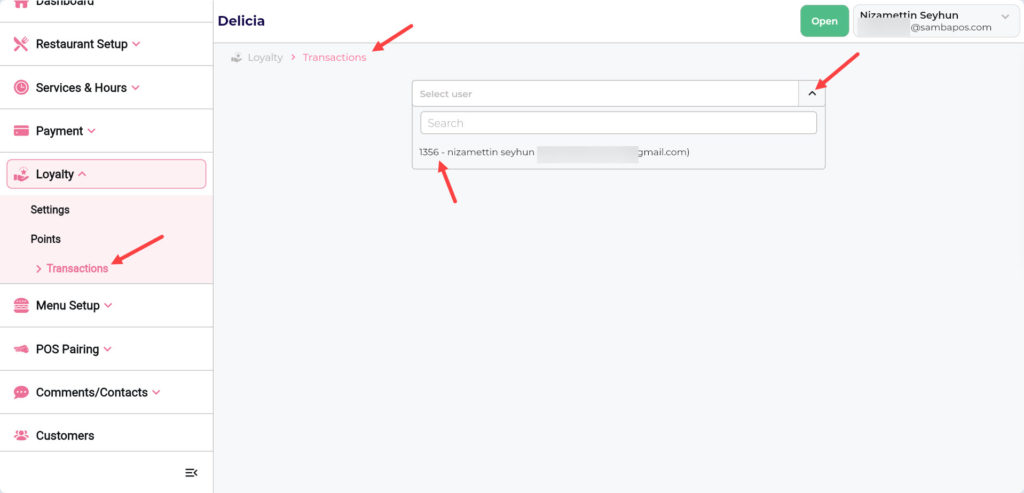
3.5.3. Transactions Screen
You can follow the activity status by selecting a user here.
3.6. Menü Setup
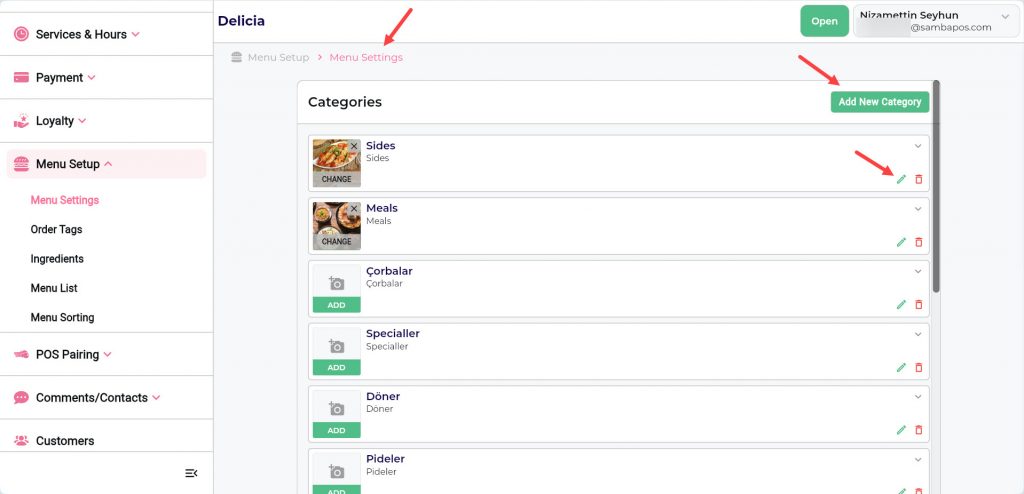
3.6.1. Menu Settings Screen
On this screen you can add new categories – products and add images to them.
While you can create your menu manually via Jetrik, you can also have your menu in SambaPOS sent to Jetrik with a single click from within SambaPOS.
Sending Menu from SambaPOS to Jetrik;
Main Menu > Manage > SambaPOS GO > GO Order Jetrik > GO Order Jetrik Settings > Select the Menu you want to send to Jetrik > Click on Send Menu button > Click on Save button.
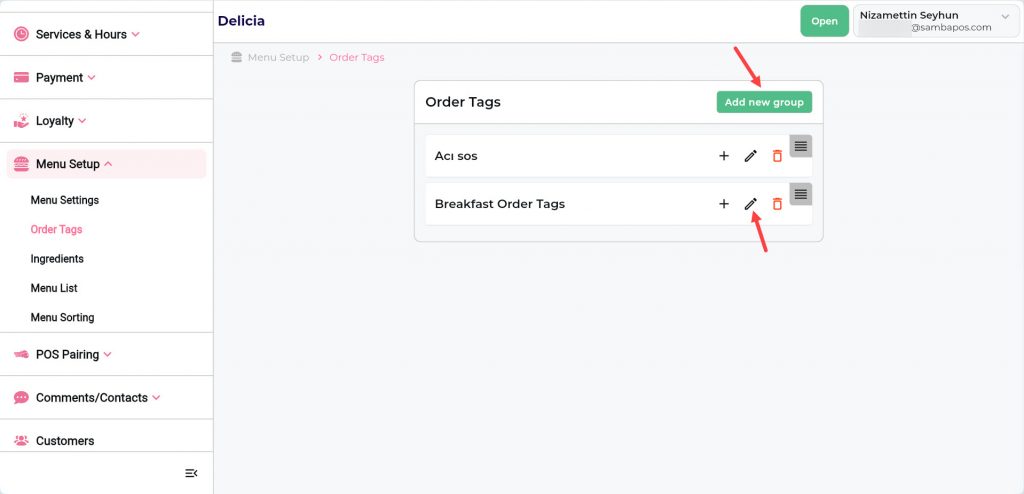
3.6.2. Order Tags Screen
On this screen you can create the Order Tags.
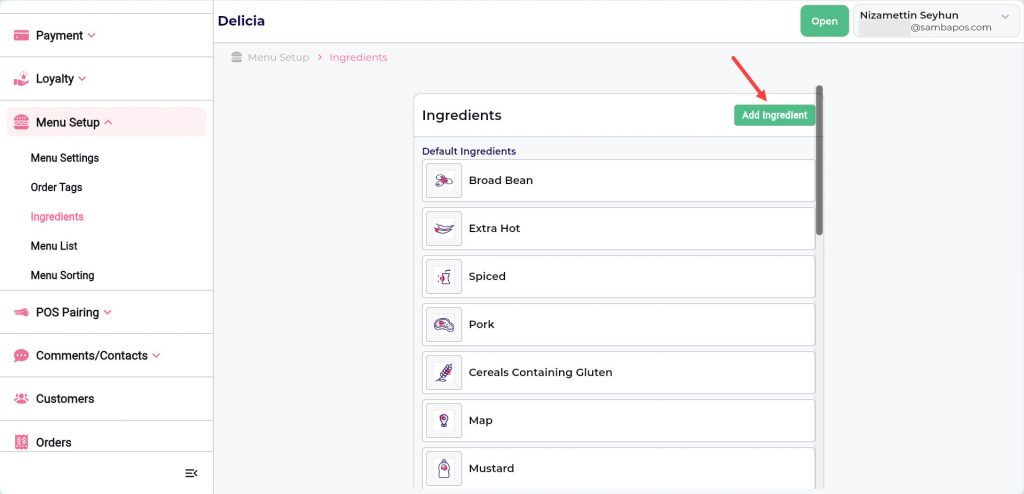
3.6.3. Ingredients Screen
On this screen you can manage the Ingredients settings.
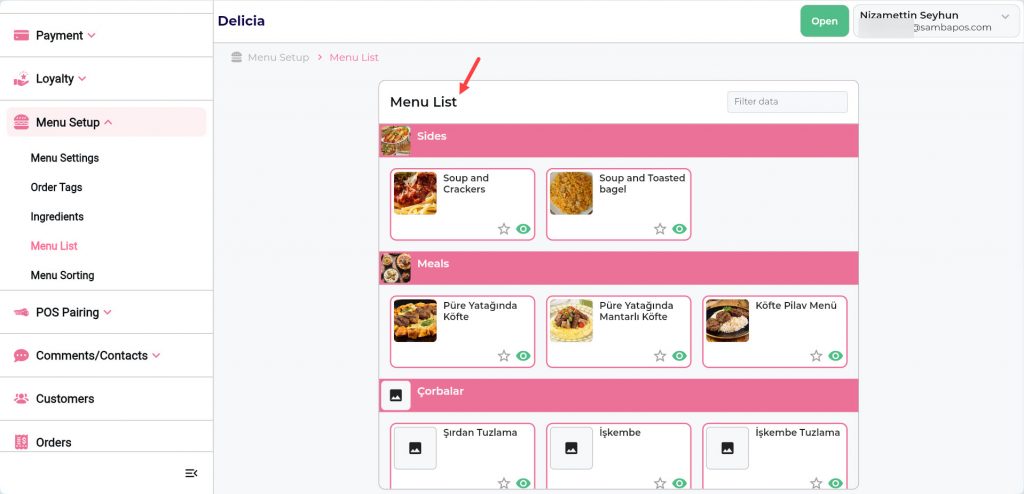
3.6.4. Menu List Screen
On this screen you can manage how your categories and products are displayed.
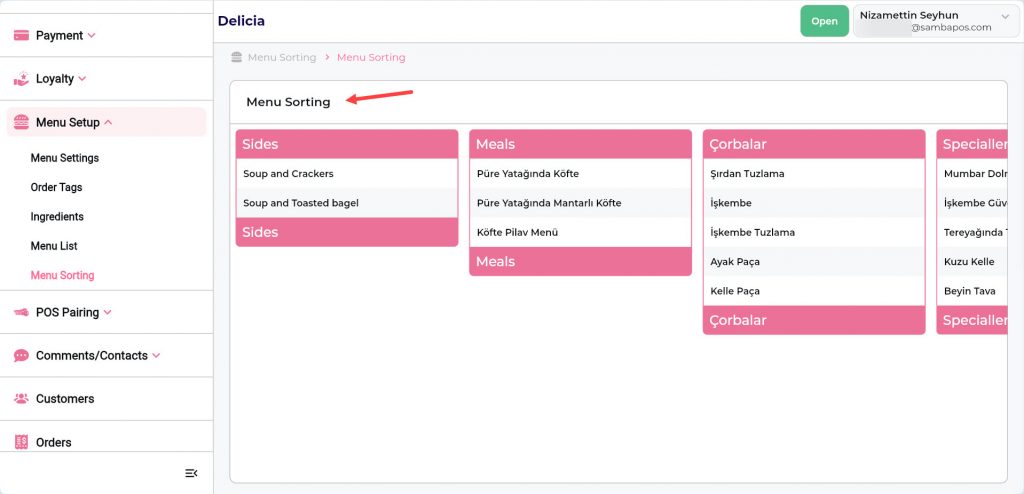
3.6.5. Menu Sorting Screen
On this screen, you can position your categories as desired.
3.7. POS Pairing
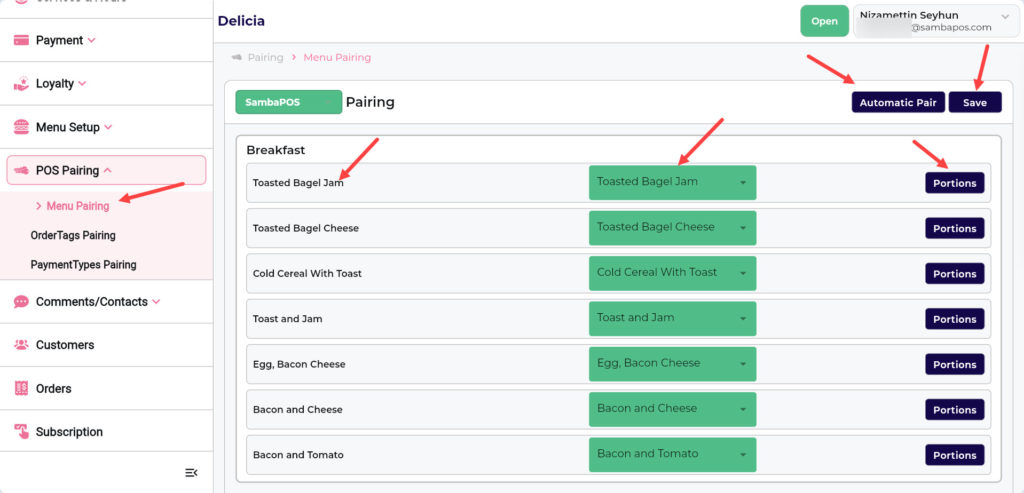
3.7.1. Menu Pairing Screen
On this screen, you need to match your products and portions in Jetrik with your products in SambaPOS.
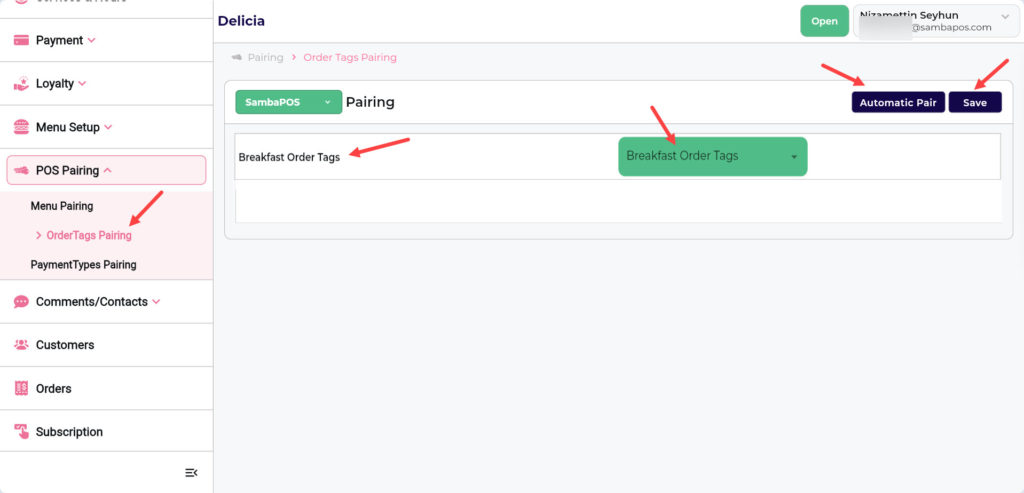
3.7.2. Order Tags Pairing Screen
On this screen, you need to match your Order Tags in Jetrik with your Order Tags in SambaPOS.
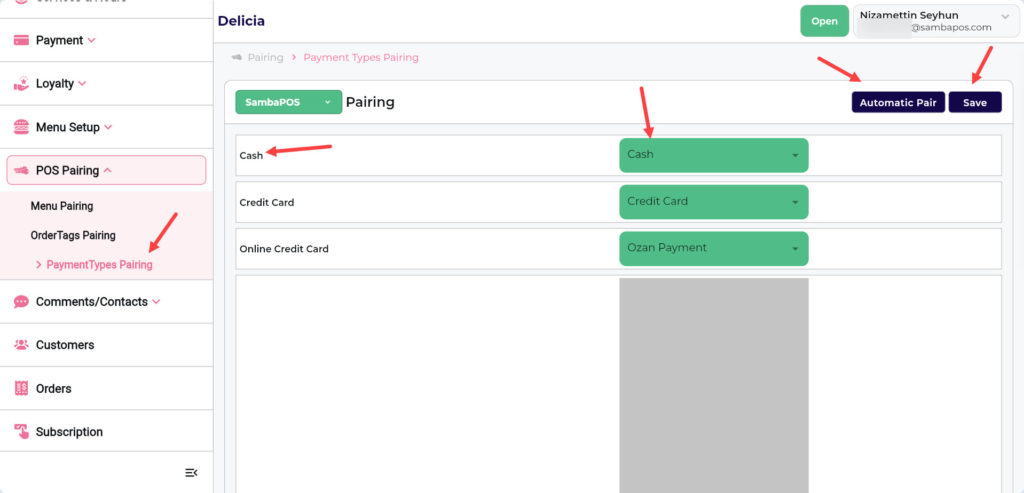
3.7.3. Payment Types Pairing Screen
On this screen, you need to match the Payment Types in Jetrik with those in SambaPOS.
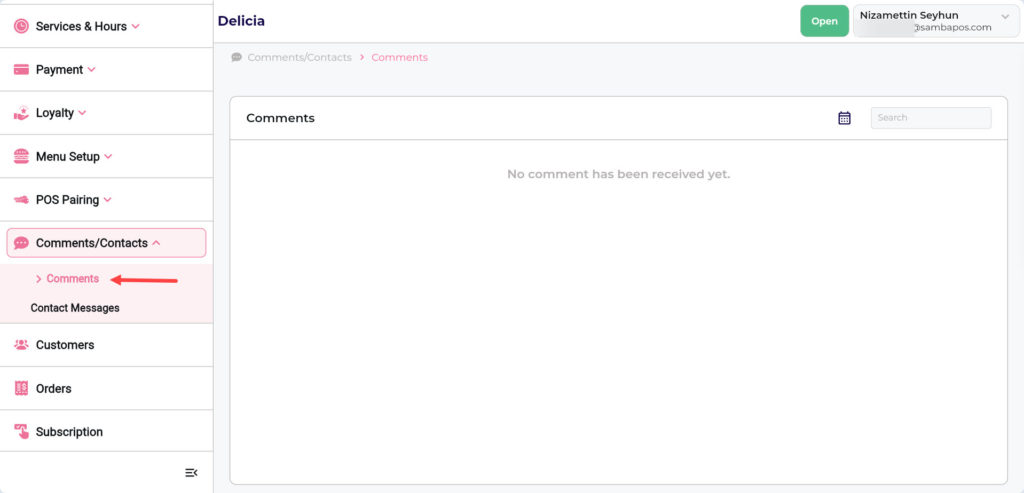
3.8. Comments/Contacts
You can view comments and communication messages about your restaurant on this screen.
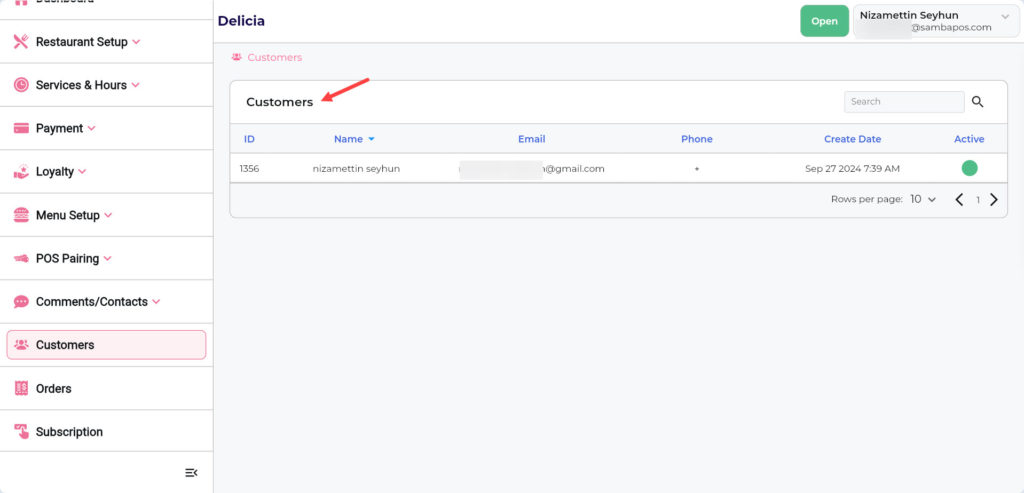
3.9. Customers
You can view your registered customers on this screen.
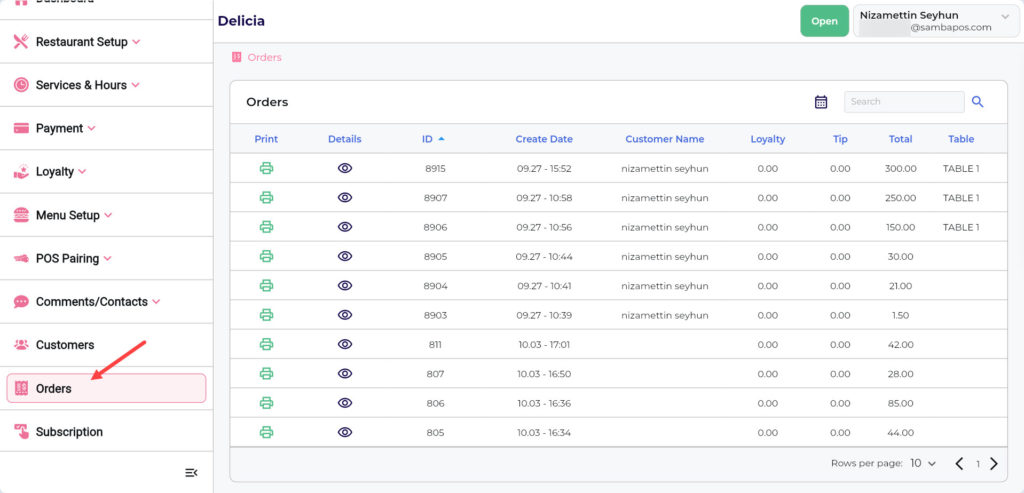
3.10. Orders
You can view your order records on this screen and print them.