4.12. Advanced Delivery Service Implementation V5.2.3
This implementation is newer version of customized delivery service. To be able to use this implementation, it is necessary to have a computer that the latest version of Microsoft SQL Express Server and SambaPOS V5.2.3 or above version installed on.
Attention!
Before starting to process, you need to backup SambaPOS Database.
All modules and implementations are prepared on basic SambaPOS setup. Perform the installation carefully if your current SambaPOS database is different than default.
In this document it will be explained how to implement advanced delivery service. To install, you have two options;
- Installing automatically by using configuration tasks.
- Installing manually by following this document step by step.
a. Installing Automatically by Using Configuration Tasks
By selecting this configuration task, all of the necessary configurations will be created automatically.
Go to Manage > Settings > Configuration Tasks from here first click on Update Tasks button and then click on Advanced Delivery Screen Setup
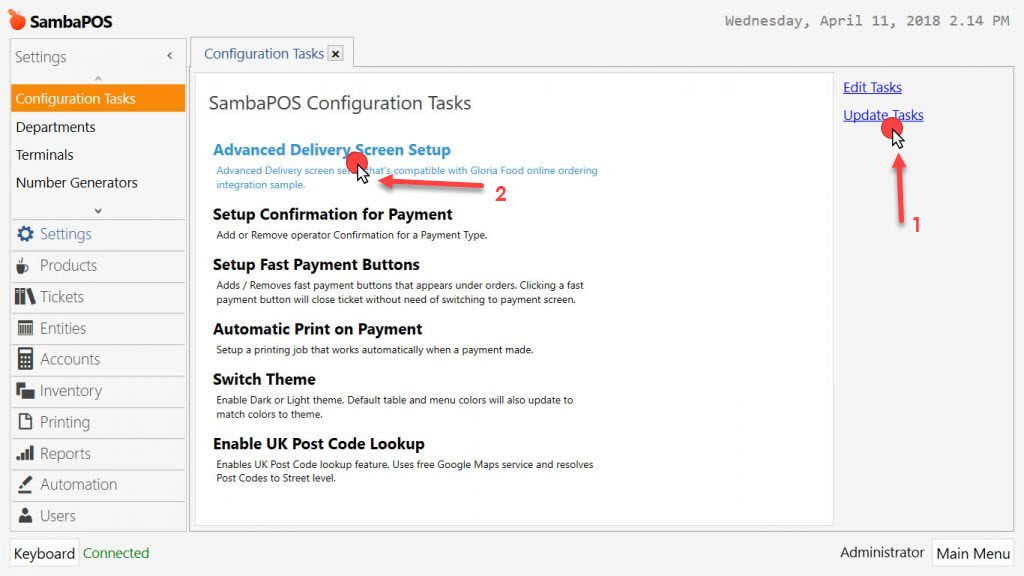
When you click on Advanced Delivery Screen Setup Configuration Task, a warning window will be appeared, click on Yes button and continue.
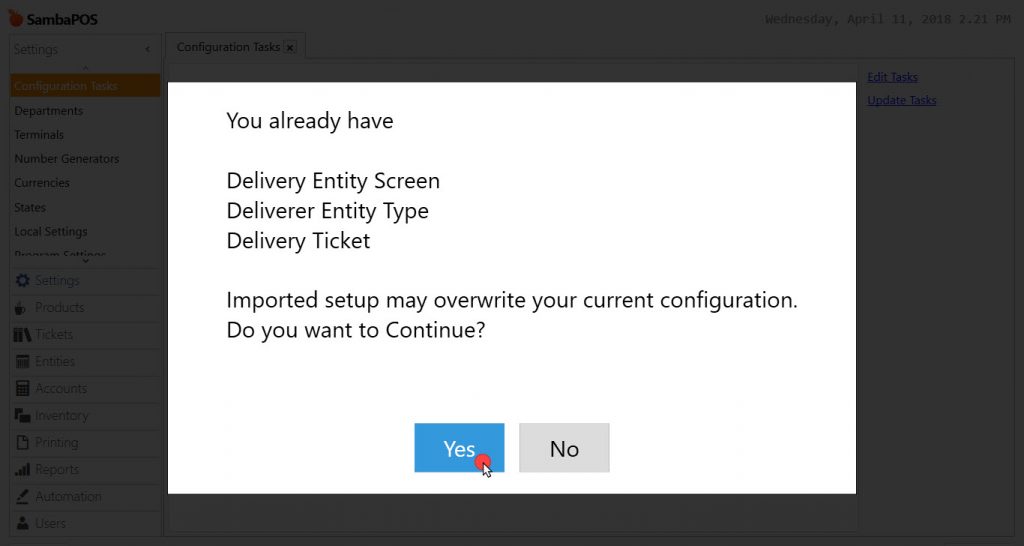
Note: If you already have Deliverers as Entities, this configuration task will add them automatically into Delivery Service Entity Screen. If you don’t have, you need to create them according to steps below;
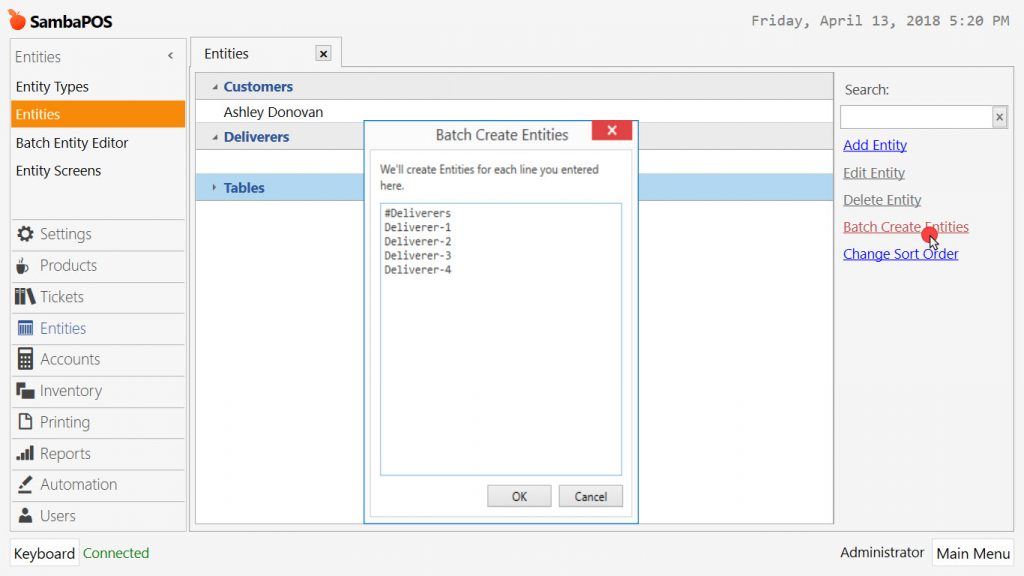
Go to Manage > Entities > Entities > from here click on Batch Create Entities link, in the window put # symbol and create your Deliverers. After completing necessary editings, click on Ok button.
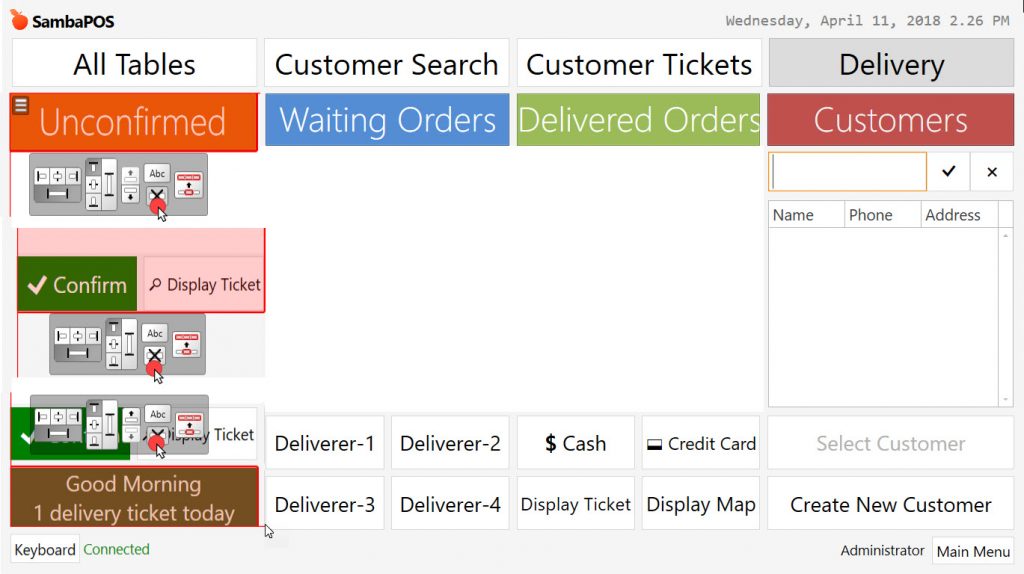
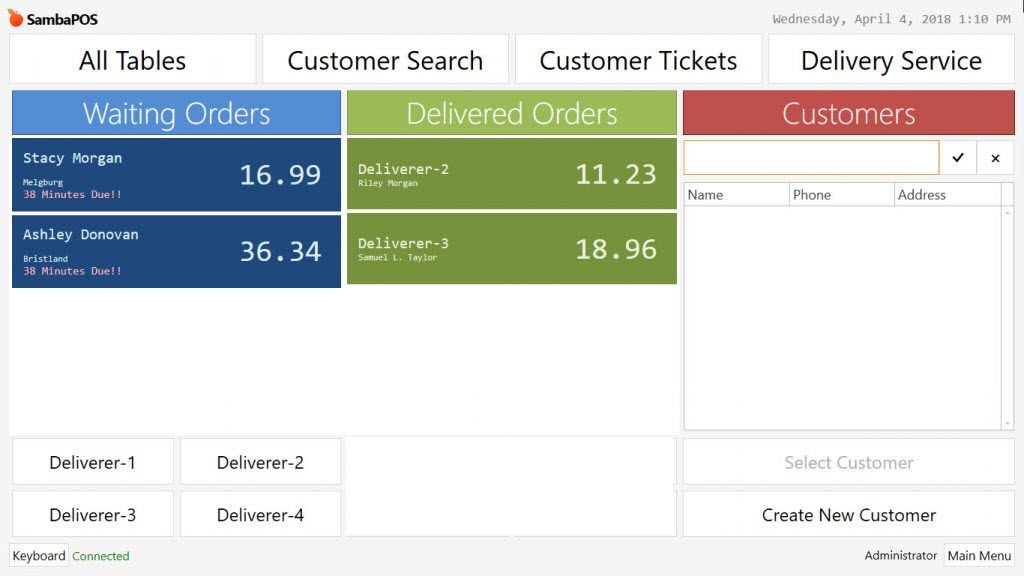
After applying the configurations above, you will have a Delivery Service Entity Screen like in the image below;
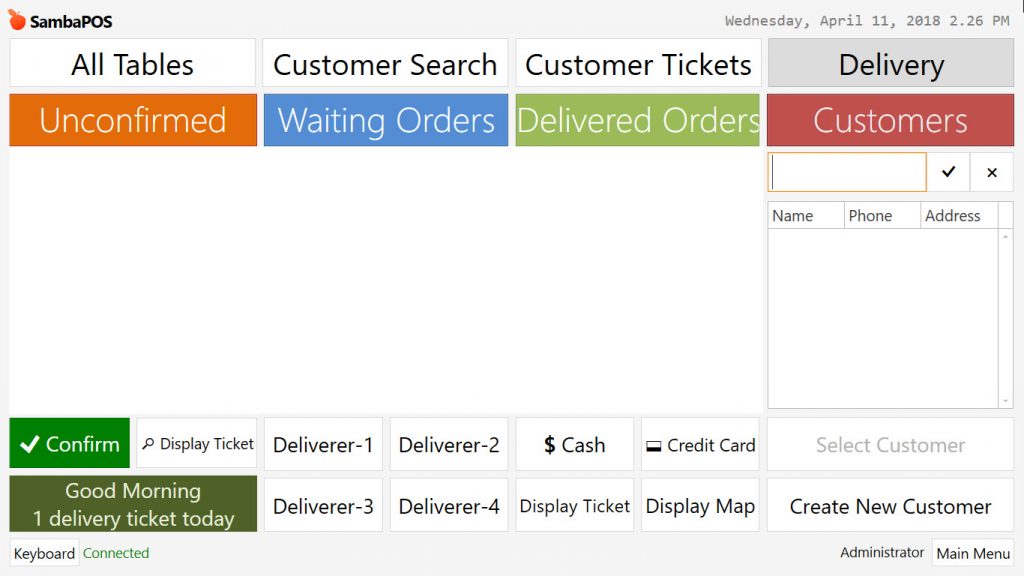
In here there are some unnecessary parts (Unconfirmed Label Widget Window) so that you need to remove them from entity screen. Open the design menu by right clicking of mouse and remove those 3 parts one by one.
After removing unnecessary parts you will have such Delivery Service Entity Screen;
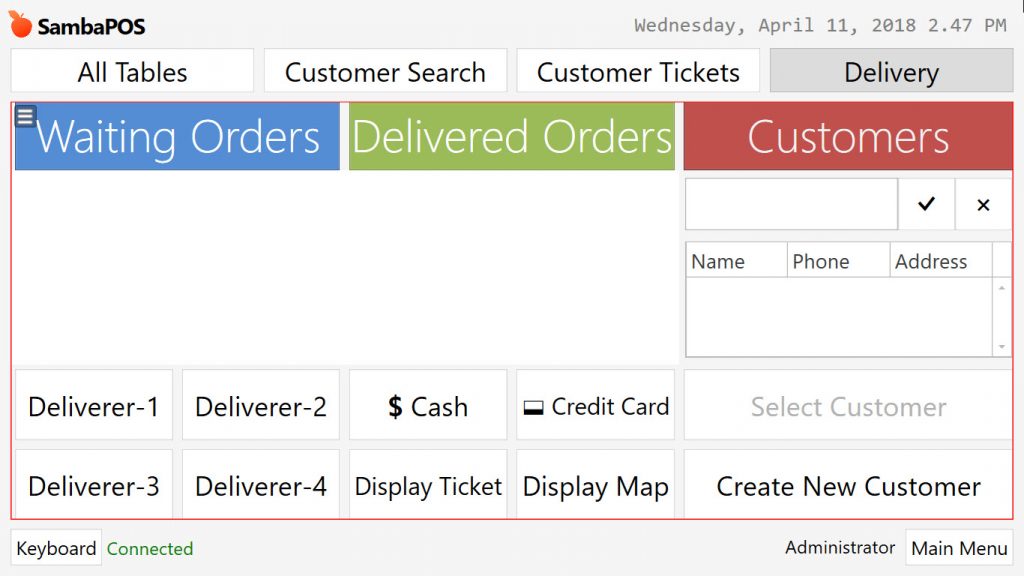
Now you can start taking delivery orders. Select a customer and take the order from order screen and click on close button. Orders of selected customer will be seen in the Waiting Orders column, if you assign a deliverer for that order, it will be moved to Delivered Orders column. In here proceed the payment according to customer’s payment type. After that step, process will be completed.
b. Installing Manually by Following The Document Step by Step
Document Index
1. Adding Entity Type and Entities
1.1. Adding Entity Type (Deliverers)
1.2. Adding Entities (Adding Deliverers)
2. Adding Ticket Type
2.1. Delivery Service Ticket
3. Adding Actions
DLVR: Delivery
3.1. DLVR-Update Delivery Service Ticket State
3.2. DLVR-Display Delivery Service Ticket
3.3. DLVR-Load Delivery Service Ticket
3.4. DLVR-Change Delivery Service Ticket Deliverer
3.5. DLVR-Update Delivery Service Deliverer State
3.6. Close Ticket (There is already one, no need to re create)
4. Adding Rules
4.1. DLVR-When Delivery Ticket Created State – Waiting
4.2. DLVR-When Deliverer Selected for Delivery Ticket State – Deliverer Name – Delivering
4.3. DLVR-Update Delivery Ticket State – Delivered
4.4. DLVR-Display Delivery Ticket Button
4.5. DLVR-Delivery Ticket No Deliverer Button
5. Adding Automation Commands
5.1. No Deliverer
6. Creating Entity Screens
6.1. Adding Delivery Service Entity Screen (Management)
6.2. Configuring Delivery Service Screen and Layout Design (User Interface)
6.2.1. Waiting Orders Widget Window Configuration and Layout. (User Interface)
– Adding and Positioning Ticket Lister Widget
– Ticket Lister Settings
– Ticket Lister Design
– Adding Deliverer Buttons
– Adding Show Ticket Button
– Adding and Positioning Tag Widget
– Tag Widget Design
6.2.2. Design of Delivered Orders Widget Window (User Interface)
– Adding and Positioning Ticket Lister Widget
– Ticket Lister Widget Settings
– Ticket Lister Widget Design
– Adding and Positioning Tag Widget
– Tag Widget Design
6.2.3. Design and Settings of Search Delivery Customer Screen (User Interface)
– Adding and Positioning Entity Search Widget
– Entity Search Widget Settings
– Entity Search Widget Design
– Adding and Positioning Tag Widget
– Tag Widget Design
6.2.4. Designing and Settings of Label Widget Windows (User Interface)
7. Adding Fast Payment Buttons
7.1. Adding Actions
7.1.1. Action: Get Fast Payment Cash
7.1.2. Action: Get Fast Payment Credit Card
7.1.3. Action: Get Fast Payment Voucher
7.2. Adding Rules
7.2.1. Rule: Get Fast Payment Cash
7.2.2. Rule: Get Fast Payment Credit Card
7.2.3. Rule: Get Fast Payment Voucher
7.3. Adding Payment Buttons on Delivered Orders Widget Screen (User Interface)
8.Uninstalling Advanced Delivery Service Implementation from SambaPOS
8.1. Actions
8.2. Rules
8.3. Entity Screens
8.4. Entities
8.5. Entity Types
8.6. Ticket Types
8.7. Automation Commands
1. Adding Entity Type and Entities
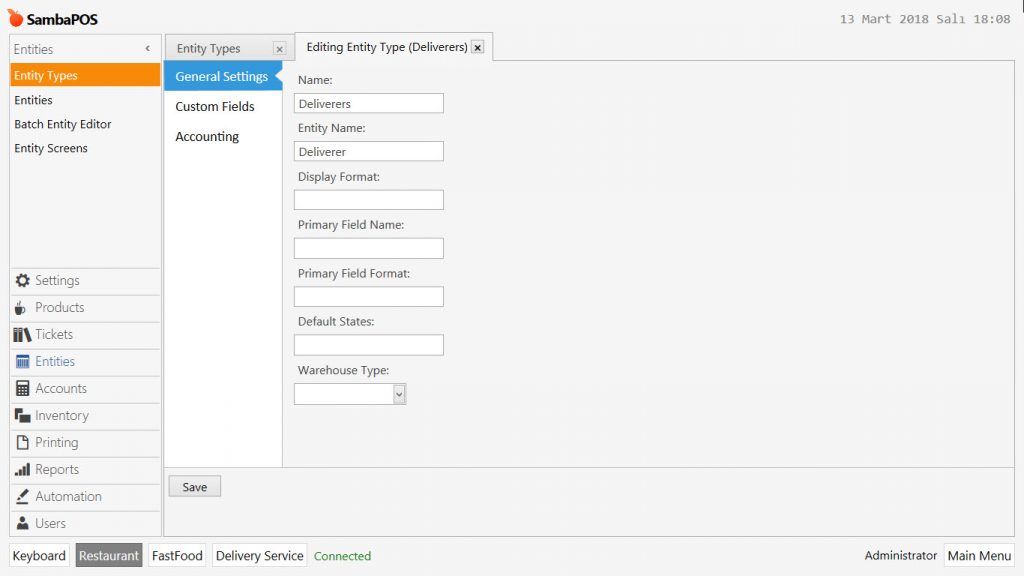
1.1. Deliverers (Adding Entity Type)
Manage > Entities > Entity Types > Add Entity Type
General Settings:
Name: Deliverers
Entity Name: Deliverer
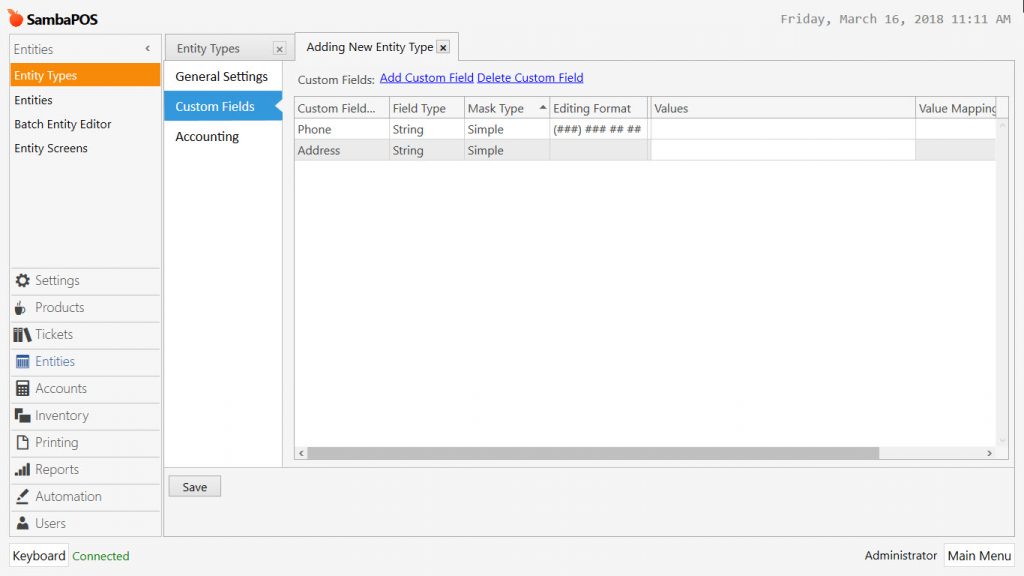
Custom Fields Section;
Add custom field for deliverers by clicking on Add Custom Field link.
1.2. Adding Entities (Adding Deliverers)
Manage > Entities > Entities > Add Entity
Entity Type: Deliverers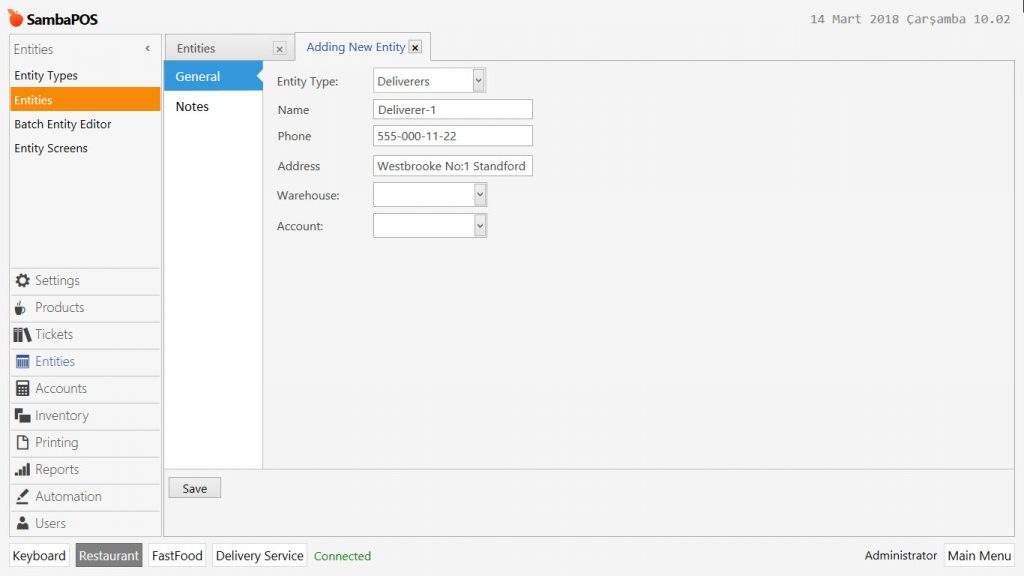
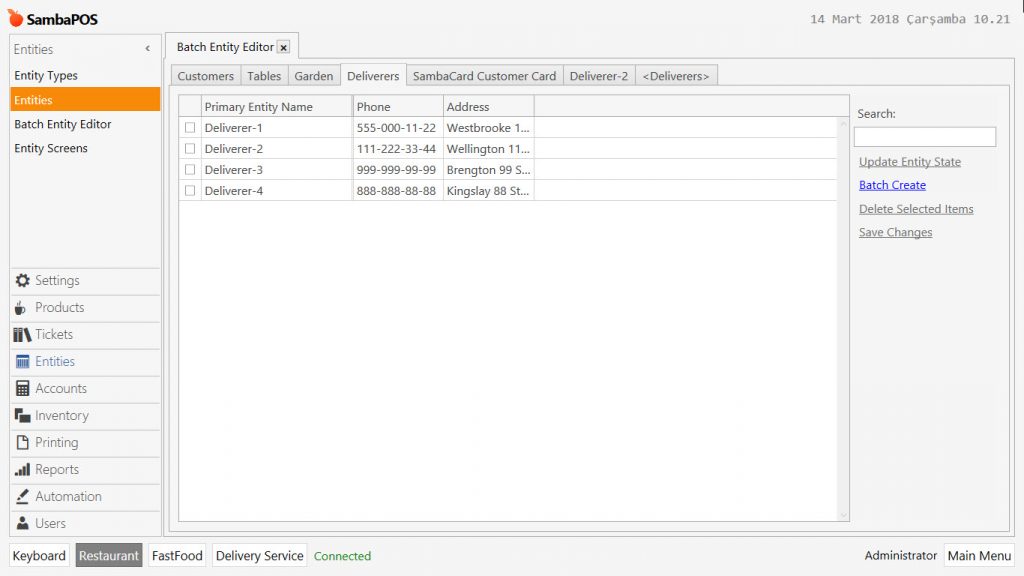
To Create Batch Entity:
Manage > Entities > Batch Create Entity Editor > Deliverers > Batch Create
#Deliverers
Deliverer-1
Deliverer-2
Deliverer-3
Deliverer-4
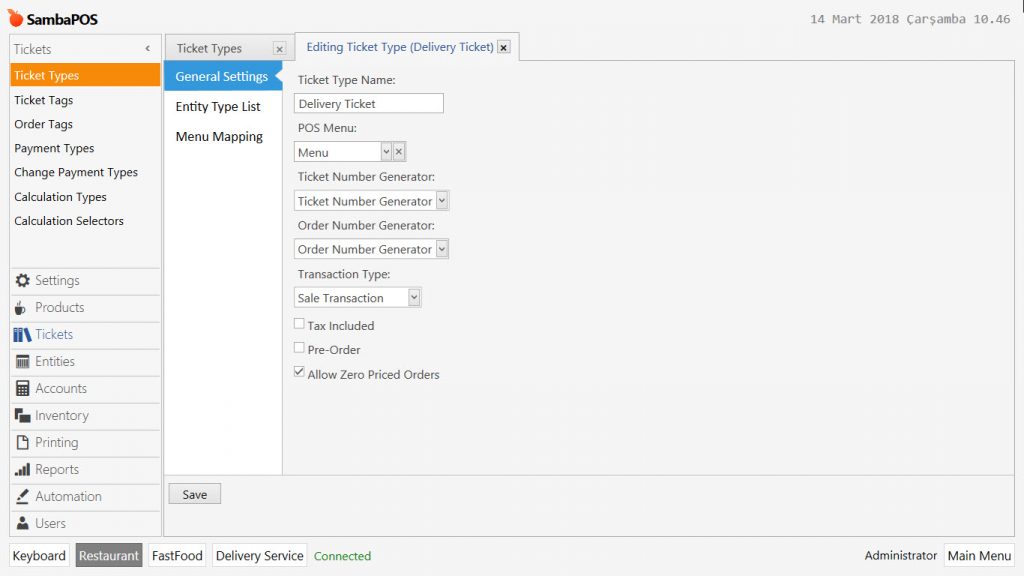
2. Adding Ticket Type
2.1. Delivery Service Ticket
Manage > Tickets > Ticket Types > Add Ticket Type
General Settings:
Ticket Type Name: Delivery Ticket
POS Menu: Menu
Ticket Number Generator: Ticket Number Generator
Order Number Generator: Order Number Generator
Transaction Type: Sale Transaction
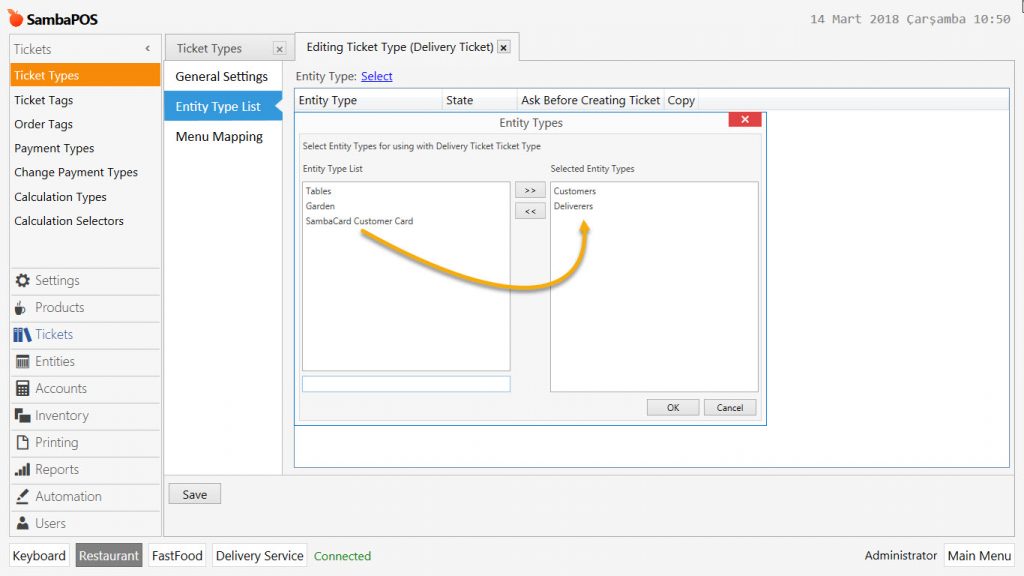
Entity Type List Section: Select Customer and Deliverers Entity Types by clicking on select link.
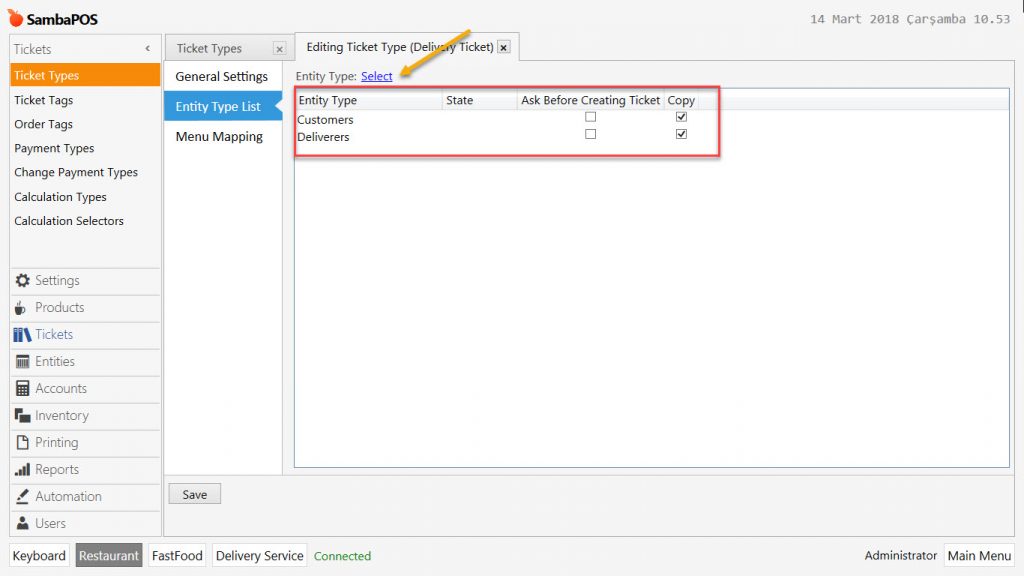
Note: It is necessary to logout-login on SambaPOS after adding ticket type.
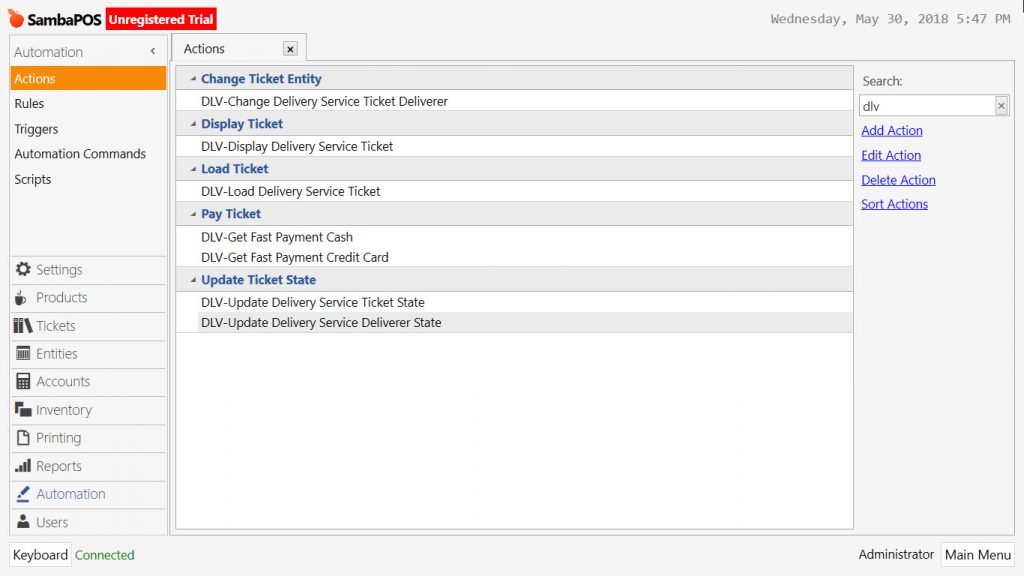
3. Adding Actions
List of Actions to Add:
Manage > Automation > Actions
DLVR: Delivery
3.1. DLVR-Update Delivery Service Ticket State
3.2. DLVR-Display Delivery Service Ticket
3.3. DLVR-Load Delivery Service Ticket
3.4. DLVR-Change Delivery Service Ticket Deliverer
3.5. DLV-Update Delivery Service Deliverer State
3.6. Close Ticket (There is already one, no need to re create)
3.1. Action: Update Delivery Service Ticket State
Manage > Automation > Actions > Add Action
Action Name: DLVR-Update Delivery Service Ticket State
Action Type: Update Ticket State
State Name: Delivery Service
Status: [:Delivery Service]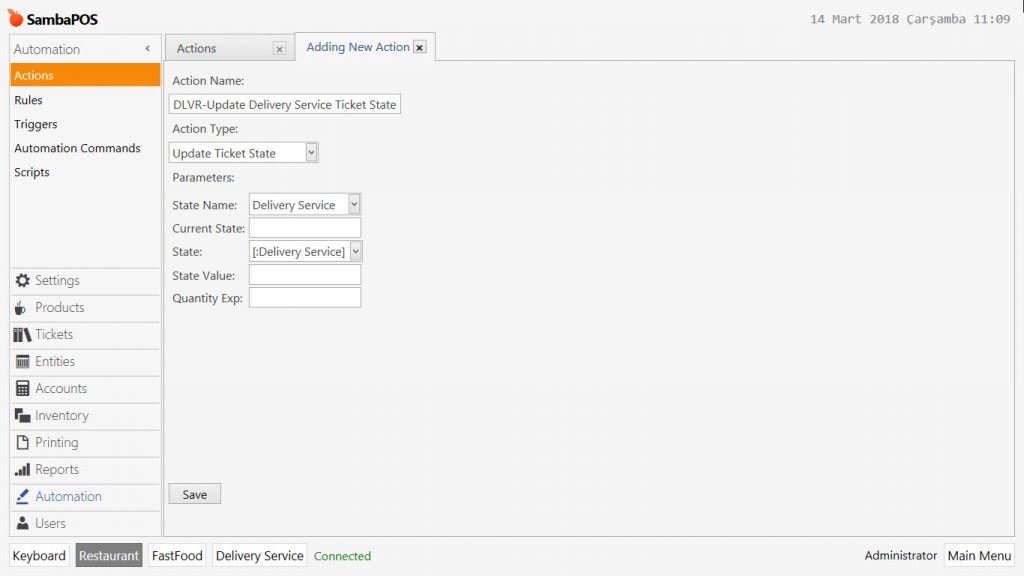
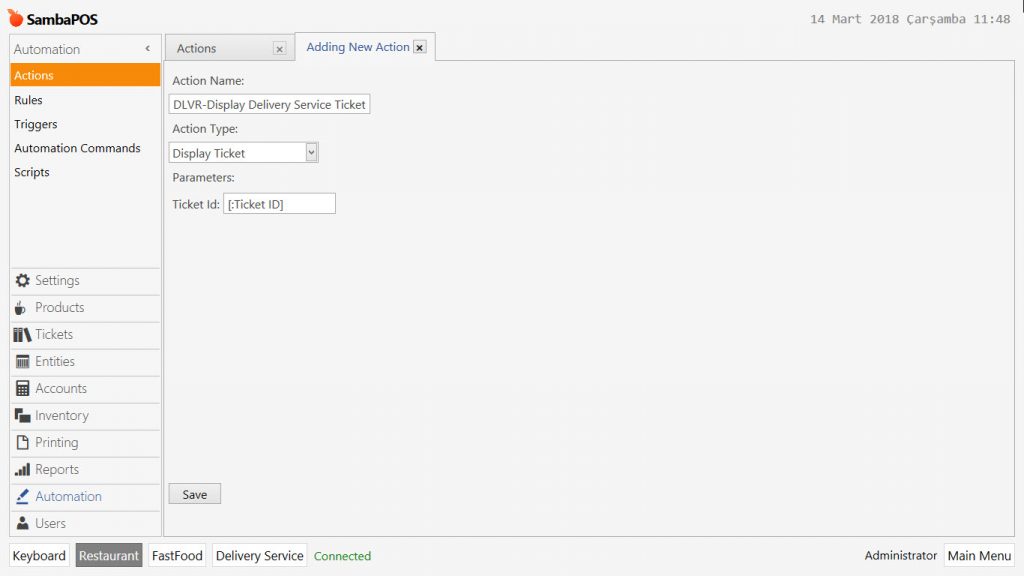
3.2. Action: DLVR-Display Delivery Service Ticket
Manage > Automation > Actions > Add Action
Action Name: DLVR-Display Delivery Service Ticket
Action Type: Display Ticket
Message: [:Ticket ID]
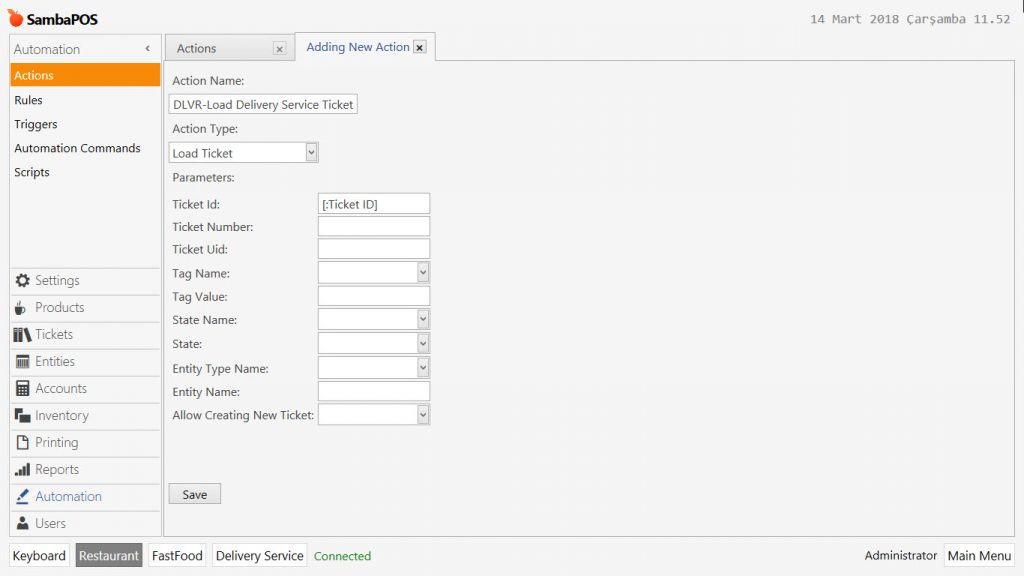
3.3. Action: Load Ticket
Manage > Automation > Actions > Add Action
Action Name: DLVR-Load Delivery Service Ticket
Action Type: Load Ticket
Ticket Id: [:Ticket ID]
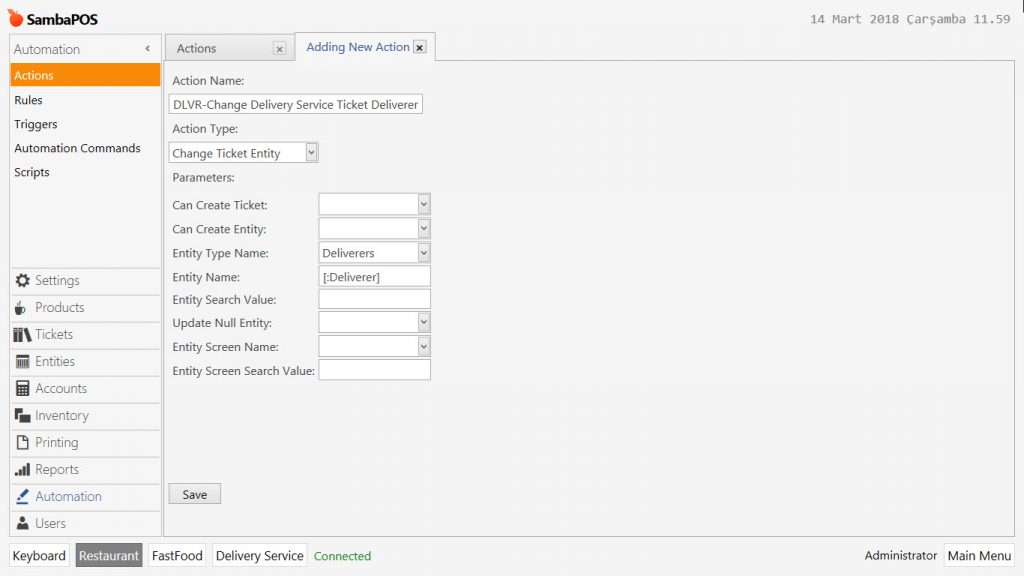
3.4. Action: Change Delivery Service Ticket Deliverer
Manage > Automation > Actions > Add Action
Action Name: DLVR-Change Delivery Service Ticket Deliverer
Action Type: Change Ticket Entity
Entity Type Name: Deliverers
Entity Name: [:Deliverer]
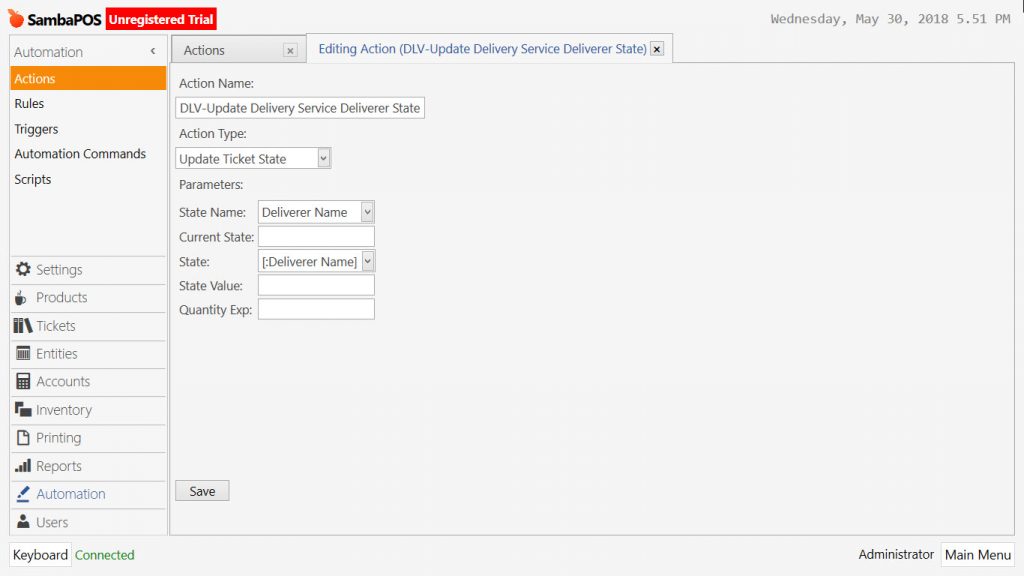
3.5. Action: Change Delivery Service Ticket Deliverer State
Manage > Automation > Actions > Add Action
Action Name: DLVR-Change Delivery Service Ticket Deliverer State
Action Type: Update Ticket State
State Name: Deliverer Name
State: [:Deliverer Name]
3.6. Action: Close Ticket (Currently Exist, No Need To Create)
Manage > Automation > Actions
Close ticket action comes as default in SambaPOS setup so that there is no need to create it.
Action Name: Close Ticket
Action Type: Close Ticket
Keep Open if Not Paid:
Backround Close: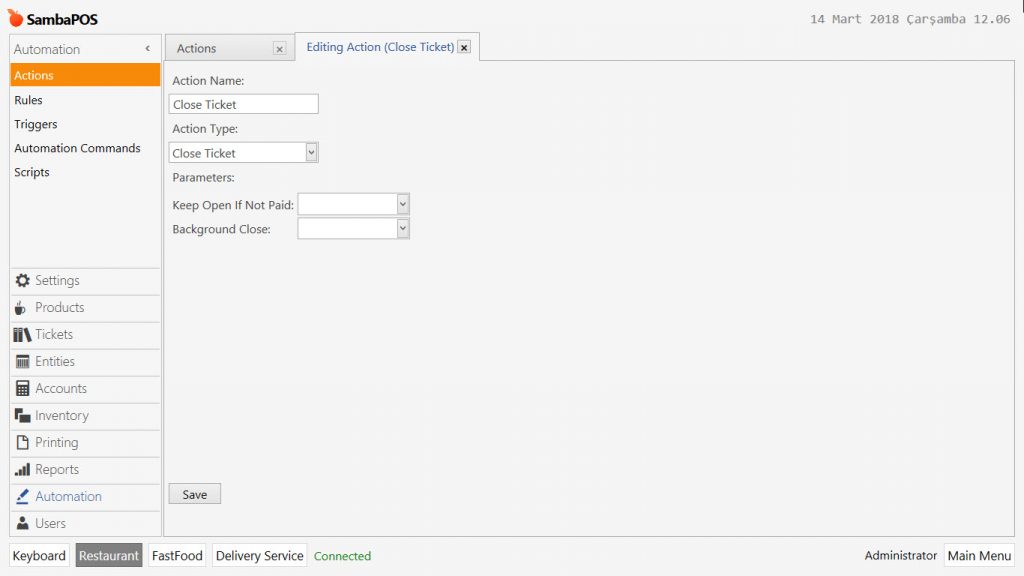
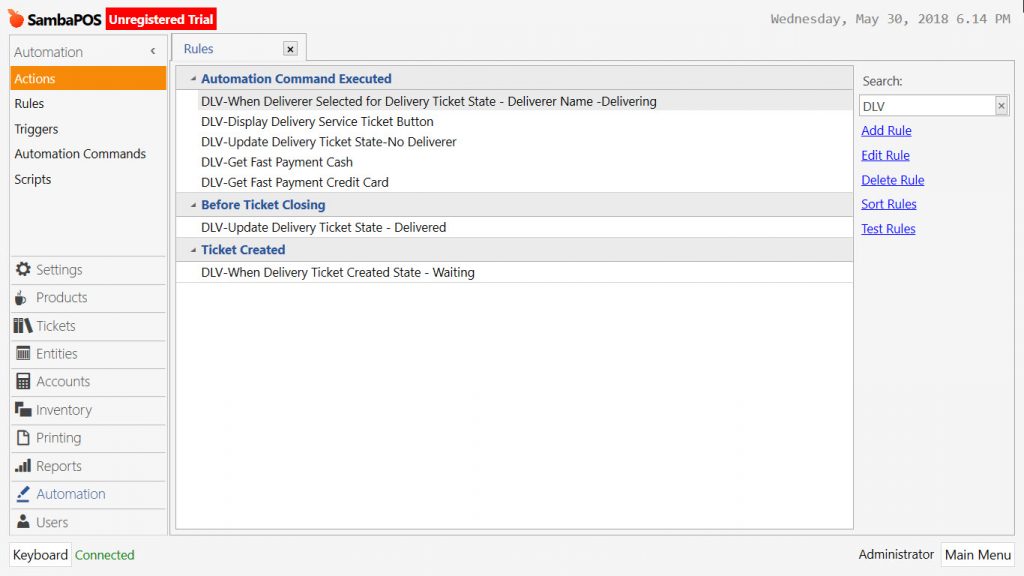
4. Adding Rules
List of Rules to Add
Manage > Automation > Rules
4.1. DLVR-When Delivery Ticket Created State – Waiting
4.2. DLVR-When Deliverer Selected for Delivery Ticket State – Deliverer Name – Delivering
4.3. DLVR-Update Delivery Ticket State – Delivered
4.4. DLVR-Display Delivery Ticket Button
4.5. DLVR-Delivery Ticket No Deliverer Button
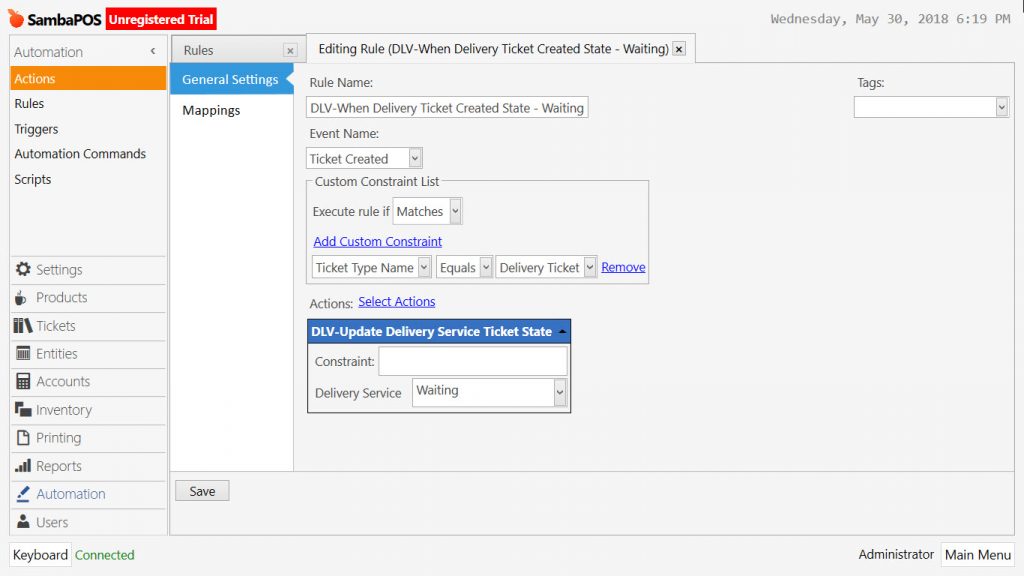
4.1. Rule: DLVR-When Delivery Ticket Created State – Waiting
Manage > Automation > Rules > Add Rule
Rule Name: DLVR-When Delivery Ticket Created State – Waiting
Event Name: Ticket Created
Custom Constraint: Ticket Type Name | Equals | Delivery Ticket
Select Action: DLVR-Update Delivery Service Ticket State
Delivery Service: Waiting
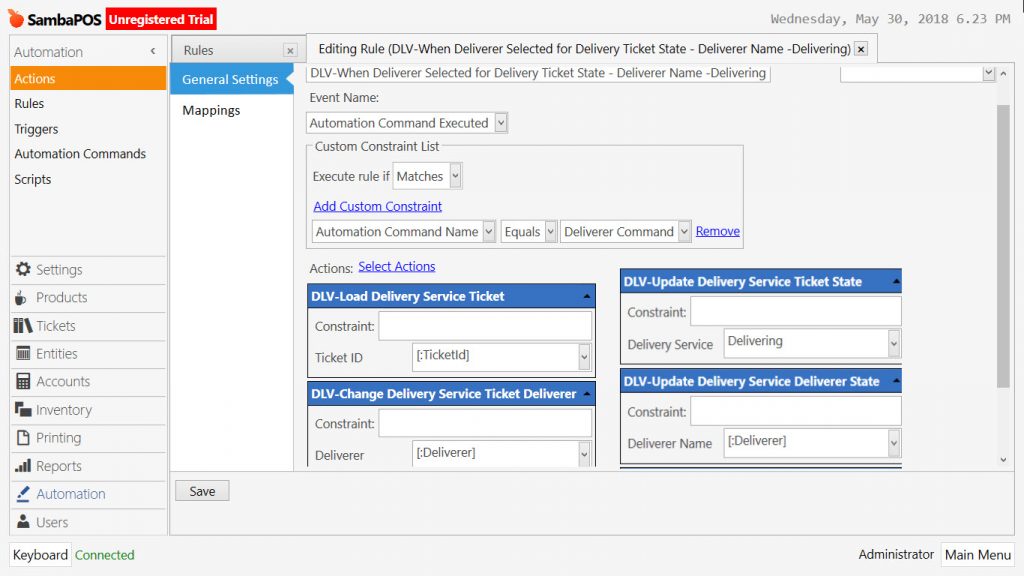
4.2. Rule: DLVR-When Deliverer Selected for Delivery Ticket State – Deliverer Name -Delivering
Manage > Automation > Rules > Add Rule
Rule Name: DLVR-When Deliverer Selected for Delivery Ticket State – Deliverer Name – Delivering
Event Name: Automation Command Executed
Add Custom Constraint: Automation Command Name| Equals | Deliverer Command
Action: DLVR-Load Delivery Service Ticket
Ticket Id: [:TicketId]
Action: DLVR-Change Delivery Service Ticket Deliverer
Deliverer: [:Deliverer]
Action: DLVR-Update Delivery Service Ticket State
Delivery Service: Delivering
Action: DLVR-Update Delivery Service Ticket Deliverer State
Deliverer Name: [:Deliverer]
Action: Close Ticket
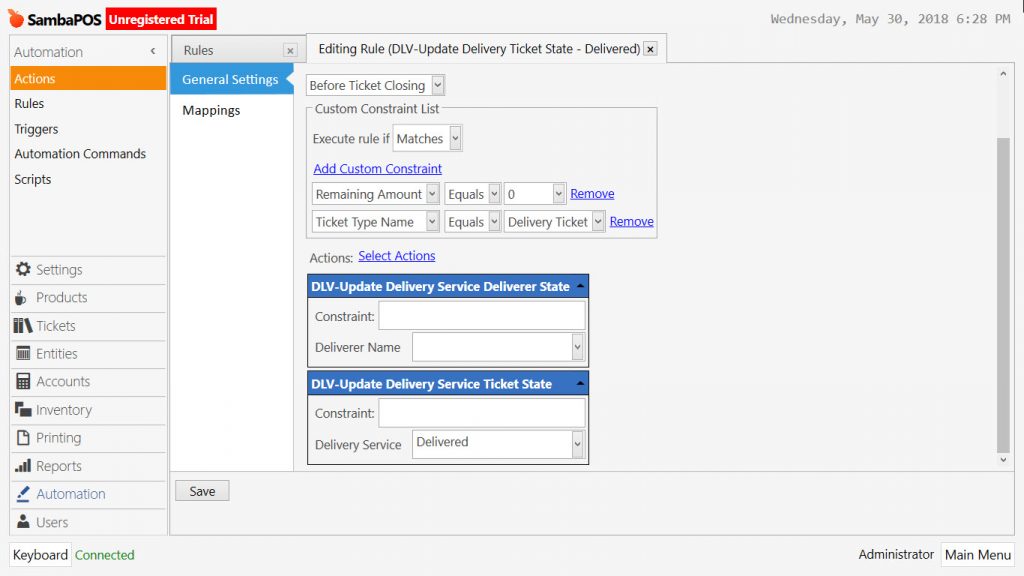
4.3. Rule: DLVR-Update Delivery Ticket State – Delivered
Manage > Automation > Rules > Add Rule
Rule Name: DLVR-Update Delivery Ticket State – Delivered
Event Name: Before Ticket Closing
Add Custom Constraint:
Remaining Amount | Equals | 0
Ticket Type Name | Equals | Delivery Ticket
Action: DLV-Update Delivery Service Deliverer State
Action: DLV-Update Delivery Service Ticket State
Delivery Service: Delivered
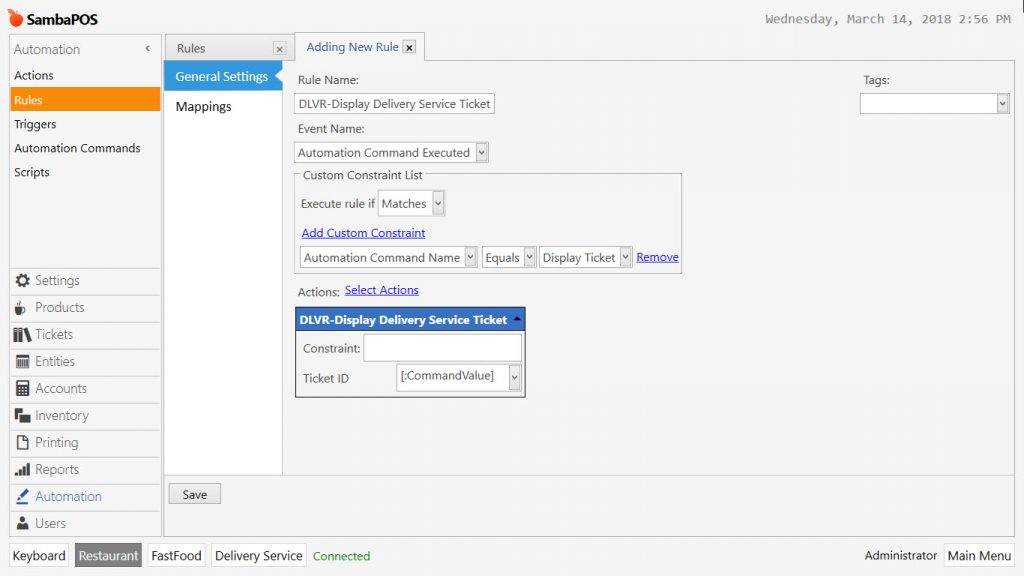
4.4. Rule: DLVR-Display Delivery Service Ticket Button
Manage > Automation > Rules > Add Rule
Rule Name: DLVR-Display Delivery Service Ticket Button
Event Name: Automation Command Executed
Add Custom Constraint: Automation Command Name | Equals | Display Ticket
Select Action: DLVR-Display Delivery Service Ticket
Ticket Id: [:CommandValue]
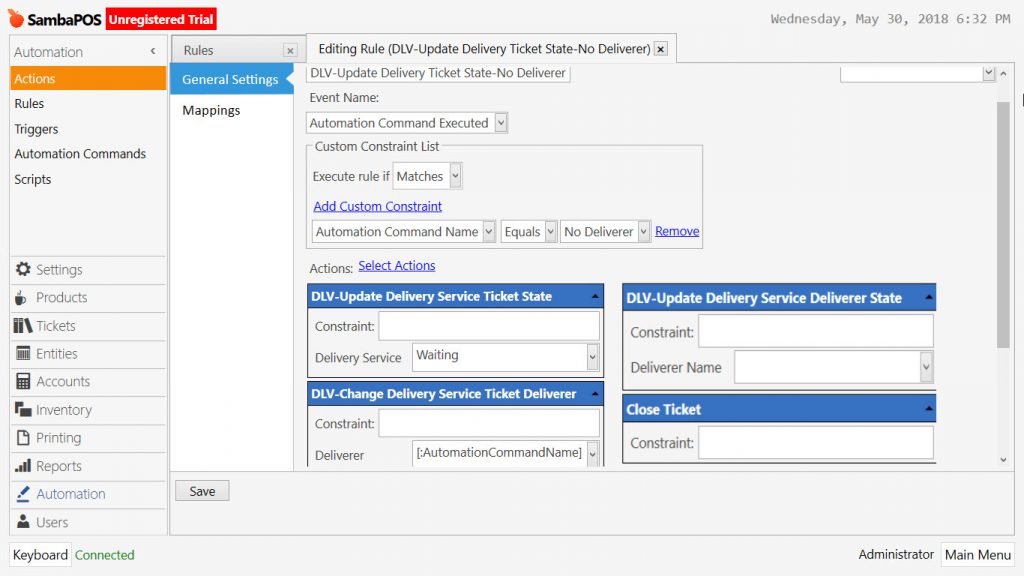
4.5. Rule: Delivery Service Ticket No Deliverer Button
Manage > Automation > Rules > Add Rule
Rule Name: DLVR-Update Delivery Ticket State-No Deliverer
Event Name: Automation Command Executed
Add Custom Constraint: Automation Command Name | Equals | No Deliverer
Action: DLVR-Update Delivery Service Ticket State
Delivery Service: Waiting
Action: DLVR-Change Delivery Service Ticket Deliverer
Deliverer: [:AutomationCommandName]
Action: DLVR-Update Delivery Service Ticket Deliverer State
Action: Close Ticket
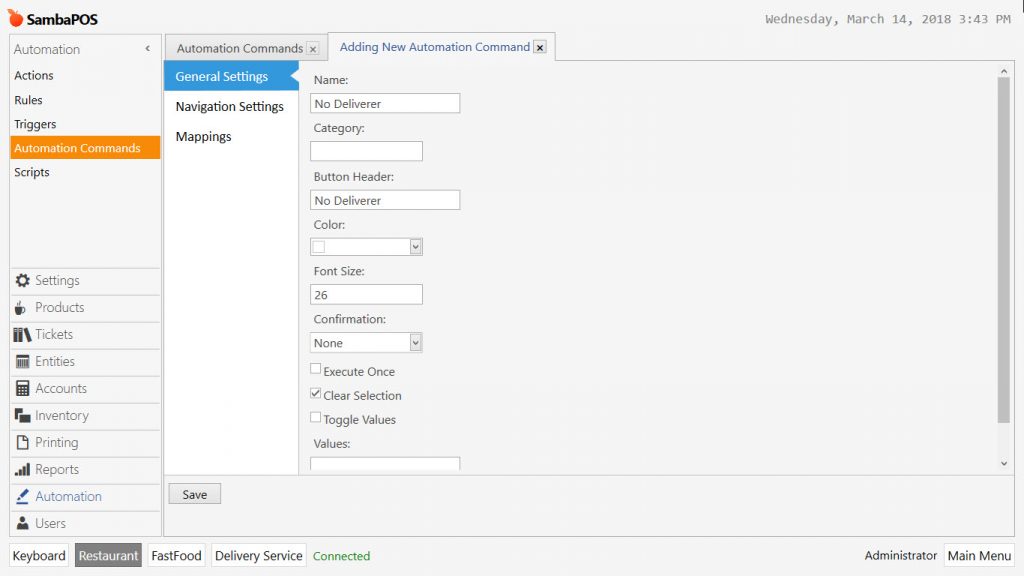
5. Adding Automation Commands
5.1. No Deliverer
Mange > Automation > Automation Commands > Add Automation Command
General Settings:
Name: No Deliverer
Button Header: No Deliverer
Mappings: Delivery Ticket

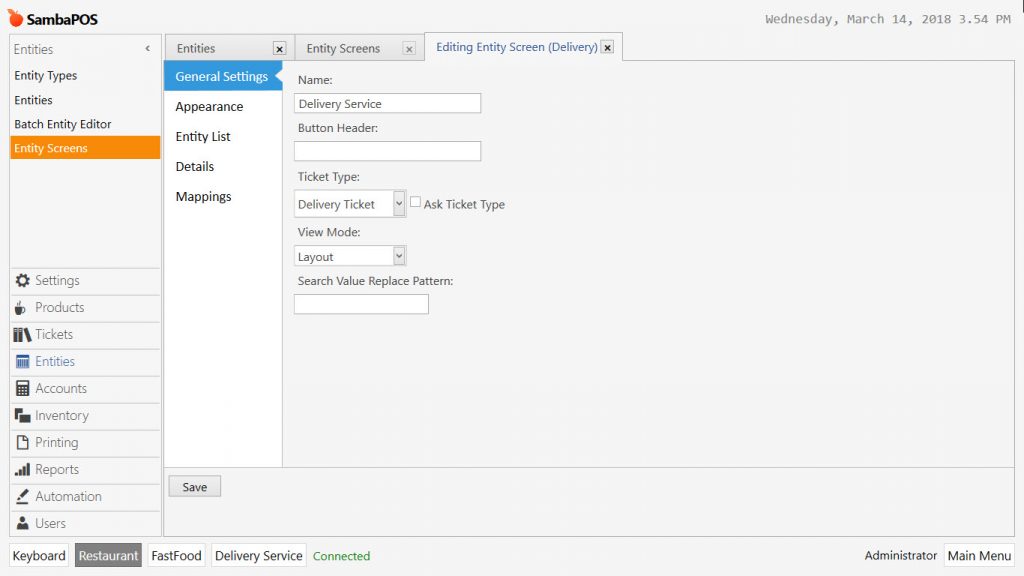
6. Creating Entity Screens
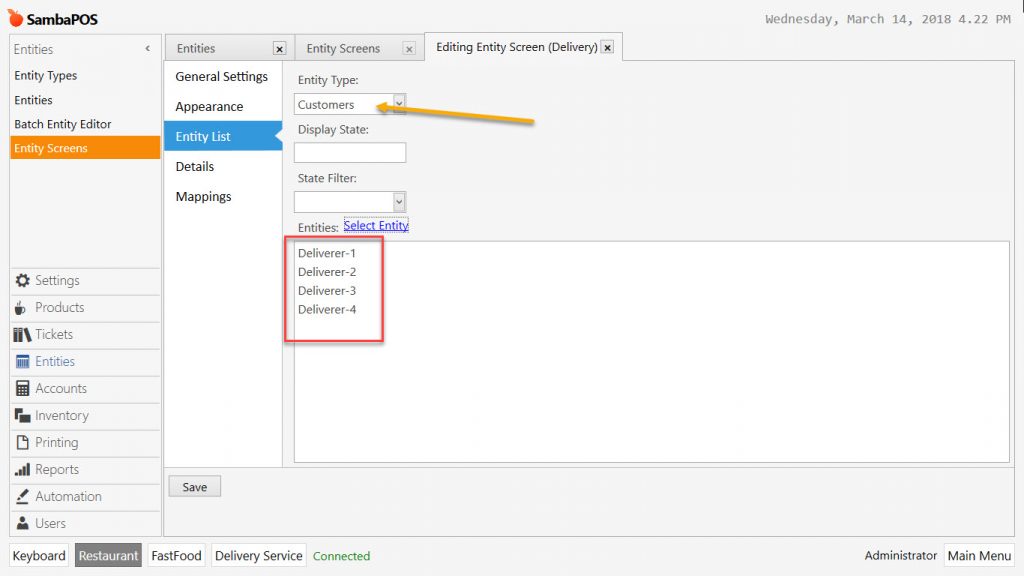
6.1. Adding Delivery Service Entity Screen (Management)
Manage > Entities > Entity Screens > Add Entity Screen
General Settings:
Name: Delivery Service
Ticket Type: Delivery Service
View Mode: Layout
Entity List Section:
Entity Type: Customers
Entities: Deliverer-1, Deliverer-2, Deliverer-3, Deliverer-4, …
Note: Select Deliverers as Entity Type, add entities and then select entity type as Customers or leave it blank.
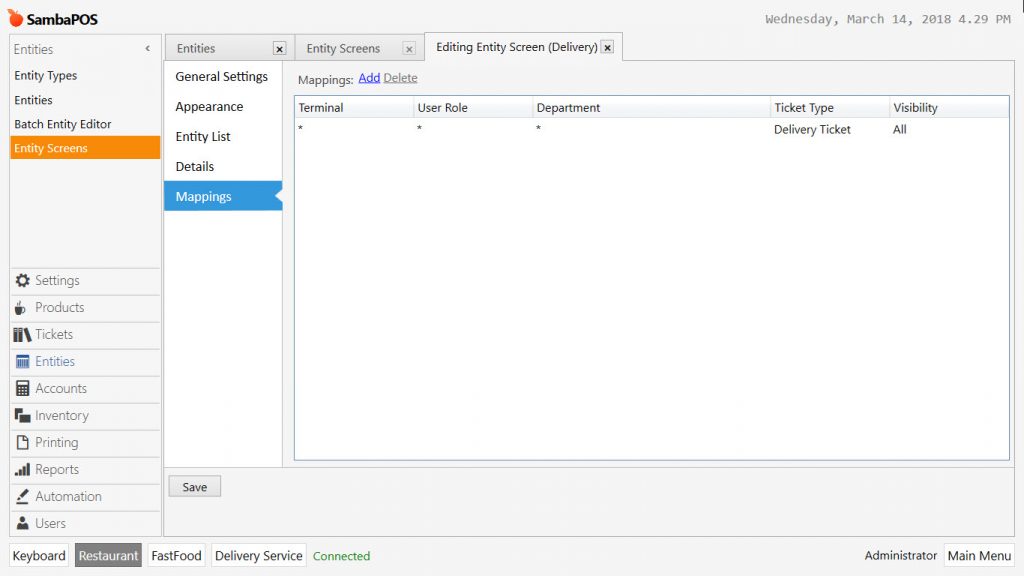
Mappings Section:
Ticket Type: Delivery Ticket
6.2. Configuring Delivery Service Screen and Layout Design (User Interface)
6.2.1 Waiting Orders Widget Window Configuration and Layout. (User Interface)
– Adding and Positioning Ticket Lister Widget
– Ticket Lister Settings
– Ticket Lister Design
– Adding Deliverer Buttons
– Adding Display Ticket Button
– Adding and Positioning Tag Widget
– Tag Widget Design
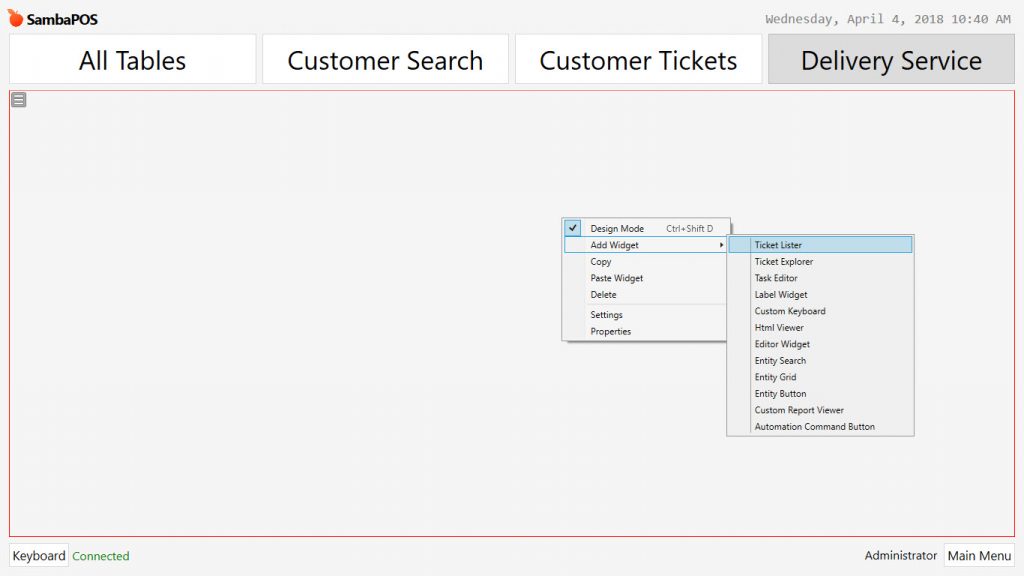
Go to Delivery Service Screen and activate design mode by right clicking of mouse. Red line of the frame indicates that design mode is activated.
After activating design mode, click on Add Widget > Ticket Lister title. Position the ticket lister on the screen by using mouse and editing tool.
For settings of Waiting Orders Widget, while design mode is active, click on Settings Ticket Lister.
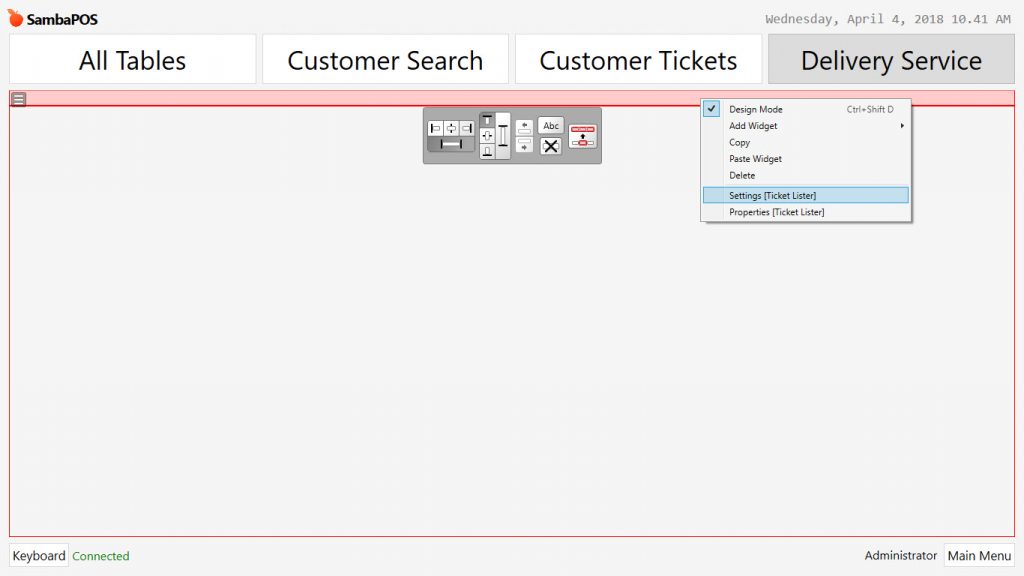
State: Waiting
Format: Copy below code group into this field.
| <L00><block 10 transparent left *> <L00><size 20>{ENTITY NAME:Customers}</size><br/> <L00>[='{ENTITY DATA:Customers:Address}’.replace(‘<!rn>’,'<br/>’)] <L00></block> <L00><block 10><size 40>{TICKET TOTAL}.-</size></block> |
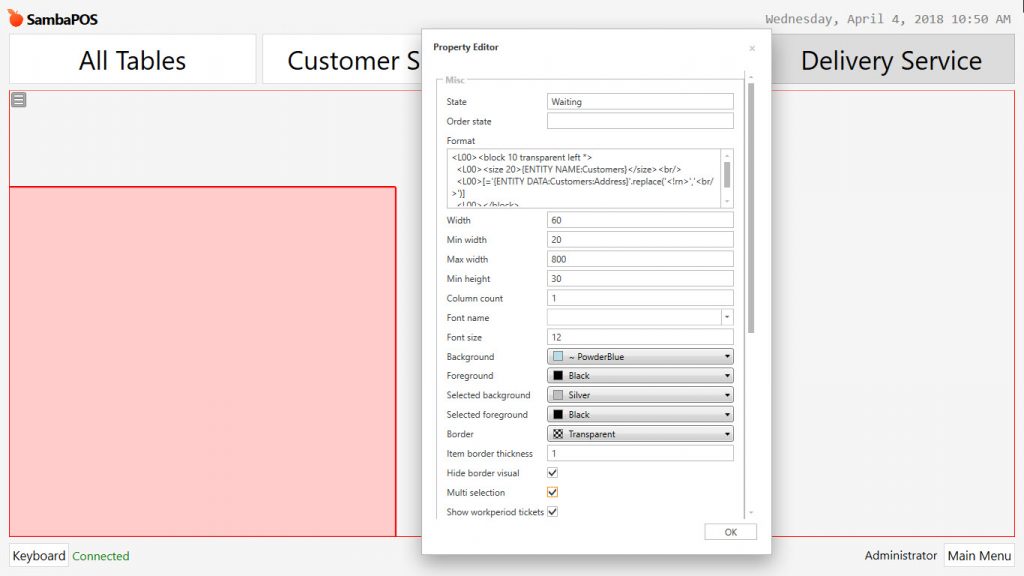
In the same window configure other settings by scrolling down.
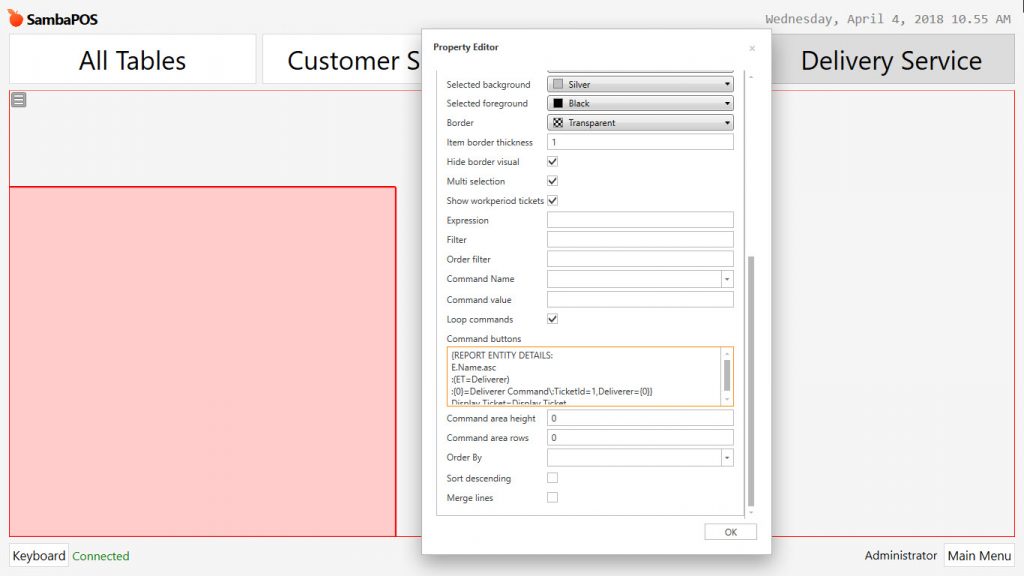
Adding Deliverer Buttons on Waiting Orders Window:
Command Buttons: Copy and paste below code group into this field.
{REPORT ENTITY DETAILS:
E.Name.asc
:(ET=Deliverer)
:{0}=Deliverer Command\:TicketId=$1,Deliverer={0}}
Display Ticket=Display Ticket
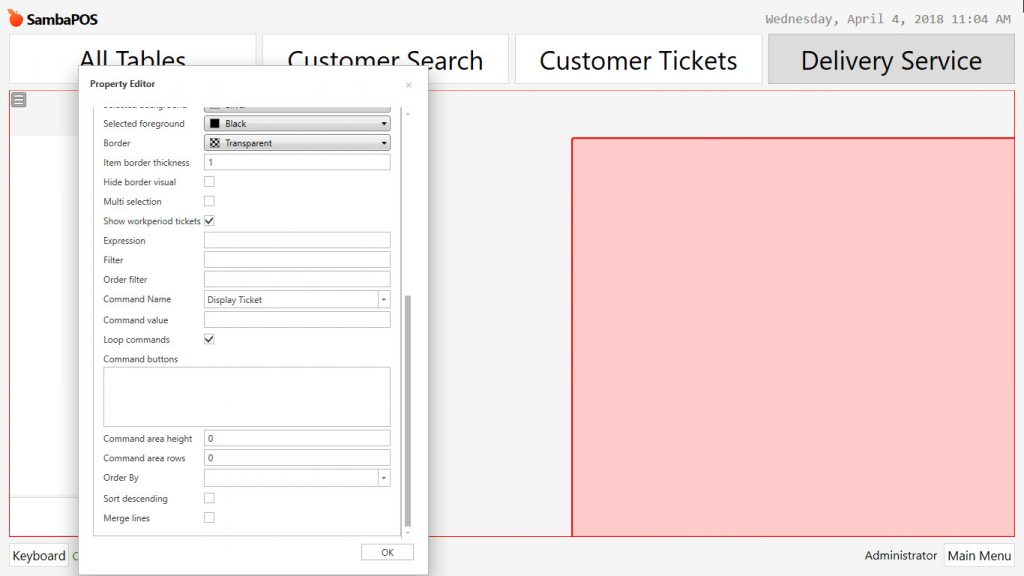
– Ticket Lister Widget Settings
– Ticket Lister Widget Design
– Adding and Positioning Tag Widget
– Tag Widget Design
After activating design mode, click on Add Widget > Ticket Lister title. Position the ticket lister on the screen by using mouse and editing tool.
State: Delivering
Show workperiod tickets: Activate this field.
Format: Copy and paste below code group into this field.
<L00><block 10 transparent left *>
<L00><size 20>{ENTITY NAME:Deliverer}</size><br/>
<L00>[='{ENTITY NAME:Customer}'.replace('<!rn>','<br/>')]
<L00></block>
<L00><block 10><size 40>{TICKET TOTAL} </size></block>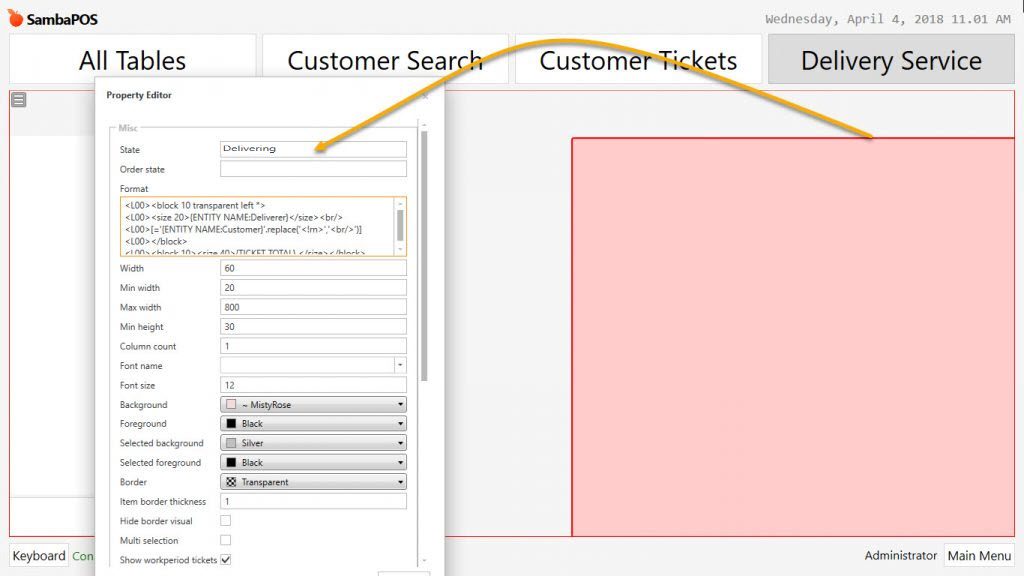
6.2.3. Design and Settings of Search Delivery Customer Screen (User Interface)
– Adding and Positioning Entity Search Widget
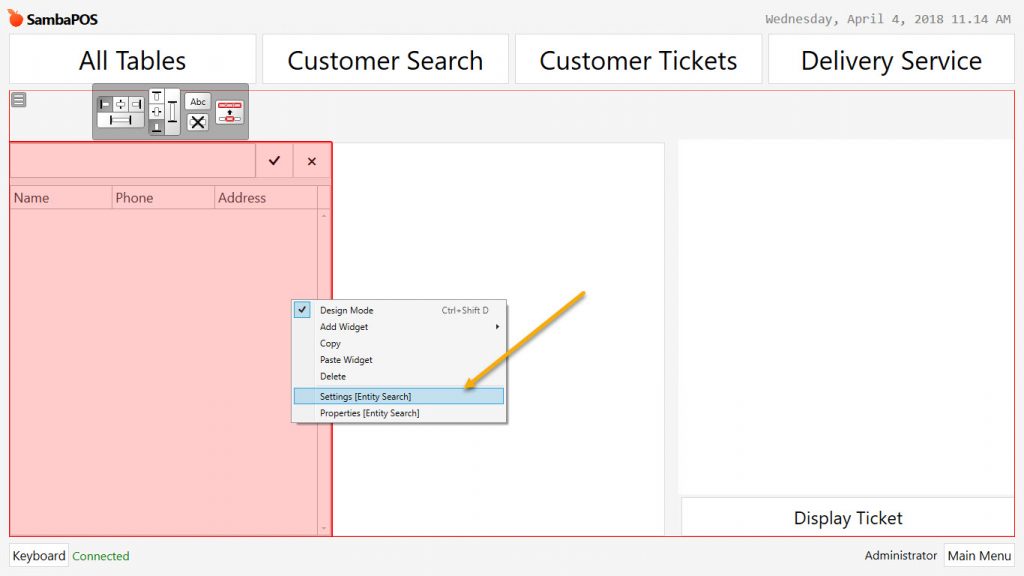
– Entity Search Widget Settings
– Entity Search Widget Design
– Adding and Positioning Tag Widget
– Tag Widget Design
Entity Search Widget: Entity Search Tool
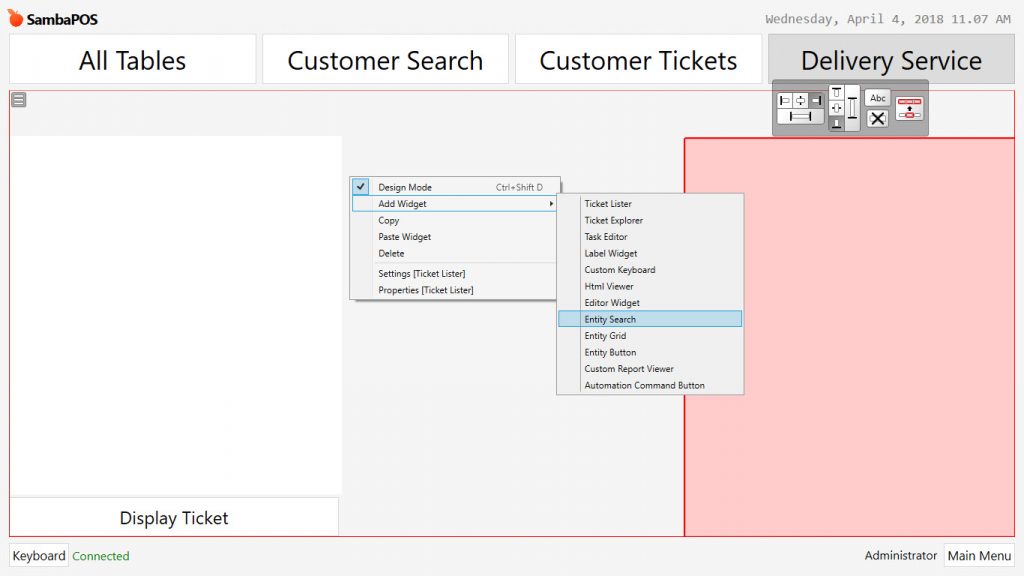
Design Mode: After activating design mode, click on Add Widget > Entity Search title. Position the entity search widget on the screen by using mouse and editing tool.
Entity Search Widget Preview
Entity Search Name Value: Customer
Is Keyboard Visible:
Can Edit Entity:
Can Create Entity:
Can Creat Account:

6.2.4. Designing and Settings of Label Widget (User Interface)
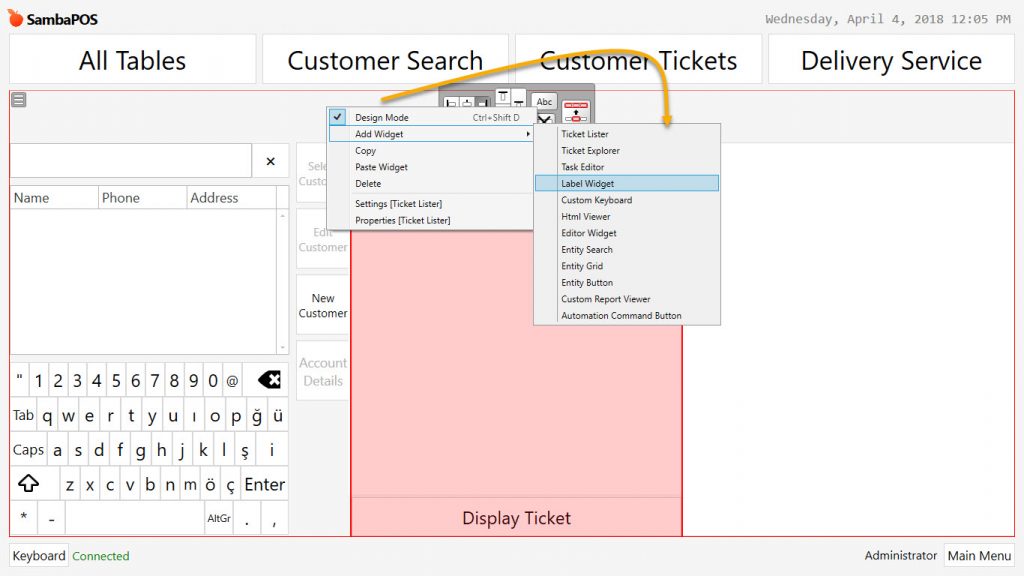
Design Mode: After activating design mode, click on Add Widget > Label Widget title. Position the label widget on the screen by using mouse and editing tool.
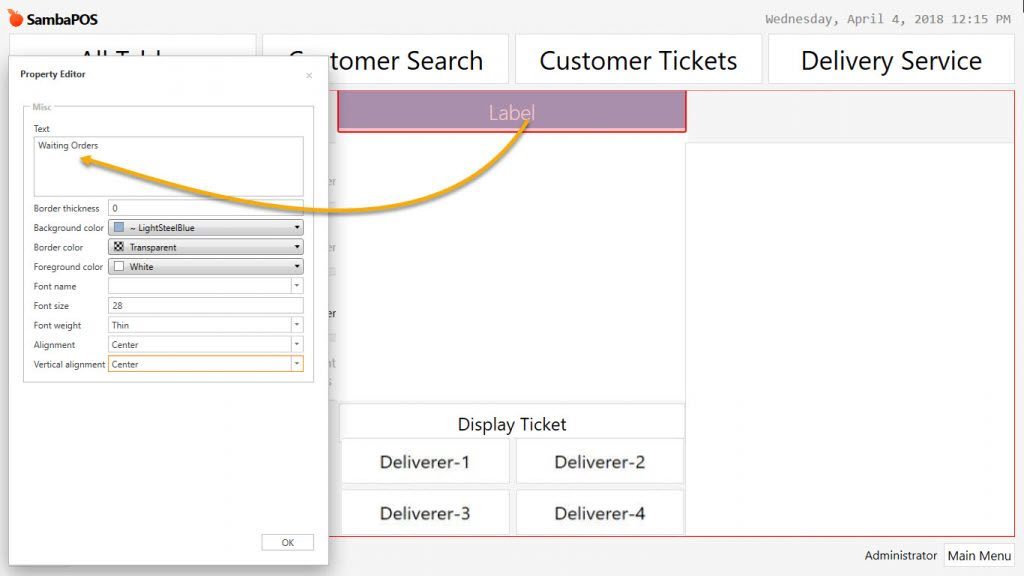
Label Widget Settings
Text (Field to write description): Waiting Orders
Border thickness: 0
Backround color: Background Color Selection
Border Color: Border Color Selection
Foreground Color: Foreground Color Selection
Font Name: Font Selection
Font Size: 28
Font Weight: Thin
Alignment: Center
Vertical Alignment: Center
Repeat the same steps for Delivered Orders Label Widget and for Customers Label Widgets too.
Advanced Delivery Entity Screen Image
7. Adding Fast Payment Buttons
7.1. Adding Actions
7.1.1. Action: Get Fast Payment Cash
Go to Main Menu > Manage > Automation > Actions > Add Action
Action Name: DLV_ACM Pay Ticket by Cash
Action Type: Pay Ticket
Parameters
Payment Type Name: Cash
Tendered Amount:
Description:
Execute Payment Processors:

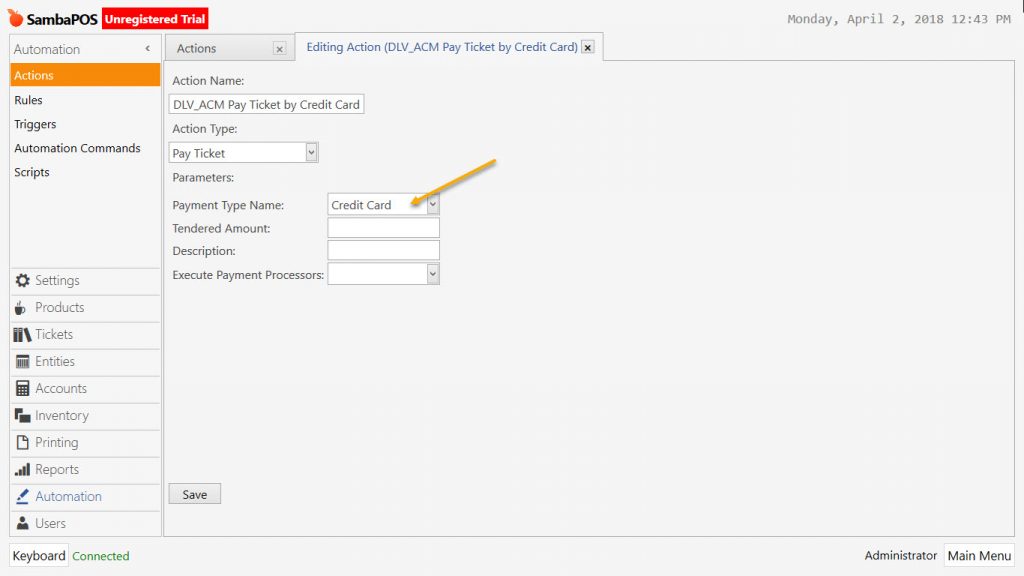
7.1.2. Action: Get Fast Payment Credit Card
Go to Main Menu > Manage > Automation > Actions > Add Action
Action Name: DLV_ACM Pay Ticket by Credit Card
Action Type: Pay Ticket
Parameters
Payment Type Name: Credit Card
Tendered Amount:
Description:
Execute Payment Processors:
7.1.3. Action: Get Fast Payment Voucher
Go to Main Menu > Manage > Automation > Actions > Add Action
Action Name: DLV_ACM Pay Ticket by Voucher
Action Type: Pay Ticket
Parameters
Payment Type Name: Voucher
Tendered Amount:
Description:
Execute Payment Processors:

7.2. Adding Rules
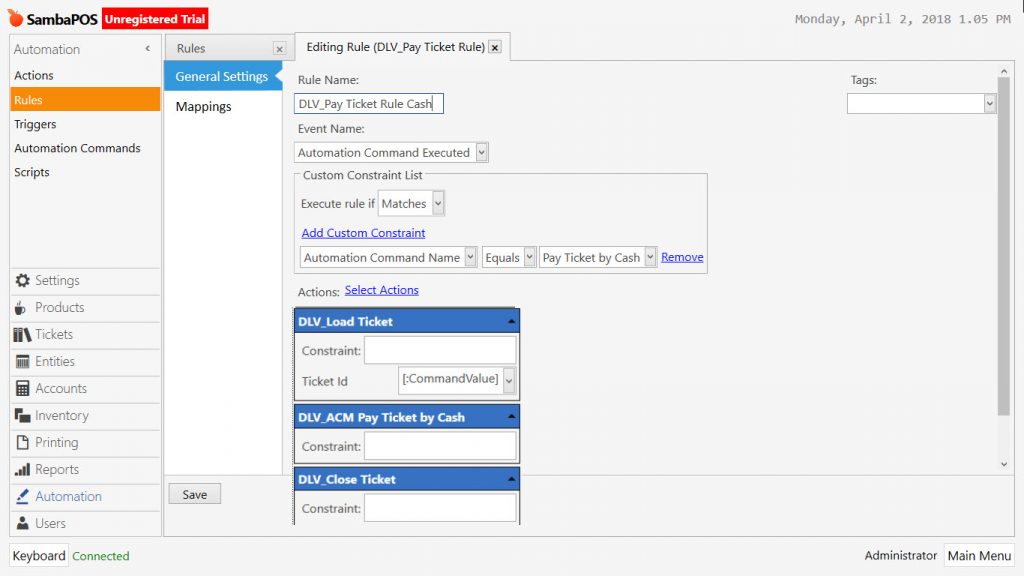
7.2.1. Rule: Get Fast Payment Cash
Main Menu > Manage > Automation > Rules > Add Rule
Rule Name: DLV_Pay Ticket Rule Cash
Event Name: Automation Command Executed
Add Custom Constraint: Automation Command Name | Equals | Cash
Action: DLV_Load Delivery Service Ticket
Ticket ID: [:CommandValue]
Action: DLV-Get Fast Payment Cash
Constraint:
Action: Close Ticket
Constraint:
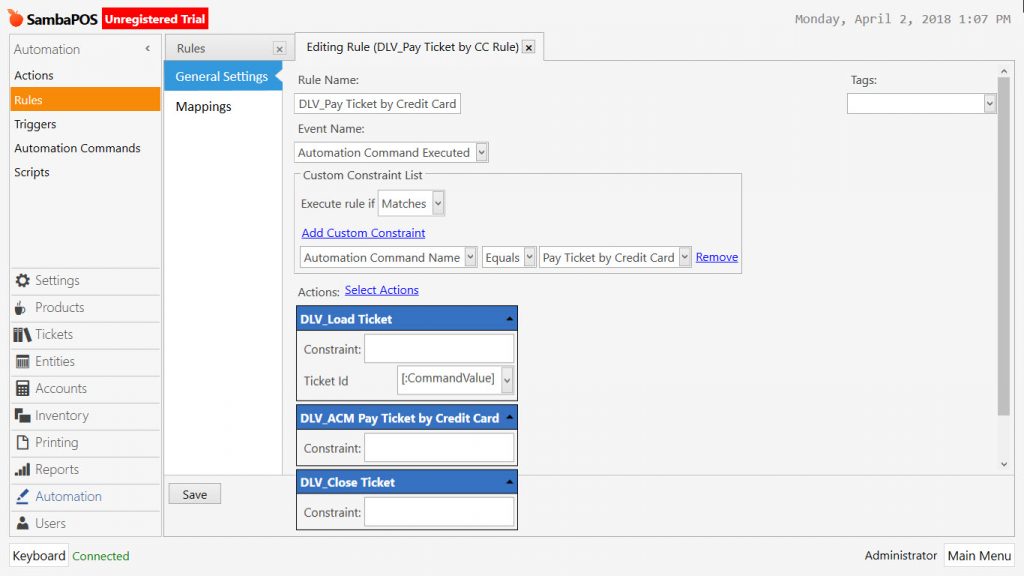
7.2.2. Rule: Get Fast Payment Credit Card
Main Menu > Manage > Automation > Rules > Add Rule
Rule Name: DLV_Pay Ticket Rule Credit Card
Event Name: Automation Command Executed
Add Custom Constraint: Automation Command Name | Equals | Credit Card
Action: DLV_Load Delivery Service Ticket
Ticket ID: [:CommandValue]
Action: DLV-Get Fast Payment Credit Card
Constraint:
Action: Close Ticket
Constraint:
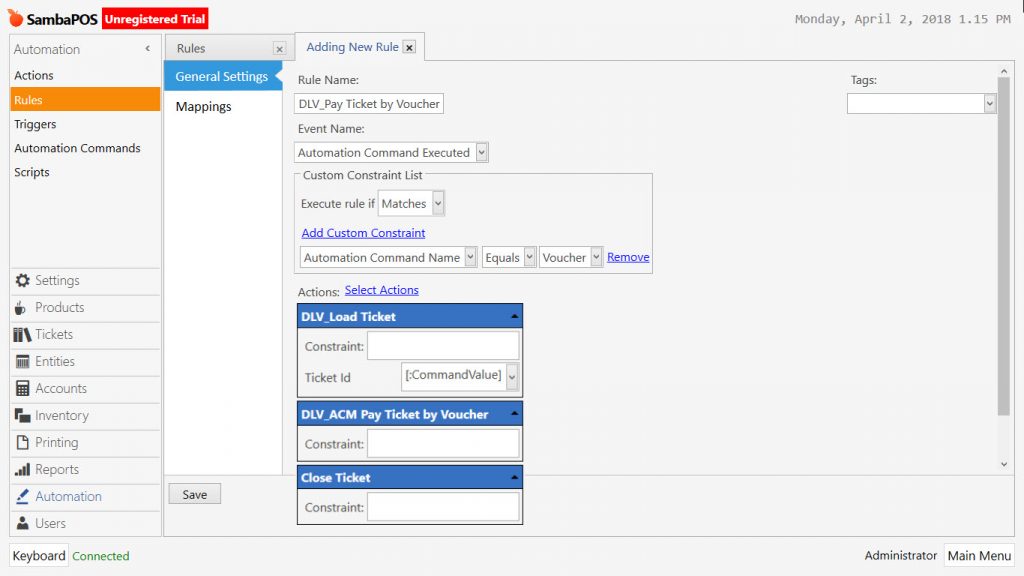
7.2.3. Rule: Get Fast Payment Voucher
Main Menu > Manage > Automation > Rules > Add Rule
Rule Name: DLV_Pay Ticket Rule Voucher
Event Name: Automation Command Executed
Add Custom Constraint: Automation Command Name | Equals | Voucher
Action: DLV_Load Delivery Service Ticket
Ticket ID: [:CommandValue]
Action: DLV-Get Fast Payment Voucher
Constraint:
Action: Close Ticket
Constraint:
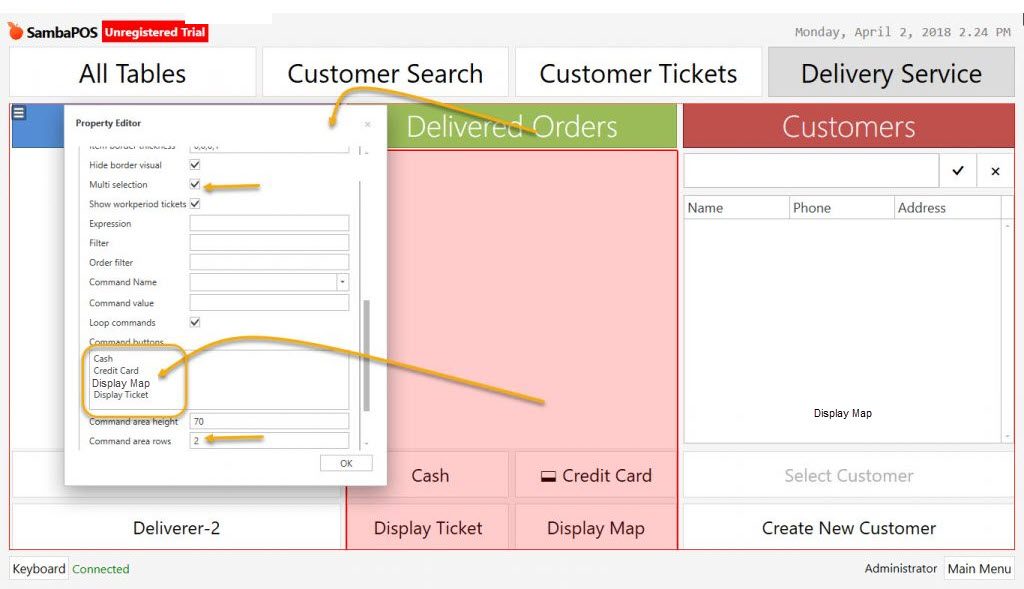
7.3. Adding Payment Buttons on Delivered Orders Widget Screen (User Interface)
Main Menu > POS Screen > Delivery Service Entity Screen > Design Mode (By right clicking on mouse ) > Delivered Orders Widget Settings (Settings-Ticket Lister)
In order to add fast payment button:
Copy and past below phrases into the Command Button field:
Cash
Credit Card
Display Ticket
Display Map
Note: It is possible to get payment of multiple tickets by selecting Multi Selection option.
According to screen layout you can add Command Area Rows.
8. Uninstalling Advanced Delivery Service Implementation
By following steps below, you can remove implementation from SambaPOS.
Note: It is not possible to remove the ticket type which has been used by sale transaction. If you delete all of the sale transactions then ticket type can be removed.
1- Actions
Manage > Automation > Actions > Actions to Delete;
> Load Ticket
DLV_Load Delivery Ticket
> Display Ticket
DLV_Display Delivery Ticket
> Update Ticket State
DLV_Update Delivery Service Ticket Status
> Update Entity State
DLV_Update Delivery Service Ticket Deliverer
2- Rules
Manage > Automation > Rules > Rules to Delete;
> Before Ticket Closing
DLV_Update Paid Delivery Ticket Status
> Ticket Created
DLV_Update New Delivery Ticket Status – Waiting
> Automation Command Executed
DLV_Handle Deliverer Command
DLV_Display Ticket Rule
DLV_Update Delivery Ticket Status No Deliverer
3- Entity Screens
Manage > Entities > Entity Screens > Entity Screens to Delete;
Delivery Service
4- Entities
Manage > Entities > Entities to Delete;
> Deliverers
Deliverer-1
Deliverer-2
Deliverer-3
Deliverer-4 …
5- Entity Types
Manage > Entity Types > Entity Types to Delete;
Deliverers
6- Ticket Type (It is not possible to delete the ticket types which has been used in a sales transaction.)
Manage > Ticket Types > Ticket Types to Delete;
Delivery Ticket
7- Automation Commands
Manage > Automation > Automation Commands > Automation Commands to Delete;
No Deliverer