4.10. How to Make 50% Off Promotion for Second Item?
In the example it will be shown how to add second of the same item to ticket by making 50% discount. It is possible to use that promotion for different cases according to need.
It is necessary to add action, rule, automation command and configure the printer template settings.
Adding Action (Decrease Price 50%)
Go to Manage > Automation > Actions from here click on Add Action link.
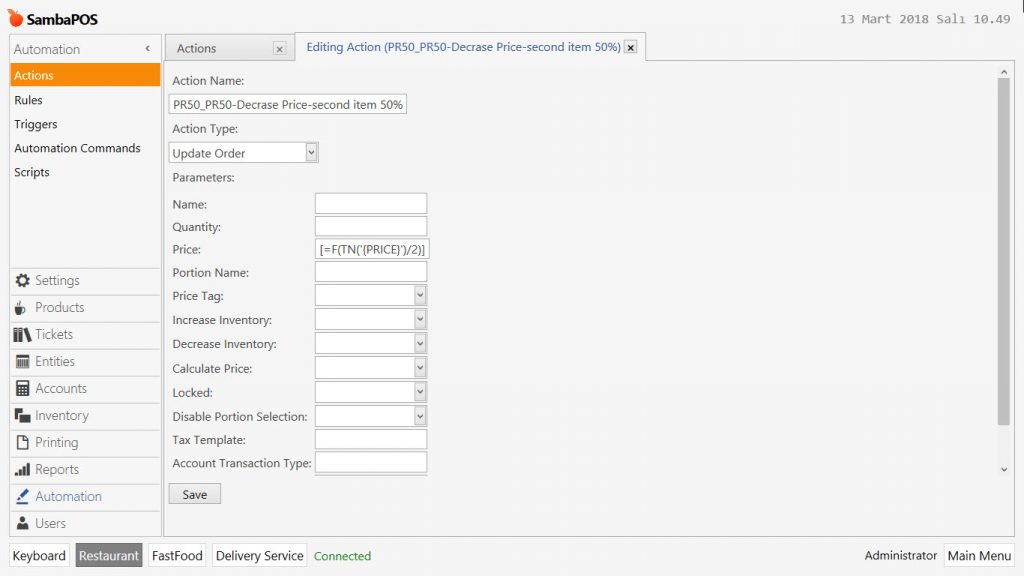
- Action Name: Field to write name of action. (In the example; PR50_PR50-Decrase Price-second item 50%)
- Action Type; Select Update Order template.
- Price: In this field write
[=F(TN('{PRICE}')/2)]
After completing necessary fields, click on Save button.
Adding Action (Activate Promotion)
Go to Manage > Automation > Actions from here click on Add Action link.

- Action Name: Field to write name of action. (In the example; PR50_PR50-Activate Promotion-second item 50%)
- Action Type: Select Update Ticket State template.
- State Name: Write “Promotion” into this field.
- State: Write “50% off” into this field.
After completing necessary fields, click on Save button.
Adding Action (Deactivate Promotion)
Go to Manage > Automation > Actions from here click on Add Action link.
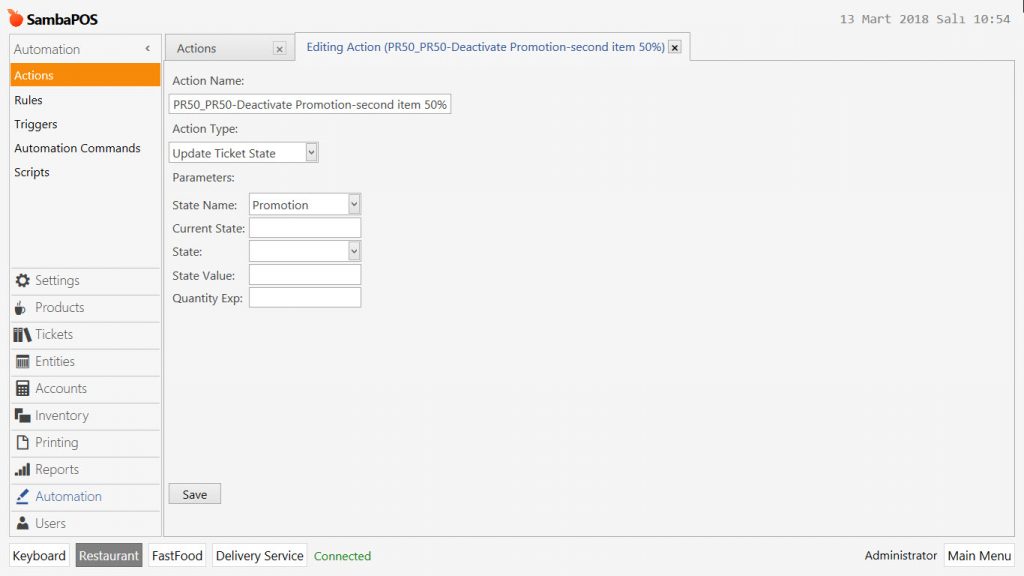
- Action Name: Field to write name of action. (In the example; PR50_PR50-Deactivate Promotion-second item 50%)
- Action Type: Select Update Ticket State template.
- State Name: Write “Promotion” into this field.
After completing necessary fields, click on Save button.
Adding Action (Update Order Service Status)
Go to Manage > Automation > Actions from here click on Add Action link.
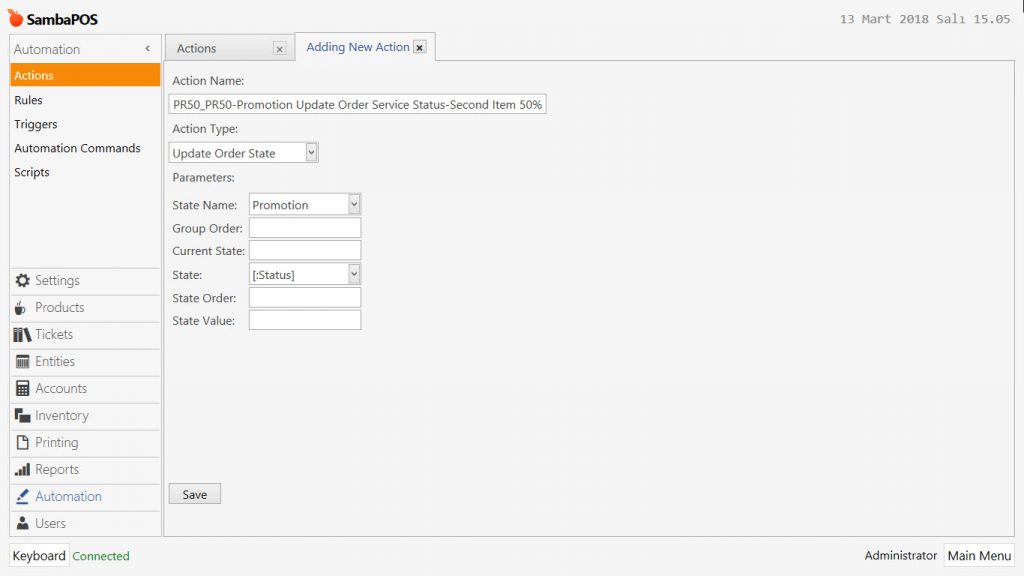
- Action Name: Field to write name of action. (In the example; PR50_PR50-Promotion Update Order Service Status-second item 50%)
- Action Type: Select Update Order State template.
- State Name: Write “Promotion” into this field.
- State: Write [:Status] into this field.
After completing necessary fields, click on Save button.
Adding Action (Update Order Promotion Status)
Go to Manage > Automation > Actions from here click on Add Action link.
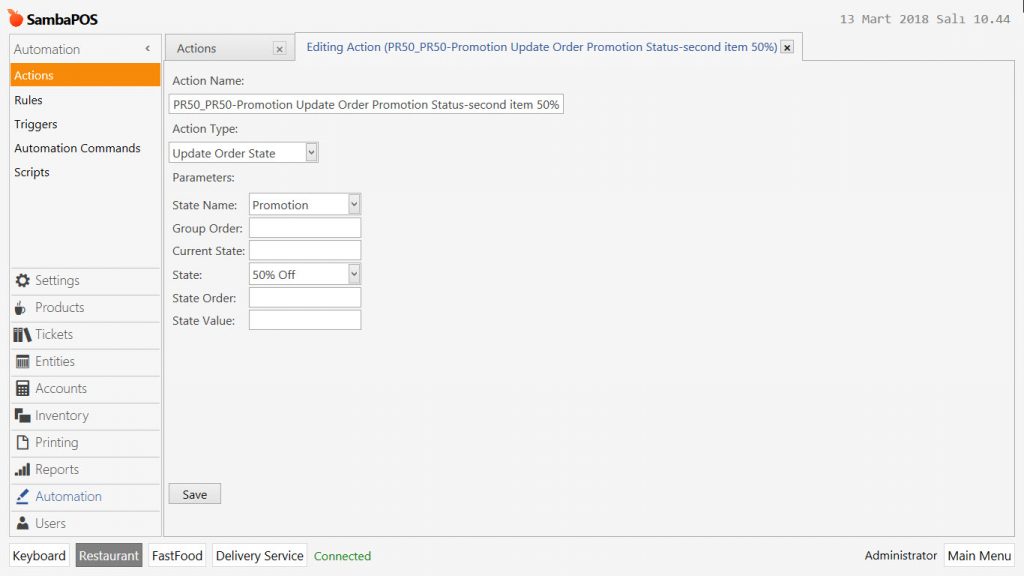
- Action Name: Field to write name of action. (In the example; PR50_PR50-Promotion Update Order Promotion Status-second item 50%)
- Action Type: Select Update Order State template.
- State Name: Write “Promotion” into this field.
- State: Write “50% Off” into this field.
After completing necessary fields, click on Save button.
Adding Action (Add New Order to Ticket)
Go to Manage > Automation > Actions from here click on Add Action link.
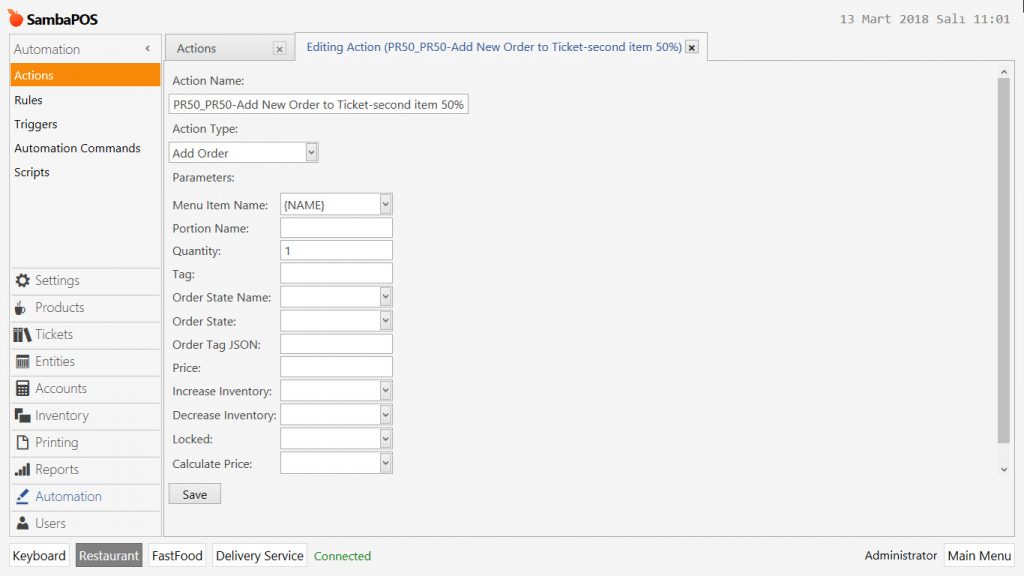
- Eylem Adı: Field to write name of action. (In the example; PR50_PR50-Add New Order to Ticket-second item 50%)
- Action Type: Select Add Order template.
- Product Name: Write {NAME} into this field.
- Quantity: Write “1” value into this field.
After completing necessary fields, click on Save button.
Adding Action (Load Last Order)
Go to Manage > Automation > Actions from here click on Add Action link.
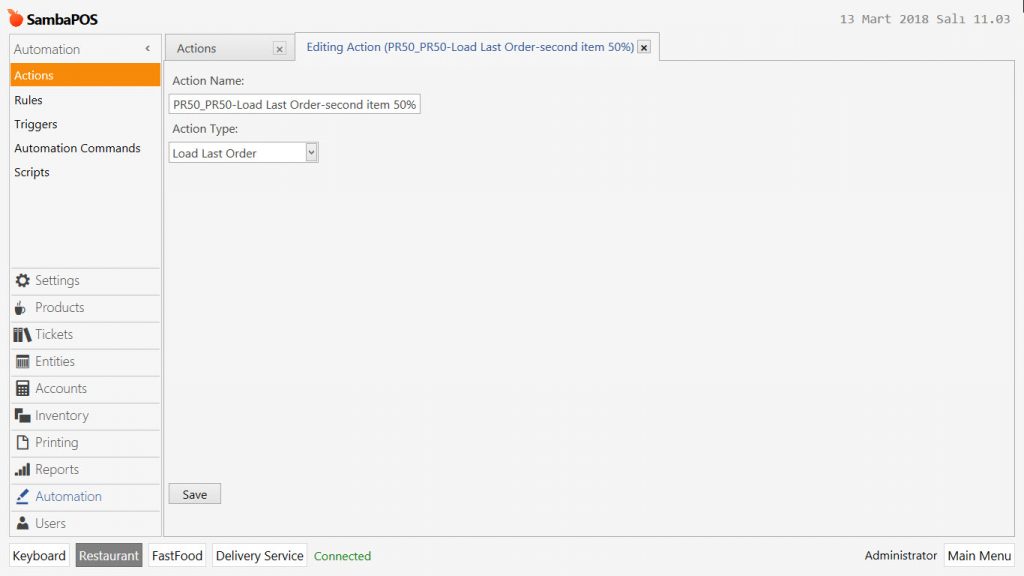
- Action Name: Field to write name of action. (In the example; PR50_PR50-Load Last Order-second item 50%)
- Action Type: Select Load Last Order template.
After completing necessary fields, click on Save button.
Adding Action (Refresh Ticket)
Go to Manage > Automation > Actions from here click on Add Action link.
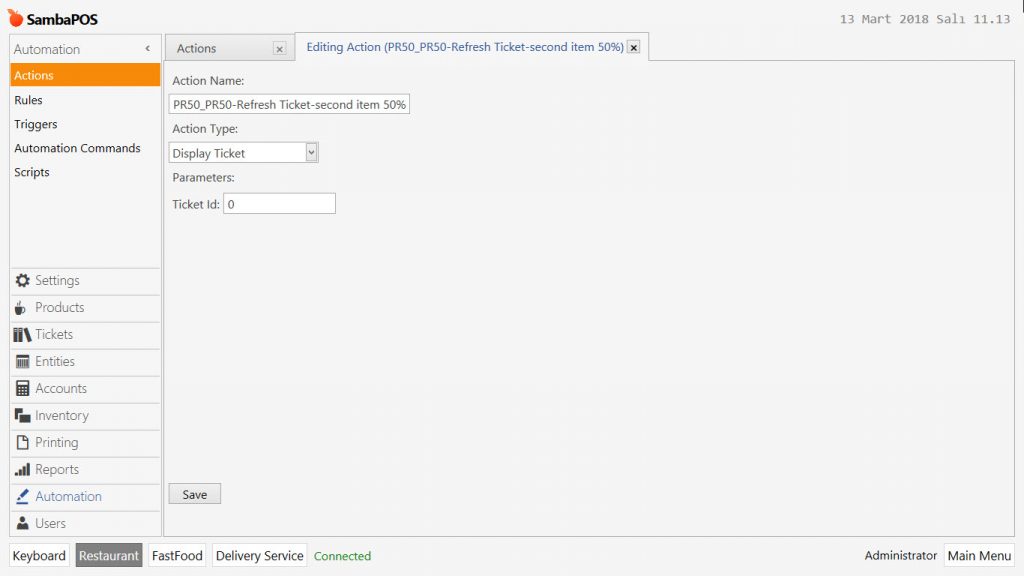
- Action Name: Field to write name of action. (In the example; PR50_PR50-Refresh Ticket-second item 50%)
- Action Type: Select Display Ticket template.
- Ticket Id: Write “0” value into this field.
After completing necessary fields, click on Save button.
Adding Automation Command (Second Beverage 50% Off )
To add ”sell second beverage 50% off ” button, go to Manage > Automation > Automation Commands from here click on Add Automation Command link.
General Settings Section;
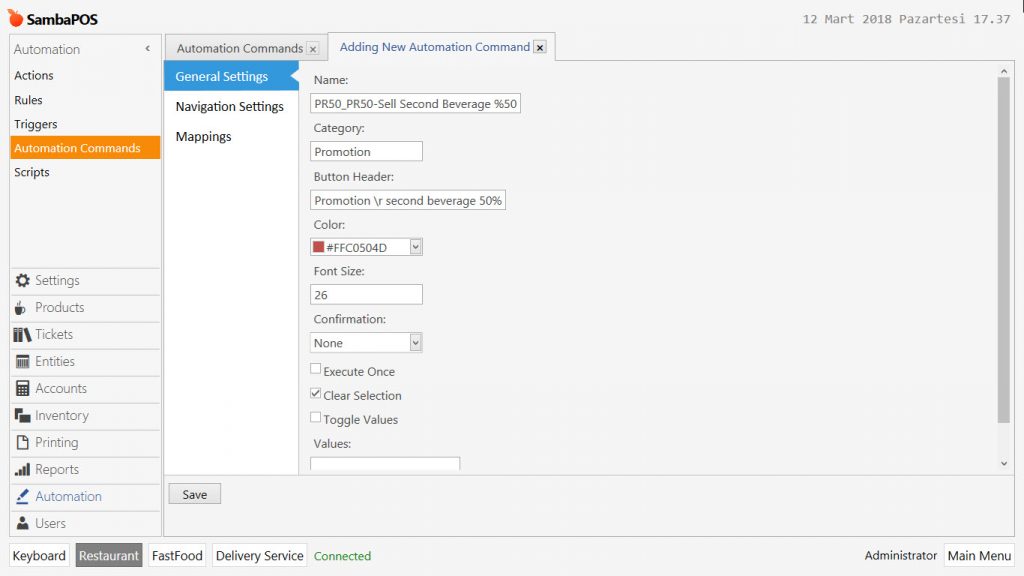
- Name: Field to write name of automation command. (In the example; PR50_PR50-Sell second beverage %50)
- Category: Write “Promotion” into this field.
- Button Header: Write “Promotion \r second beverage 50%” in this field. Use \r in here to scroll down the line.
- Color: Field to select the button color.
- Font Size: Field to set font size of the button.
- Confirmation: Select None template in this field.
- Clear Selection: Activate Clear selection box.
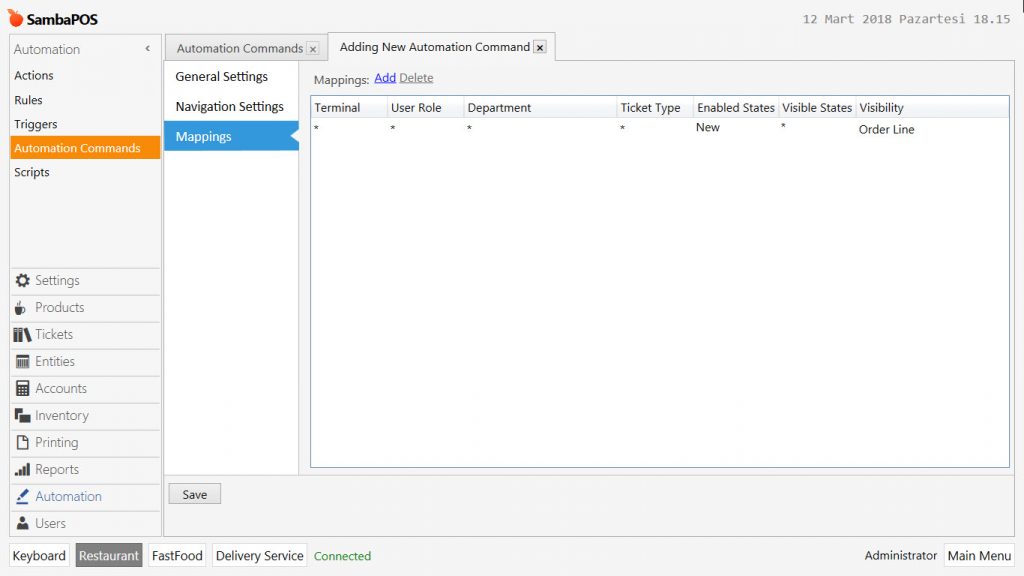
Mappings Section;

Add at a line to mappings section.
- Enabled States: Write 50% Off into this field.
- Visibility: Select Ticket in this field.
After completing necessary fields, click on Save button.
Adding Automation Command (Hold Service)
To add hold service button, go to Manage > Automation > Automation Commands from here click on Add Automation Command link.
General Settings Section;

- Name: Field to write name of automation command. (In the example; PR50_PR50-Hold Service)
- Category: Write “Promotion” into this field.
- Button Header: Write “Hold\r Service” in this field. Use \r in here to scroll down the line.
- Color: Field to select the button color.
- Font Size: Field to set font size of the button.
- Confirmation: Select None template in this field.
- Clear Selection: Activate Clear selection box.
Mappings Section;
Add at a line to mappings section.
- Enabled States: Write “New” into this field.
- Visibility: Select Order Line in this field.
After completing necessary fields, click on Save button.
Adding Automation Command (Start Service)
To add start service button, go to Manage > Automation > Automation Commands from here click on Add Automation Command link.
General Settings Section;
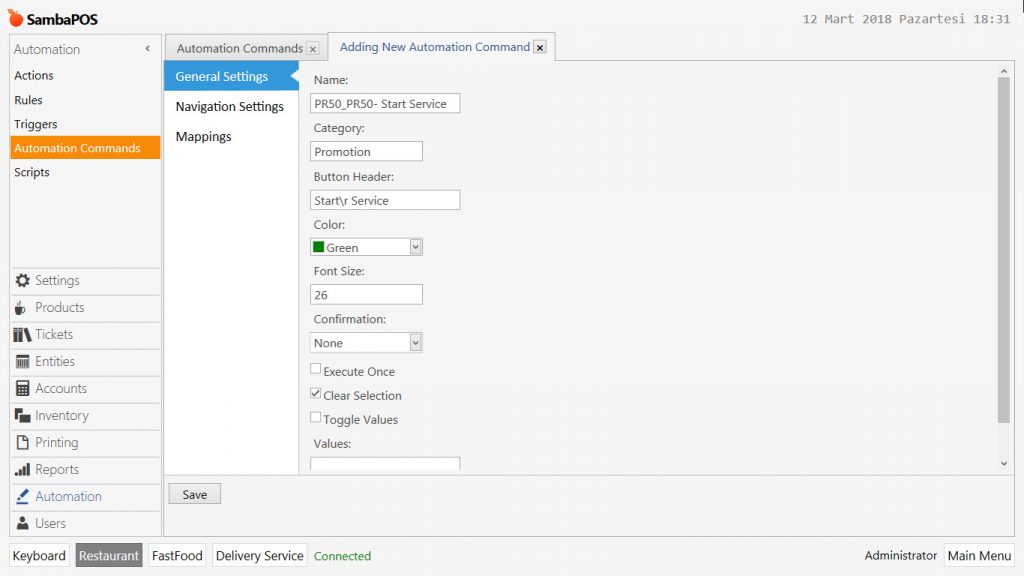
- Name: Field to write name of automation command. (In the example; PR50_PR50- Start Service)
- Category: Write “Promotion” into this field.
- Button Header: Write “Start\r Service” in this field. Use \r in here to scroll down the line.
- Color: Field to select the button color.
- Font Size: Field to set font size of the button.
- Confirmation: Select None template in this field.
- Clear Selection: Activate Clear selection box.
Mappings Section;

Add at a line to mappings section.
- Enabled States: Write “Start Service” into this field.
- Visibility: Select Order Line in this field.
After completing necessary fields, click on Save button.
Adding Rule (Start 50% Off Promotion)
Go to Manage > Automation > Rules from here click on Add Rule link.
General Settings Section;
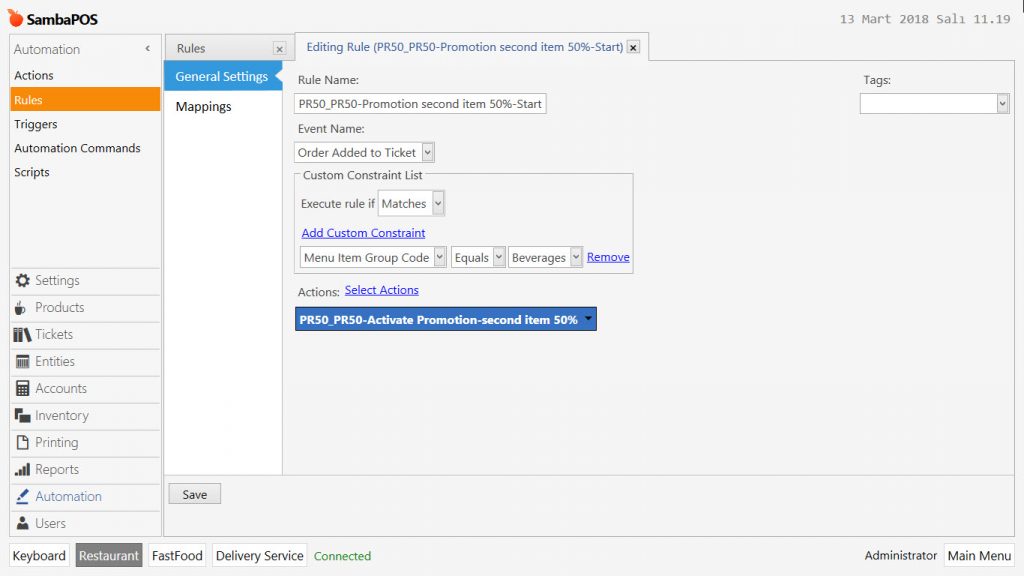
- Rule Name: Field to write name of rule. (In the example; PR50_PR50-Promotion second item 50%-Start)
- Event Name: Select Order Added to Ticket template.
- Add Custom Constraint: In this field in case of making discount for a specific item select “Item Name” template, if making discount for all items in a category then select “Menu Item Group Code” template.
- Menu Item Group Code | Equals | Beverages
- Actions > Select Action: Select related action that was created on previous step. (In the example; PR50_PR50-Activate Promotion-second item 50%)
After completing necessary fields, click on Save button.
Adding Rule (Execute Promotion 50% for Second Item)
Go to Manage > Automation > Rules from here click on Add Rule link.
General Settings Section;
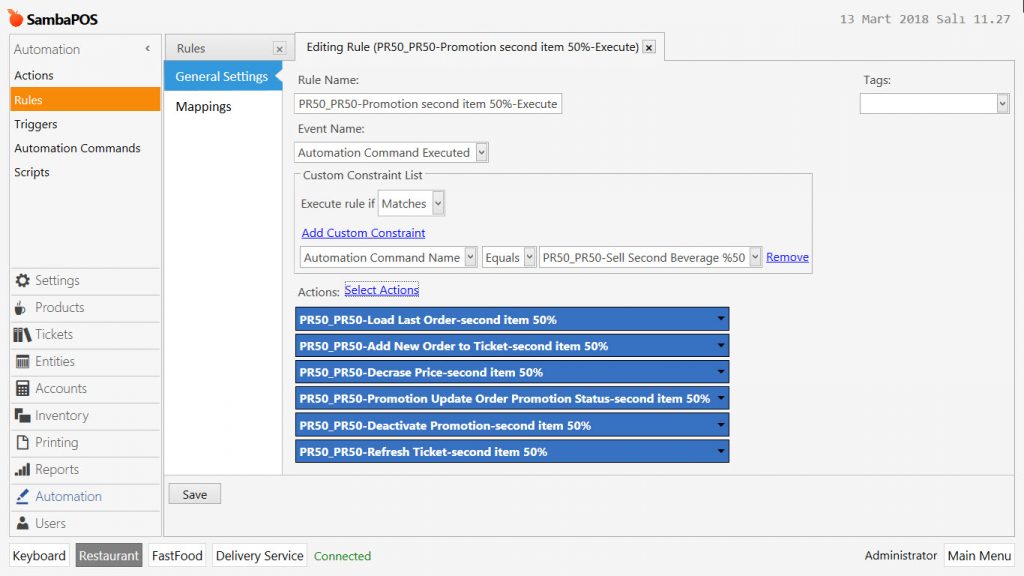
- Rule Name: Field to write name of rule. (In the example; PR50_PR50-Promotion second item 50%-Execute)
- Event Name: Select Automation Command Executed template.
- Add Custom Constraint: Automation Command Name | Equals | PR50_PR50-sell second beverage 50% Off.
- Actions > Select Action: Select actions that were created on previous steps.
- PR50_PR50-Load Last Order-second item 50%
- PR50_PR50-Add New Order to Ticket-second item 50%
- PR50_PR50-Decrase Price-second item 50%
- PR50_PR50-Promotion Update Order Promotion Status-second item 50%
- PR50_PR50-Deactivate Promotion-second item 50%
- PR50_PR50-Refresh Ticket-second item 50%
After completing necessary fields, click on Save button.
Adding Rule (When Clicked on Hold Service Button)
Go to Manage > Automation > Rules from here click on Add Rule link.
General Settings Section;
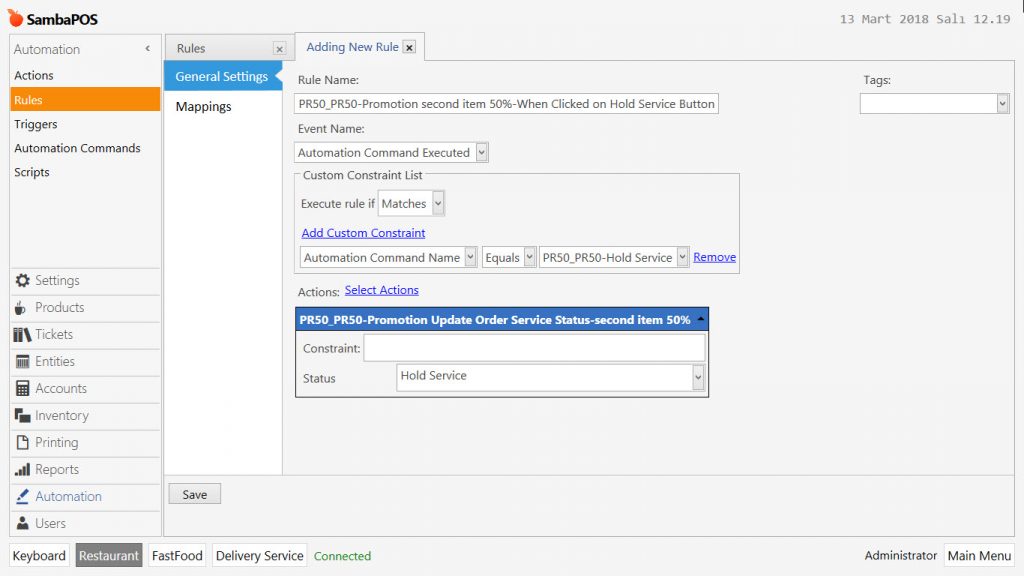
- Rule Name: Field to write name of rule. (In the example; PR50_PR50-Promotion second item 50%-When Clicked on Hold Service Button)
- Event Name: Select Automation Command Executed template.
- Add Custom Constraint: Automation Command Name | Equals | PR50_PR50- Hold Service
- Action > Select Action: Select previously created action.
- Select PR50_PR50-Promotion Update Order Service Status-second item 50% action. Write “Hold Service” into Status field.
After completing necessary fields, click on Save button.
Adding Rule (When Clicked on Start Service Button)
Go to Manage > Automation > Rules from here click on Add Rule link.
General Settings Section;

- Rule Name: Field to write name of rule. (In the example; PR50_PR50-Promotion second item 50%-When Clicked on Start Service Button)
- Event Name: Select Automation Command Executed template.
- Add Custom Constraint: Automation Command Name | Equals | PR50_PR50- Start Service
- Actions > Select Action : Select previously created action.
- Select PR50_PR50-Promotion Update Order Service Status-second item 50% action. Write “Start Service” into Status field.
After completing necessary fields, click on Save button.
Configuring Printer Template
Go to Manage > Printing > Printer Templates from here open editing screen by double clicking on Kitchen Orders Template.
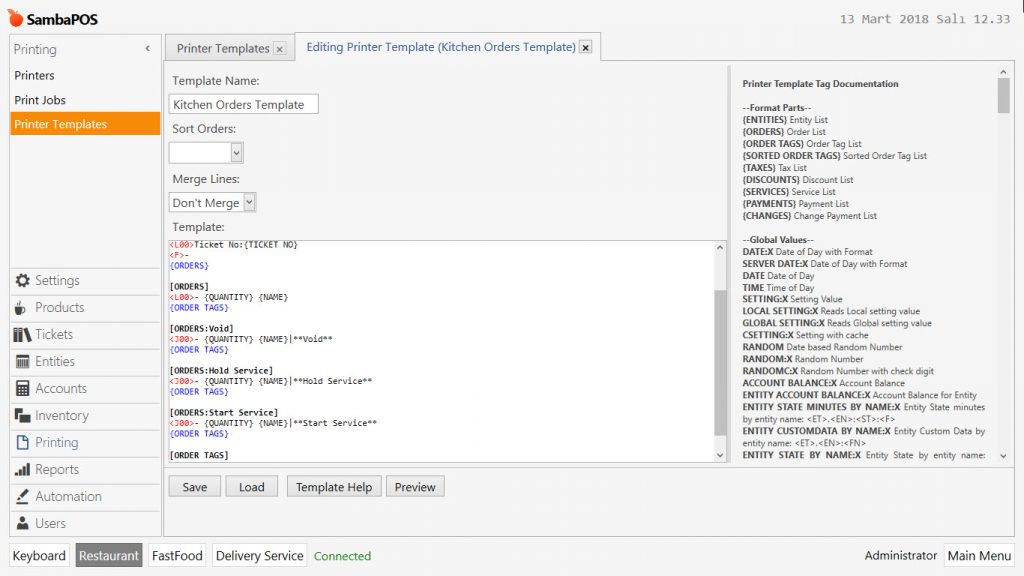
Copy and paste phrases below into the Orders field.
[ORDERS:Hold Service]
<J00>- {QUANTITY} {NAME}|**Hold Service**
{ORDER TAGS}
[ORDERS:Start Service]
<J00>- {QUANTITY} {NAME}|**Start Service**
{ORDER TAGS}
After completing necessary fields, click on Save button.