2.3.15.d. How to Process Inventory Item Purchases into Company Accounts?
When tracking Inventories and Costs, it is important to process the purchases to the company that goods purchased from. In this way it is possible to work with those companies through current accounts.
In the example it will be shown how to track purchasings and payment processes of related companies.
Adding Accounts
Account Templates and Adding Accounts
Go to Manage > Accounts > Account Types from here click on Add Account Template link.
Adding Company Account Template
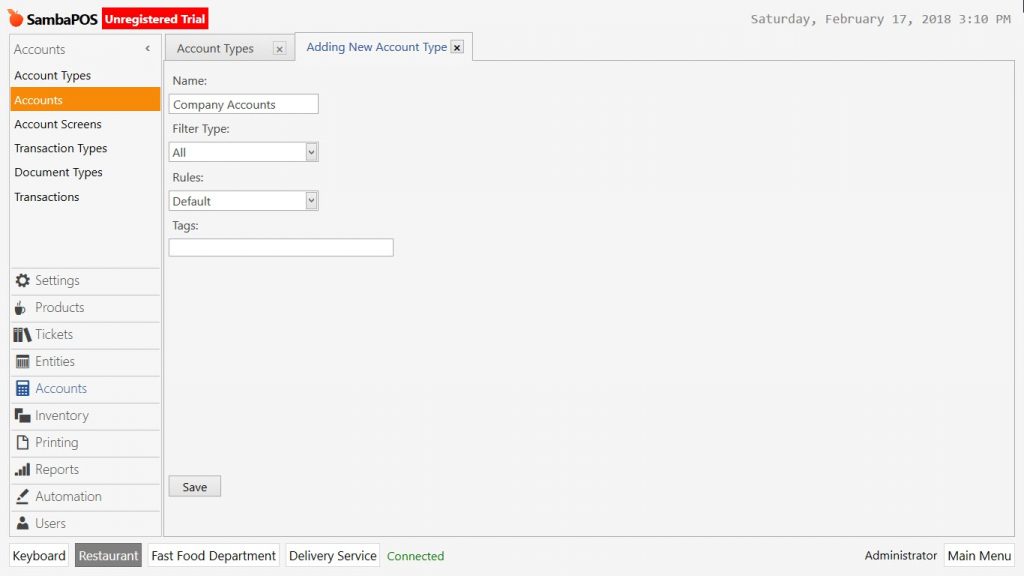
- Name: Write a proper name for Account Template. (For example Company Accounts)
- Filter Type: Select All template here.
- Rules: Select Default template here.
After completing necessary fields, click on Save button.
Adding Product Purchase Accounts Template
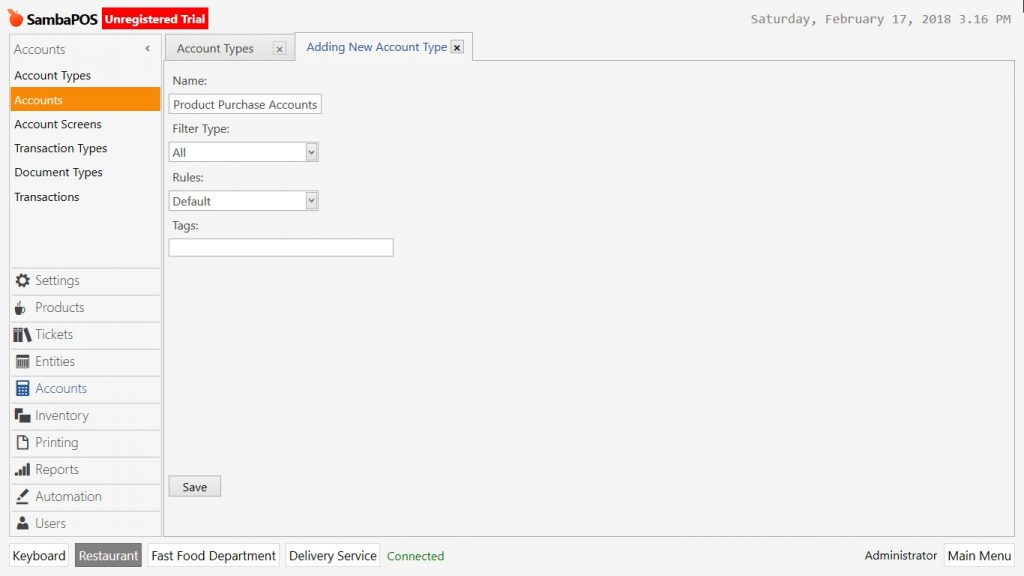
- Name: Write a proper name for Account Template. (For example Product Purchase Accounts)
- Filter Type: Select All template here.
- Rules: Select Default template here.
Perform the necessary editings and click on Save button.
After completing Account Templates, create a new account for product purchase account template. This account will be used for showing like all inventories purchased through a single account.
Go to Manage > Accounts > Accounts in here click on Add Account link.
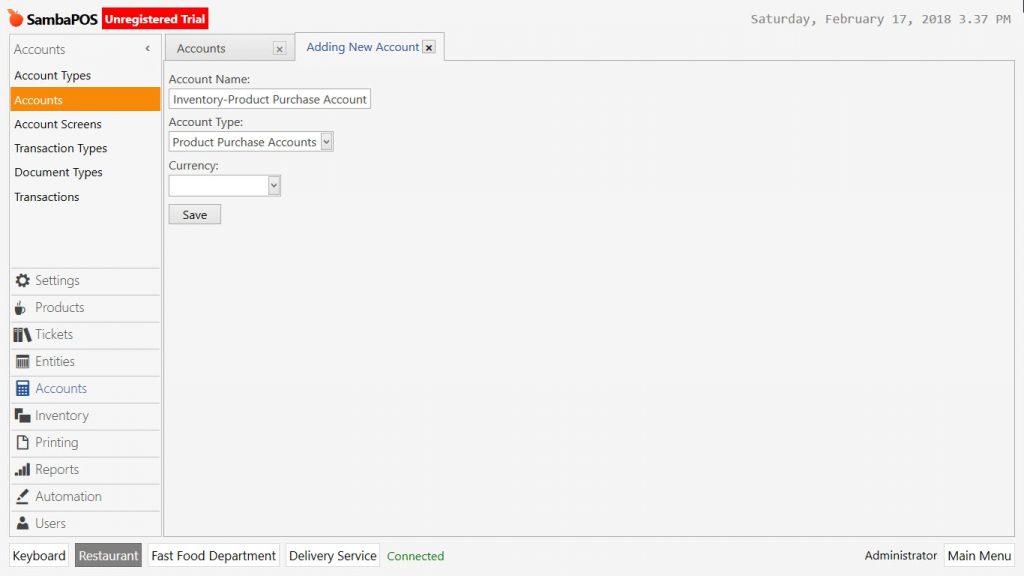
- Account Name: Write the name of account. (For example; Inventory – Product Purchase Account)
- Account Template: Select account template that added on previous step.(Product Purchase Accounts)
After completing necessary fields click on Save button.
Adding Transaction Type
Adding Debit Account Transaction Type to Companies
When purchasing inventory product, amount of the products will be saved as credit for that company automatically. Also that amount will be saved as debit for product purchasing account.
Go to Manage > Accounts > Account Types here click on Add Account Transaction Type link.
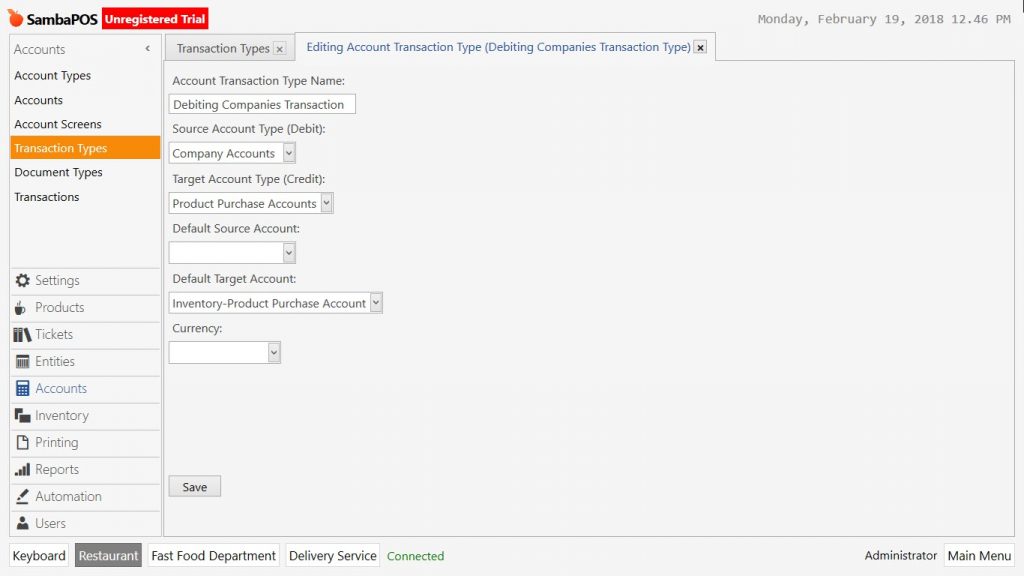
- Account Transaction Type: Field to write the name of account transaction type. (For example ; Debiting Companies Account Transaction)
- Source Account Type (Debit): Select the previously added Company Accounts template.
- Target Account Type (Credit): Select previously added Product Purchase Accounts template.
- Default Target Account: Select previously added Inventory – Product Purchase Account template.
After completing necessary fields click on Save button.
Adding Cash Payment Transaction to Companies
Select payment accounts as debit account type and select company accounts as credit account type because of the money will be paid to companies through current payment accounts. Leave blank default target account so that you can select the company manually during the payment process.
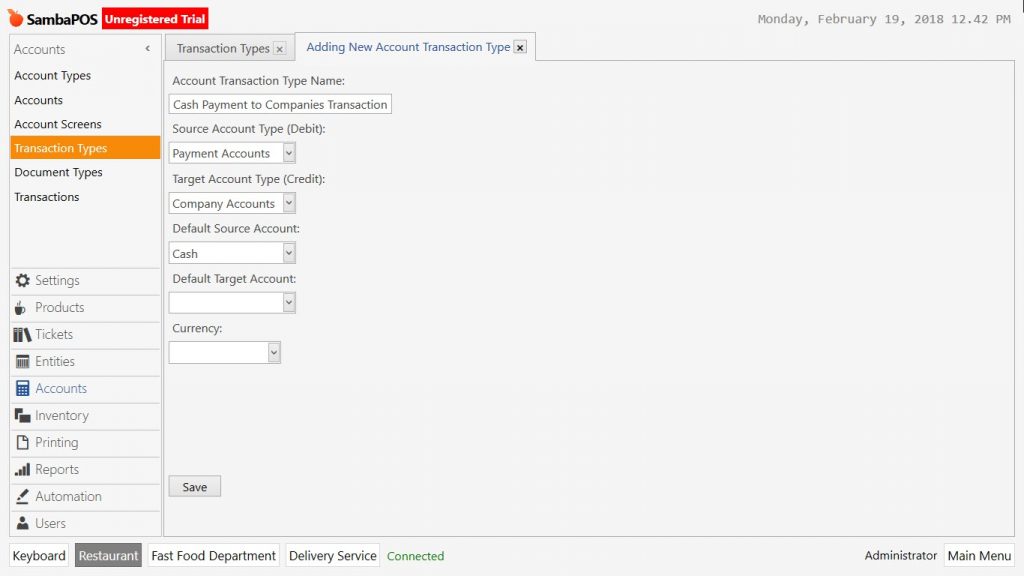
- Account Transaction Type Name: Field to write name of account transaction type. (For example; Cash Payment to Companies Transaction)
- Source Account Type (Debit): Select Payment Accounts template.
- Target Account Type (Credit): Select previously added Company Accounts template.
- Default Source Account: Select Cash template.
After completing necessary fields, click on Save button.
Creating Document Type to Make Payment to Companies
This document type will create a button to be used on account screens which will be created on further steps. So that by clicking on this button, it will be possible to make cash payment through payment accounts.
Go to Manage > Accounts > Document Types from here click on Add Document Type button.

- Name: Write the name of document type. (For example; Make Cash Payment to Company)
- Button Header: Write the name which will be seen on the button. (For example; Cash to Company)
- Button Color: Field to select button color.
- Account Template: Select Company Accounts template.
- Default Amount: Select [Balance]
- Description Template: Write the description in this field. (For example; Cash Payment to Company)
- Document Type > Add Account Transaction Type: Select previously created account transaction type. (Cash Payment Transaction to Companies)
After completing necessary fields, click on Save button.
Creating Account Screens for Transaction with Companies
It is necessary to create an Account Screen to track both accounts and payments. Go to Manage > Accounts > Account Screens from here click on Add Account Screen link.
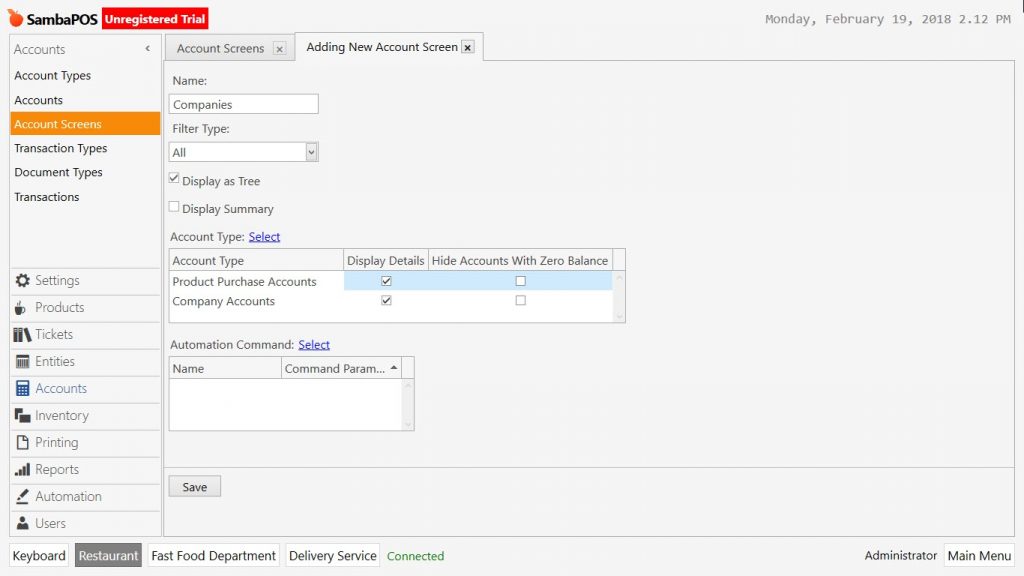
- Name: Write the name of account screen. (For example; Companies)
- Filter Type: Select All template.
- Display as Tree: Activate the box by selecting it.
- Account Template > Select: Select Product Purchase Accounts and Company Accounts. After selecting them click on Display Details boxes.
After completing necessary fields, click on Save button. So that companies account screen will be created in accounts menu.
Adding Company Accounts
It is necessary to add the companies one by one under the created account template in order to track the accounts of those companies. Go to Manage > Accounts from here clik on Add Account link.

- Account Name: Write the name of account. (Greengrocer Company Account)
- Account Template: Select Company Accounts template.
After completing necessary fields click on Save button. Repeat the same process for other companies too.
Adding Entities
After adding account screen and details it is necessary to add entities to use for companies.
Adding Entity Type
Go to Manage > Entities > Entity Types from here click on Add Entity Type link.
General Settings Section;
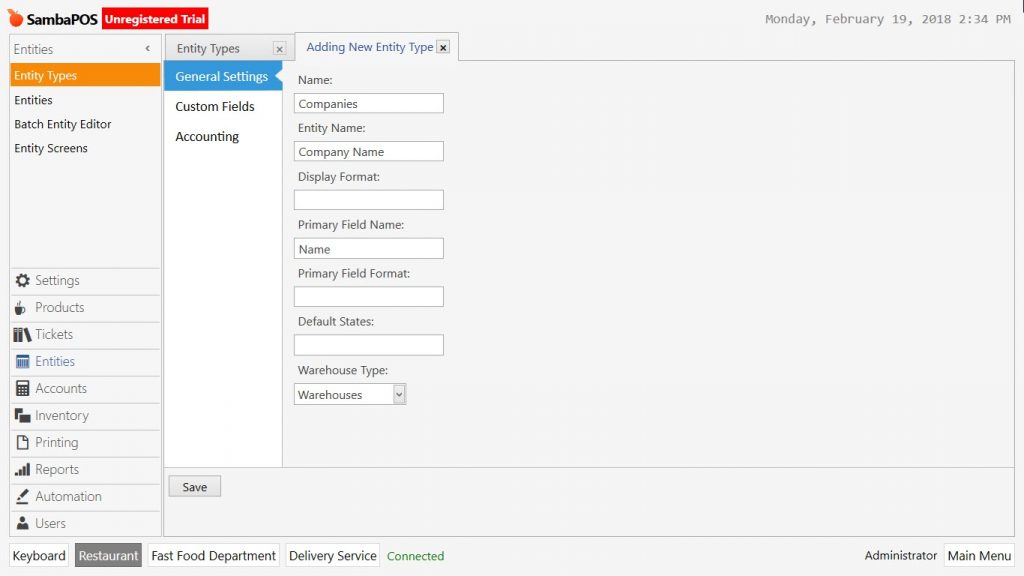
- Name: Write the name of entity type. (For example; Companies)
- Entity Name: Write the name of entity. (For example; Company)
- Primary Field Name: Write name in this field.
- Warehouse Type: Select Warehouses.
Custom Fields Section;
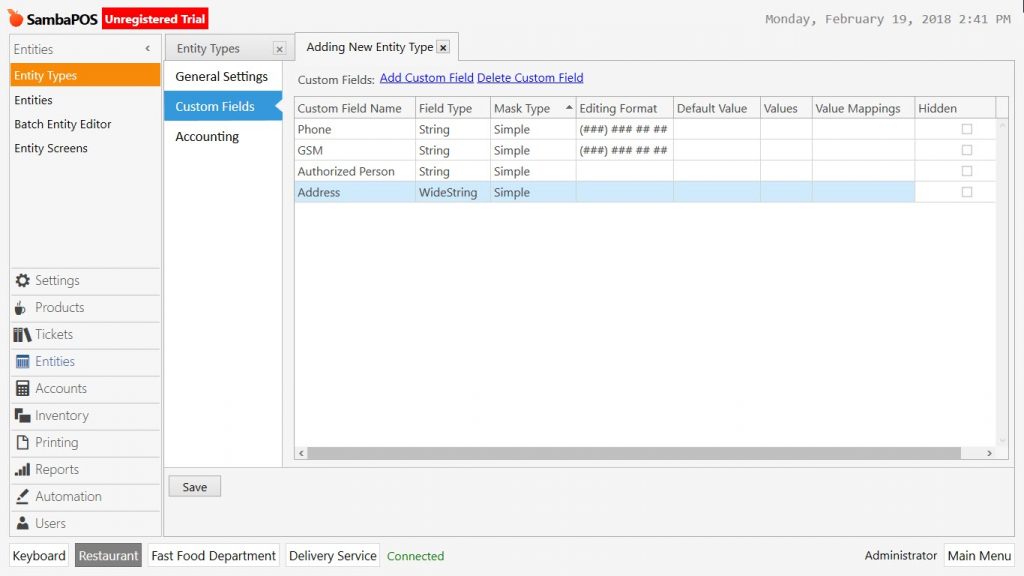
In here create custom fields for companies to save information.
Accounting Section;
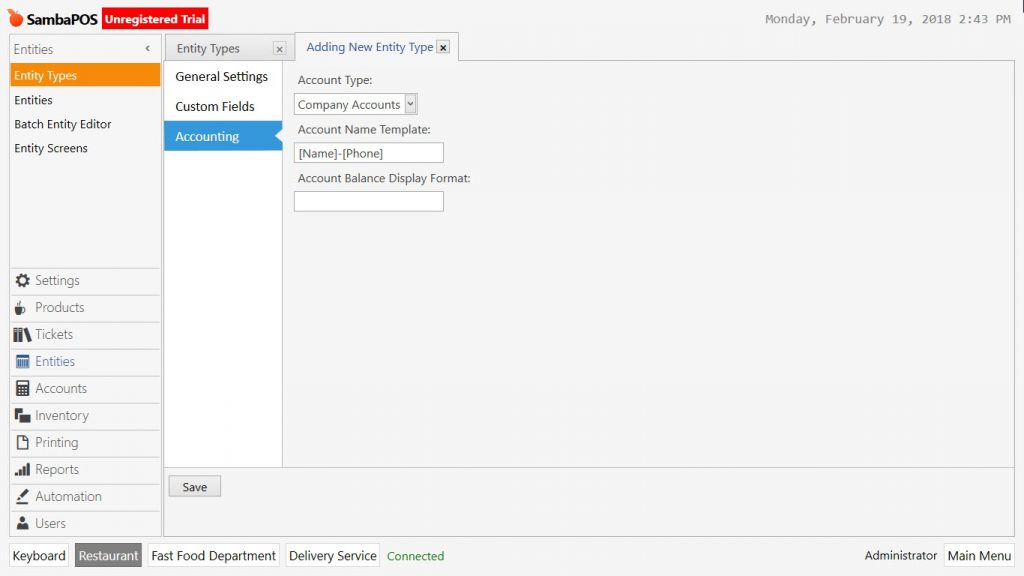
- Account Template: Select Company Accounts template here.
- Account Name Template: Write [Name]-[Phone] in this field.
After completing necessary fields, click on Save button.
Adding Company Entities
Go to Manage > Entities > Entities from here click on Add Entity link.
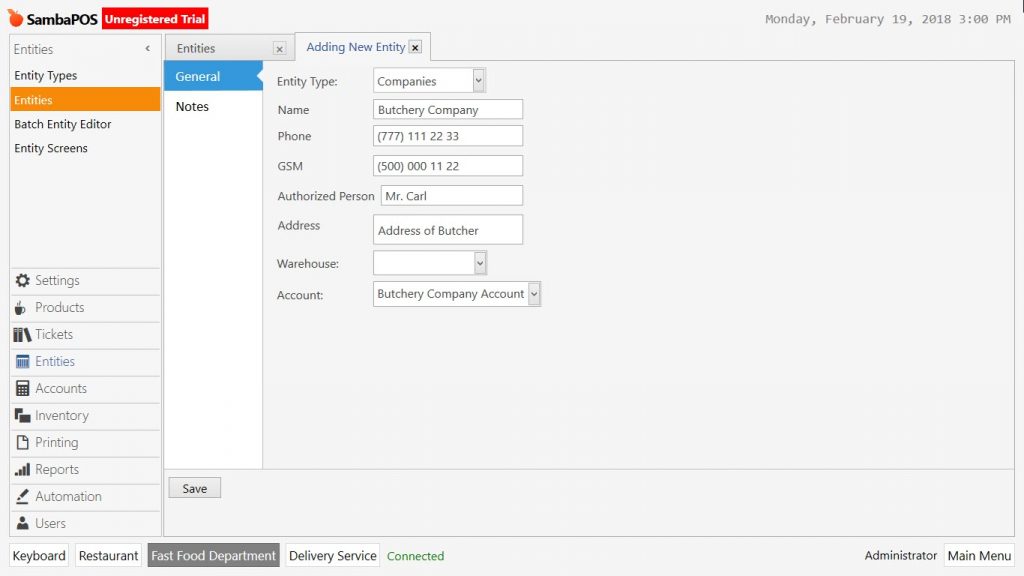
- Entity Type: Select the entity type that created on previous step. (Companies)
- Account: Field to select the account which created for related company. (Butchery Account)
After completing necessary fields, click on Save button. Repeat this process for other companies too.
Note: It is necessary to create Entity and Account for the companies that will be added newly.
Associating the Entity Type to Purchase Documents
When purchasing inventory into the warehouses, some changes are necessary in the purchasing document in order to select the created entity type.
Go to Manage > Inventory > Document Types from here click on purchase transaction and open the editing mode.
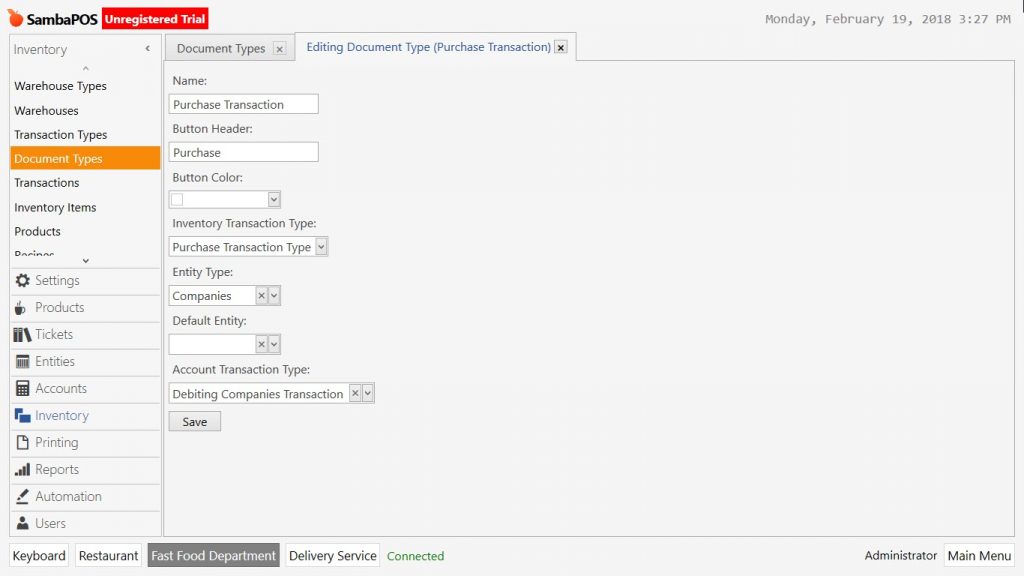
- Entity Type: Select Companies template.
- Account Transaction Type: Select Debiting to Companies Account Transaction template.
After completing necessary fields, click on Save button.