2.2.8.How to Change/Edit Basic Printer Templates?
Printer Templates General Features
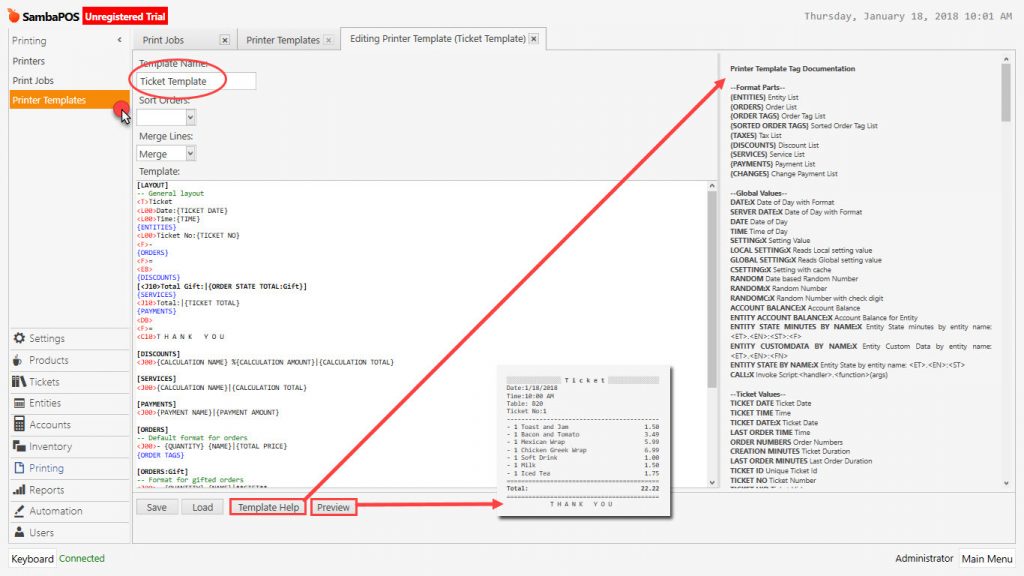
Manage > Settings > Printer Templates

[LAYOUTS] is basic field in printer template which general layout plan is configured. Inside, there are basic ticket information. Check out the screenshot above;
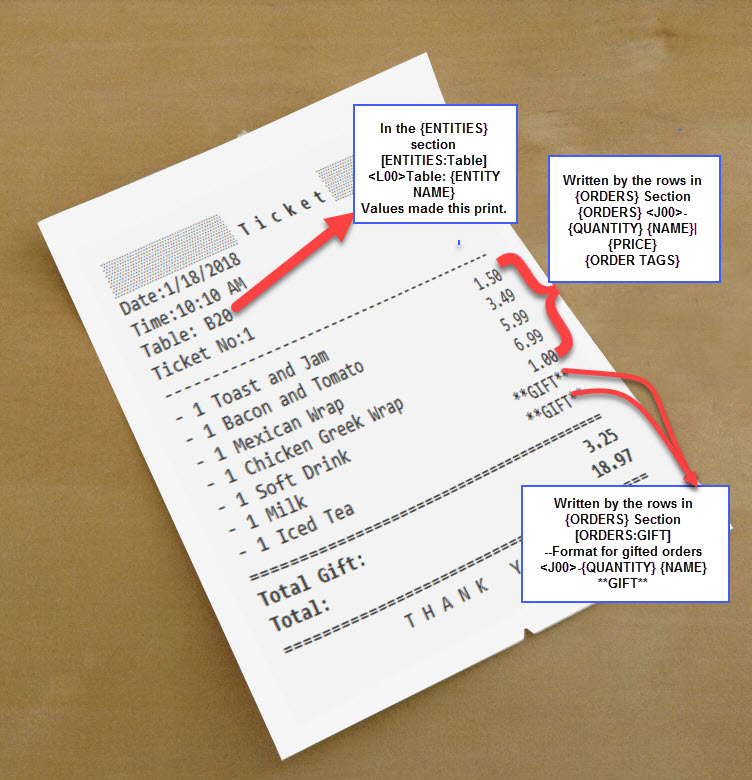
{ENTITIES} is a section in Layouts field. In this row [ENTITIES:Table] and [ENTITIES:Customer] titles are marked by blue arrows. It shows which data will be written under these titles.
{ENTITIES}
[ENTITIES:Table]
–Table Entity Format
<L00>Table: {ENTITY NAME}
[ENTITIES:Customer]
–Customer Entity Format.
<j00>Customer: {ENTITY NAME} | {ENTITY DATA:Phone}
<L00>Address: {ENTITY DATA:Address}
In the same way; {ORDERS} field shows the place where orders will be written. In this example Orders show how to write data fields ( from above to below ) [ORDERS], [ORDERS:Gift], [ORDERS:Void], [ORDER TAGS]
{ORDERS}
–Write the products according to the format which edited under the tag titles.
[ORDERS]
— Default Template view for Orders.
<J00>- {QUANTITY} {NAME} |{TOTAL PRICE}
{ORDER TAGS}
[ORDERS:Gift]
— Format for gifted orders
<J00>- {QUANTITY} {NAME}|**GIFT**
{ORDER TAGS}
[ORDERS:Void]
— Nothing will print for void lines
[ORDER TAGS]
— Format for order tags
By using default template like above we get a such output.
[LAYOUT]
-- General layout
<T>Ticket
<L00>Date:{TICKET DATE}
<L00>Time:{TIME}
{ENTITIES}
<L00>Ticket No:{TICKET NO}
<F>-
{ORDERS}
<F>=
<EB>
{DISCOUNTS}
[<J10>Total Gifts:|{ORDER STATE TOTAL:Gifts}]
{SERVICES}
<J10>Total:|{TICKET TOTAL}
{PAYMENTS}
<DB>
<F>=
<C10>T H A N K Y O U
[DISCOUNTS]
<J00>{CALCULATION NAME} %{CALCULATION AMOUNT}|{CALCULATION TOTAL}
[SERVICES]
<J00>{CALCULATION NAME}|{CALCULATION TOTAL}
[PAYMENTS]
<J00>{PAYMENT NAME}|{PAYMENT AMOUNT}
[ORDERS]
-- Default format for orders
<J00>- {QUANTITY} {NAME}|{TOTAL PRICE}
{ORDER TAGS}
[ORDERS:Gift]
-- Format for gifted orders
<J00>- {QUANTITY} {NAME}|**GIFT**
{ORDER TAGS}
[ORDERS:Void]
-- Nothing will print for void lines
[ORDER TAGS]
-- Format for order tags
<J00> * {ORDER TAG NAME} | {ORDER TAG PRICE}
[ENTITIES:Table]
-- Table entity format
<L00>Table: {ENTITY NAME}
[ENTITIES:Customer]
-- Customer entity format
<J00>Customer: {ENTITY NAME} | {ENTITY DATA:Phone}
General Sections that can be found in a sample Template;
-
{ENTITIES} Entity List
-
{ORDERS} Order List
-
{ORDER TAGS}Order Tag List
-
{TAXES} Taxes List
-
{DISCOUNTS} Discount List
-
{SERVICES} Service List
-
{PAYMENTS} Payment List
-
{CHANGES} Change Payment List
All the values which can be found in each section above, are given on the right column in the template screens.
– Nothing will print for void lines, like this rows are information rows, they start with double ( – ) sign and they will be ignored in the output. When you designing the template it’s used for information that you want to remember later on. Your printers ignore these rows.
In front of values between <> symbols are used for definiton of format for that row’s sentence. For example <L00> means print as Left aligned, font height:0, font width:0 After the symbol first digit indicates height of font and second digit indicates width of font.
Below there are other tags that can be used:
| Tag | Meaning |
|---|---|
| <T> | Title; Allows you to write title Left and Right with period. |
| <F> | Full ; Allows you to write the character after itself during the whole row . For example when you write <F> * it writes until end of row. Usually it is used for drawing – |
| <L> | Left; Allows you to write that row as Left aligned. |
| <R> | Right; Allows you to write that row as Right aligned. |
| <C> | Center; Allows you to write that row as centric. |
| <J> | Justify; Fits the sentence into the row. |
| <W> | Wait; Allows you to make waiting between sending data especially on HUGIN Fiscal Printer. Each <W> makes wait 10 milliseconds. If you write as <W><W><W> then it gives 30 milliseconds waiting. |
| <BEEP> | Usually added at the end of Ticket Template. If printer has audible alarm feature, when printing finished, it warns with audio. |
| <BMP> | By giving together with path of Bmp extension picture file allows you to add to the printing Example;<BMP>c:\Logo.bmp |