4.32. How to Separate Food and Drinks on Kitchen Display?
In this document, it will be explained how to show Food and Drinks on different kitchen screens.
1. Adding Necessary Components
1.1. Adding Product Tag Caption
Go to Main Menu > Manage > Settings > Program Settings > in here type productType into Product Tag Caption field.
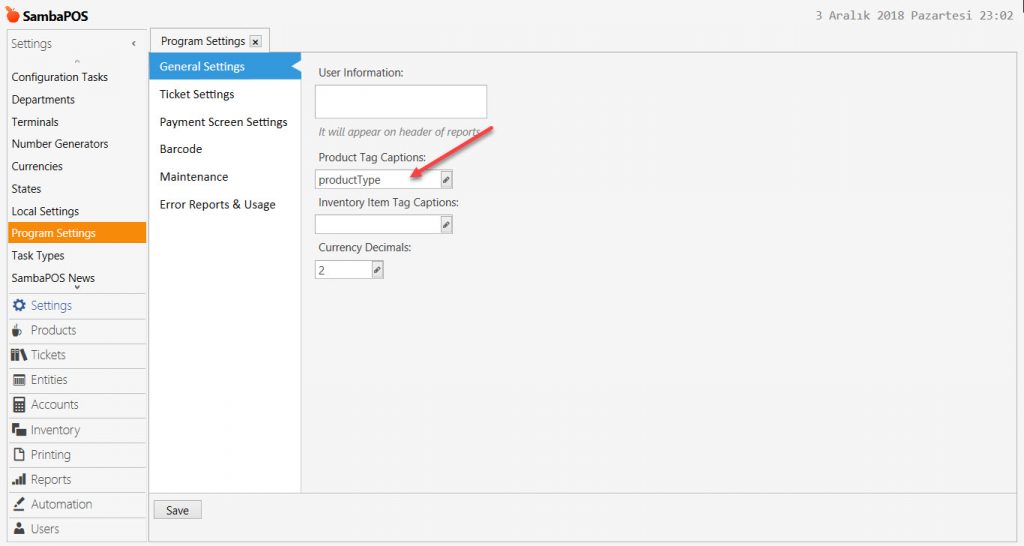
After completing necessary editings, click on Save button.
1.2. Editing Product Tag Editor
Main Menu > Manage > Products > Product Tag Editor > here into the productType column write Food for Foods and Drink for Drinks.
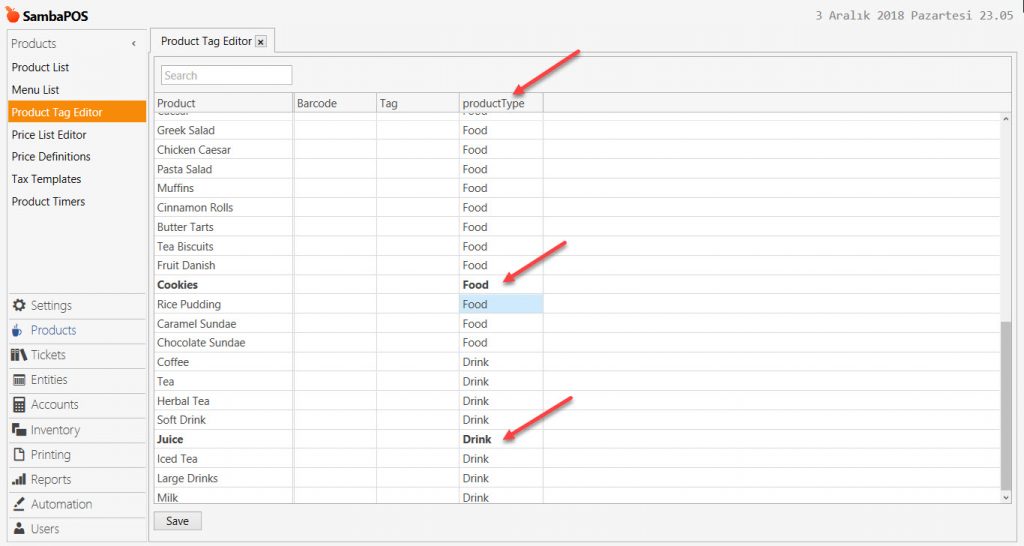
After completing necessary editings, click on Save button.
1.3. Adding Tasks
1.3.1. Adding Drink Task
Main Menu > Manage > Settings > Task Types > here clik on Add Task Type.
Name: KD Task GUI - Drink
After completing necessary editings, click on Save button.
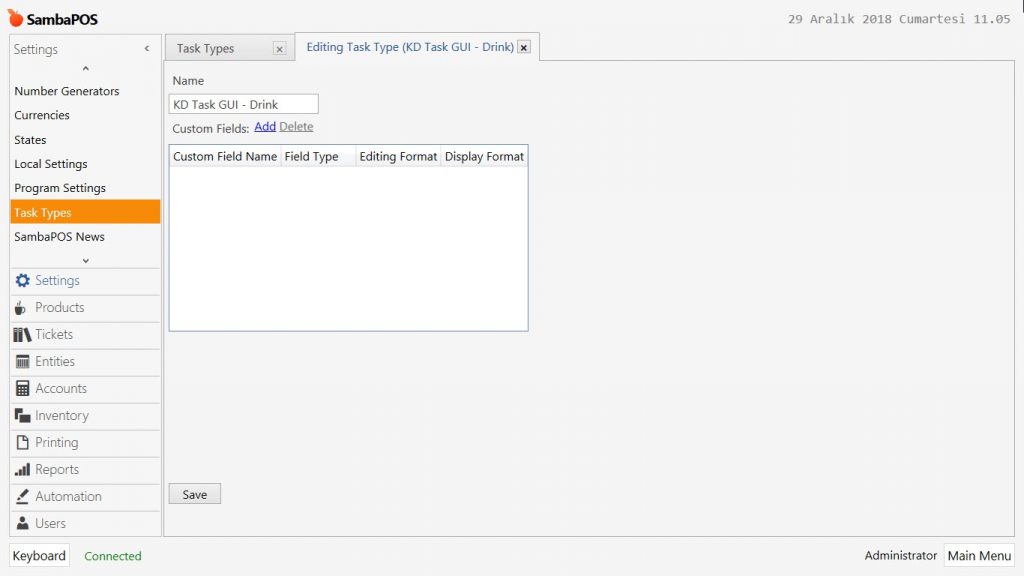
1.3.2. Adding Food Task
Main Menu > Manage > Settings > Task Types > here clik on Add Task Type.
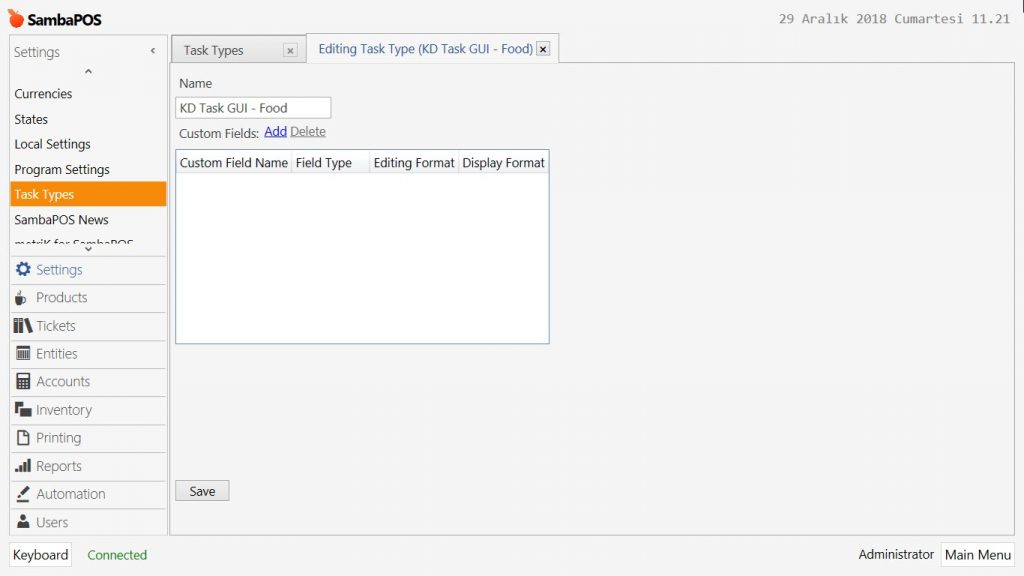
Name: KD Task GUI - Food
After completing necessary editings, click on Save button.
1.4. Adding Entity Screens
1.4.1. Adding Food Entity Screen
Main Menu > Manage > Entities > Entity Screens > here, click on Add Entity Screen.
General Settings Section;
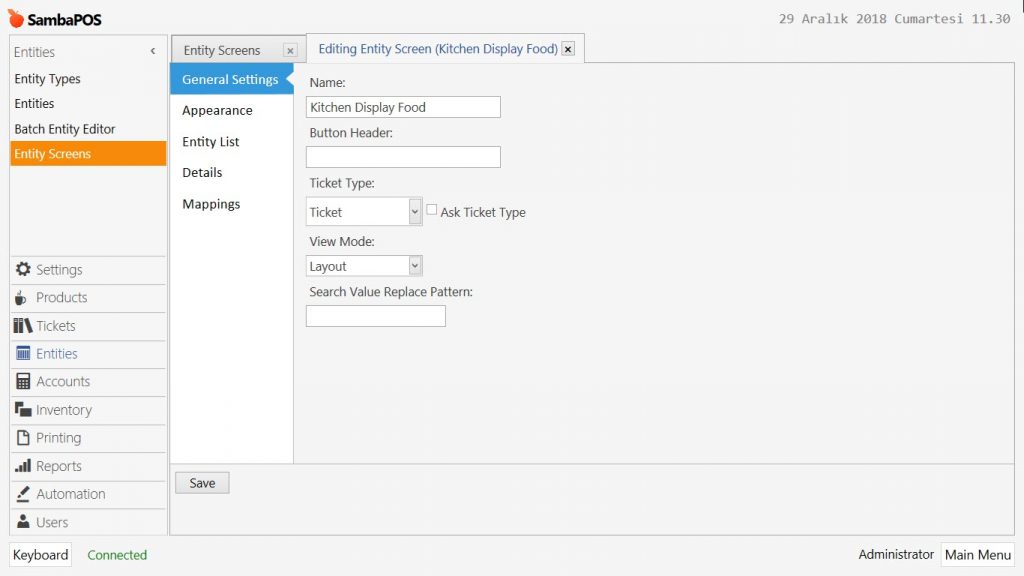
Name: Kitchen Display Food
Ticket Type: Ticket
View Mode: Layout
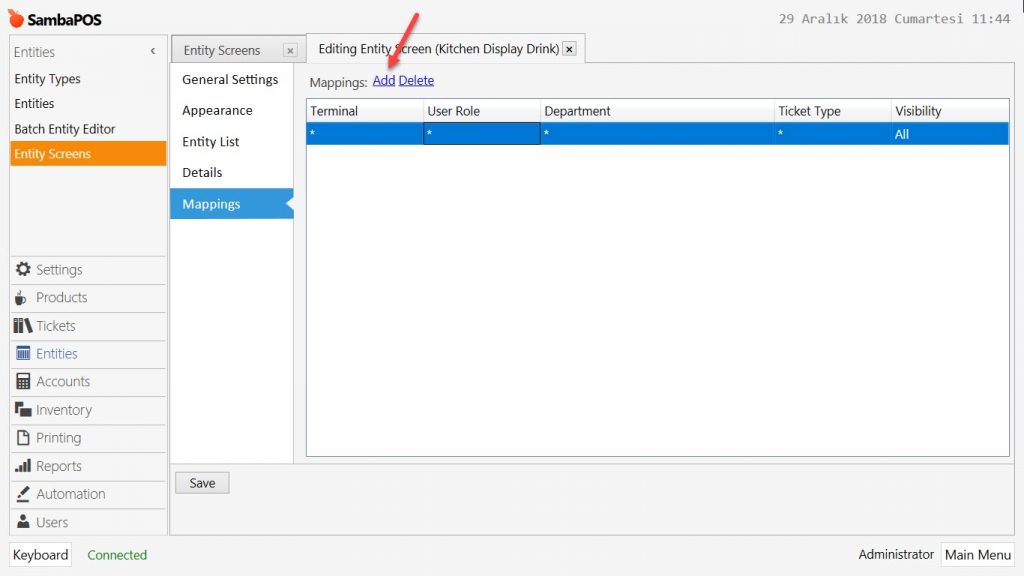
Mappings Section;
Add a line by clicking on Add and configure the settings according to below image.
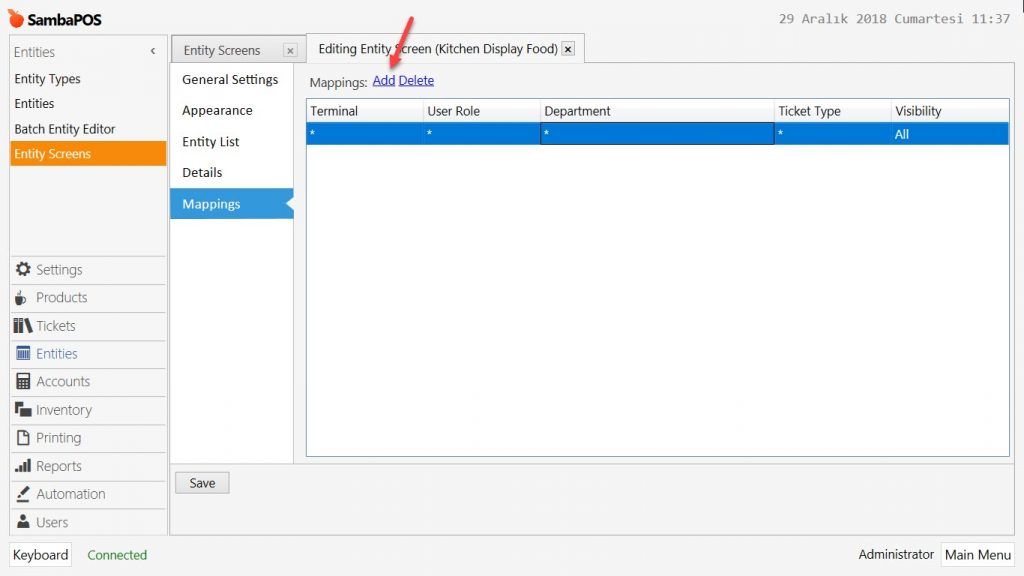
After completing necessary editings, click on Save button.
1.4.2. Adding Drink Entity Screen
Main Menu > Manage > Entities > Entity Screens > here, click on Add Entity Screen.
General Settings Section;

Name: Kitchen Display Drink
Ticket Type: Ticket
View Mode: Layout
Mappings Section;
Add a line by clicking on Add and configure the settings according to below image.
After completing necessary editings, click on Save button.
1.5. Editing Entity Screens
1.5.1. Editing Foods Entity Screen
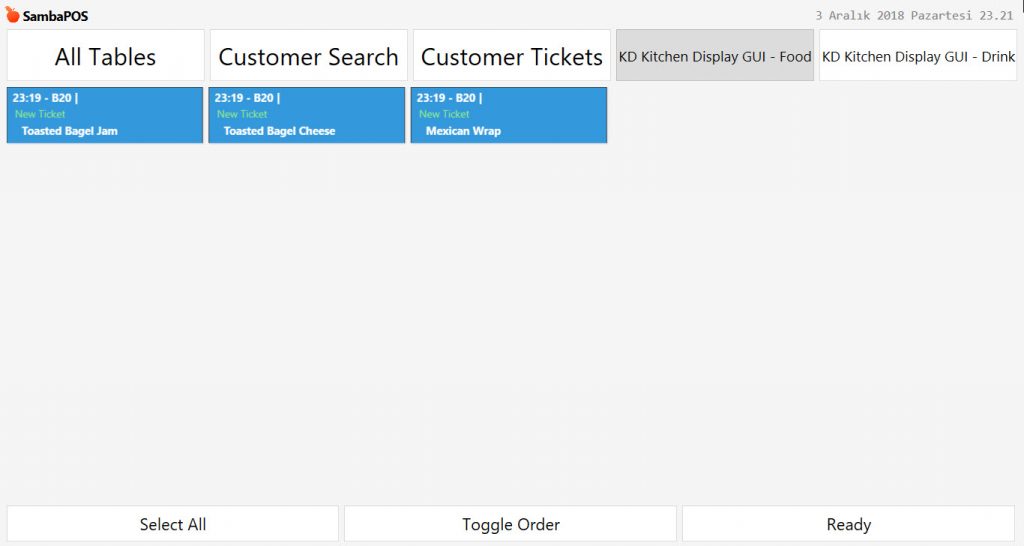
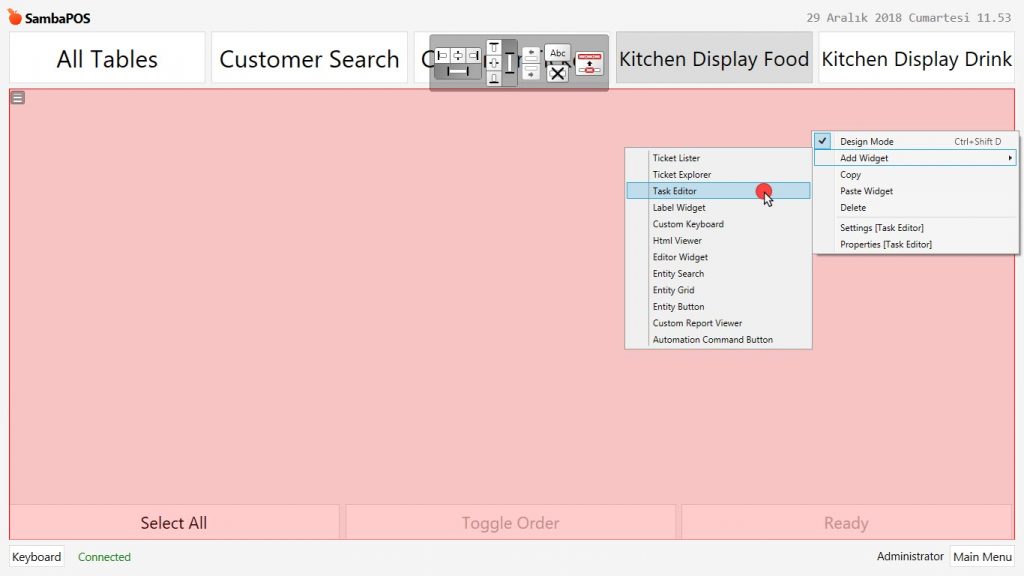
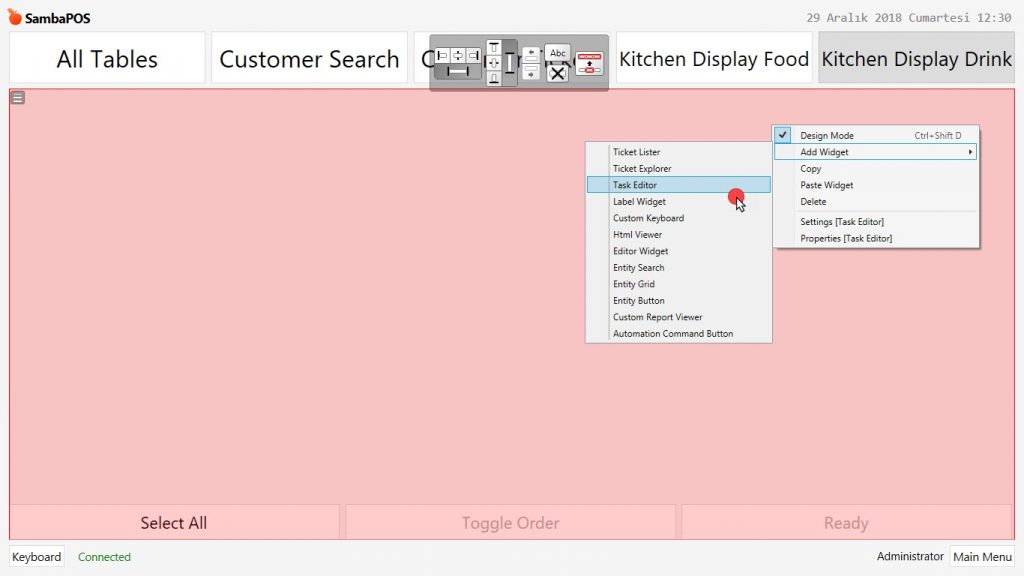
Main Menu > POS > Kitchen Screen Food > When you are on this screen, right click on mouse and activate the Design Mode again right click on mouse, select Add Widget and then select Task Editor.
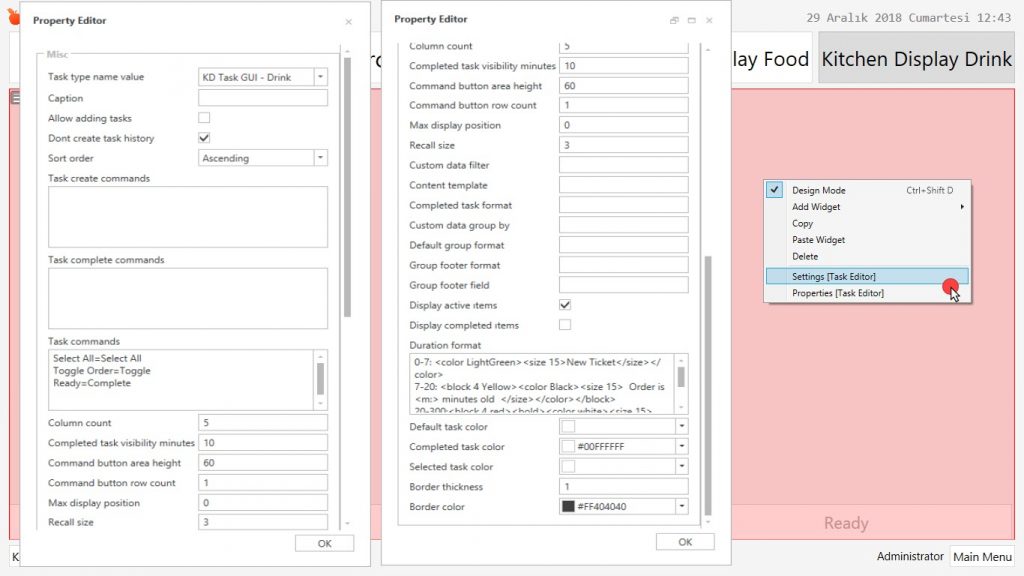
When the Design Mode is active, select Task Editor, right click on mouse and select Settings and configure it as shown in the below image.
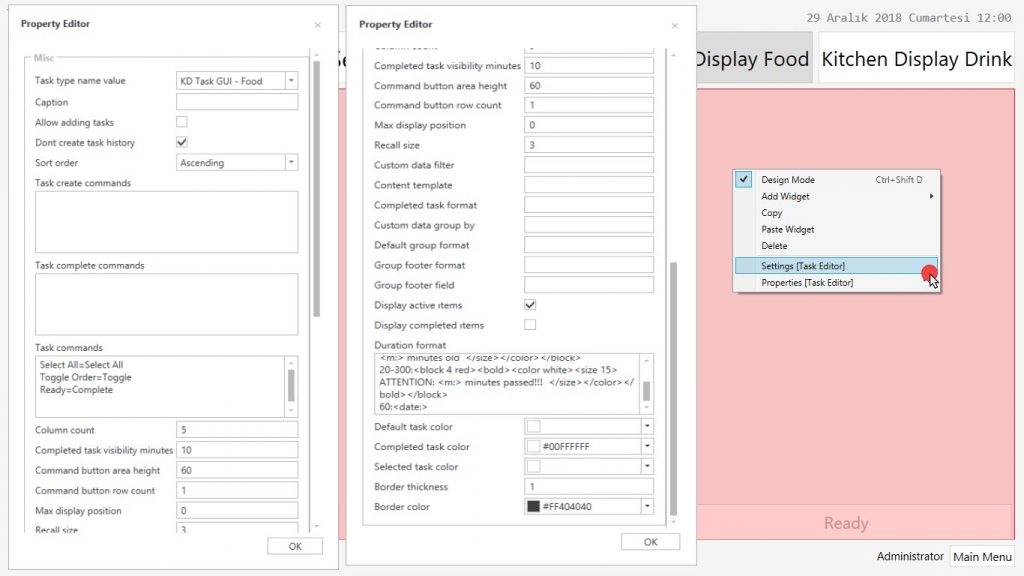
Task Type Name Value: KD Task GUI - Food
Don’t Create Task History: Must be selected.
Sort Order: Ascending
Task Commands:
Select All=Select All
Toggle Order=Toggle
Ready=Complete
Display Active Items: Must be selected.
Duration Format:
0-7: <color LightGreen><size 15>New Ticket</size></color> |
Completed Task Color: #00FFFFFF
Border Color: #FF404040
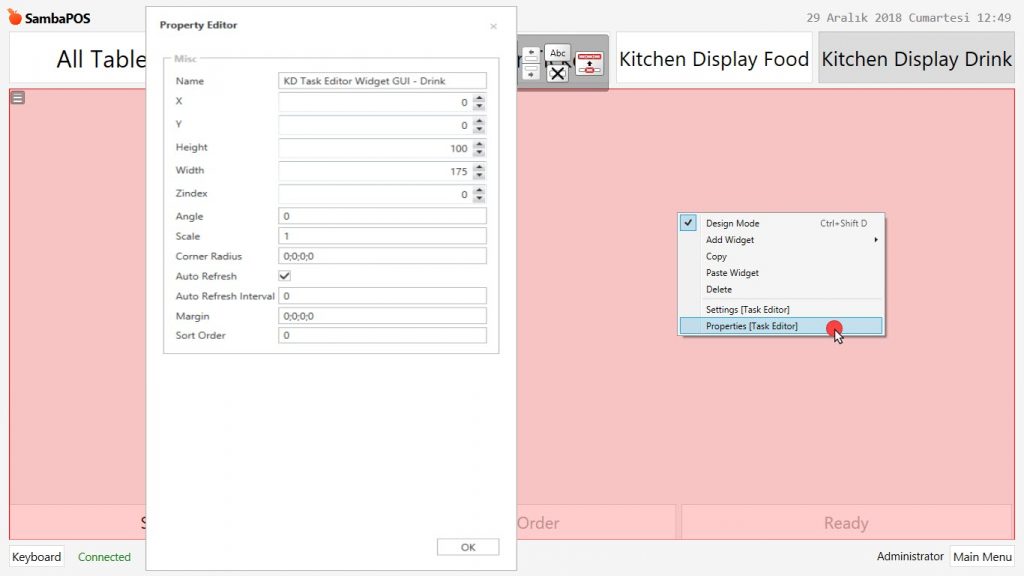
When the Design Mode is active, select Task Editor, right click mouse and select Properties and then configure settings as shown in the below image.
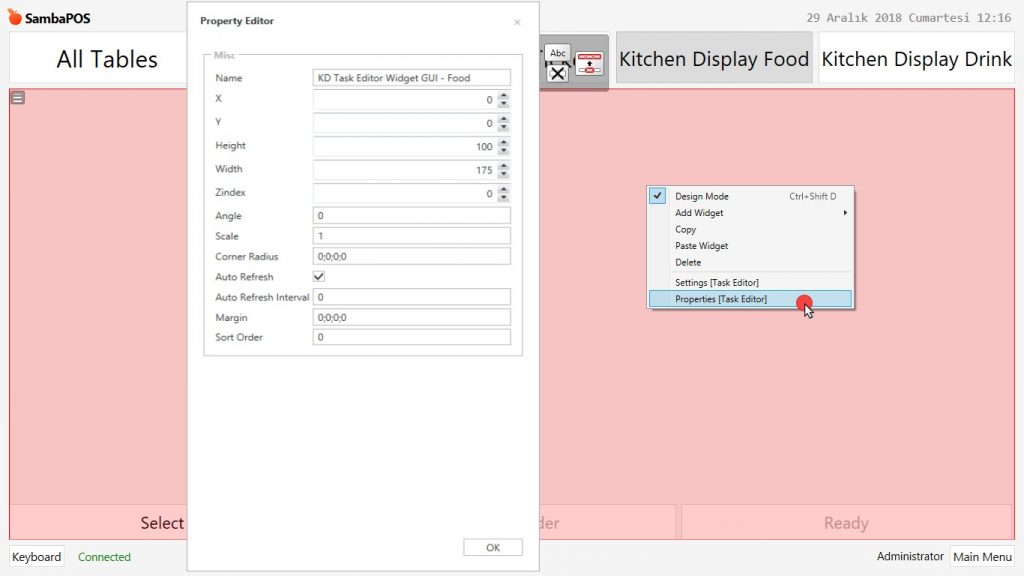
Name: KD Task Editor Widget GUI - Food
1.5.2. Editing Drinks Entity Screen
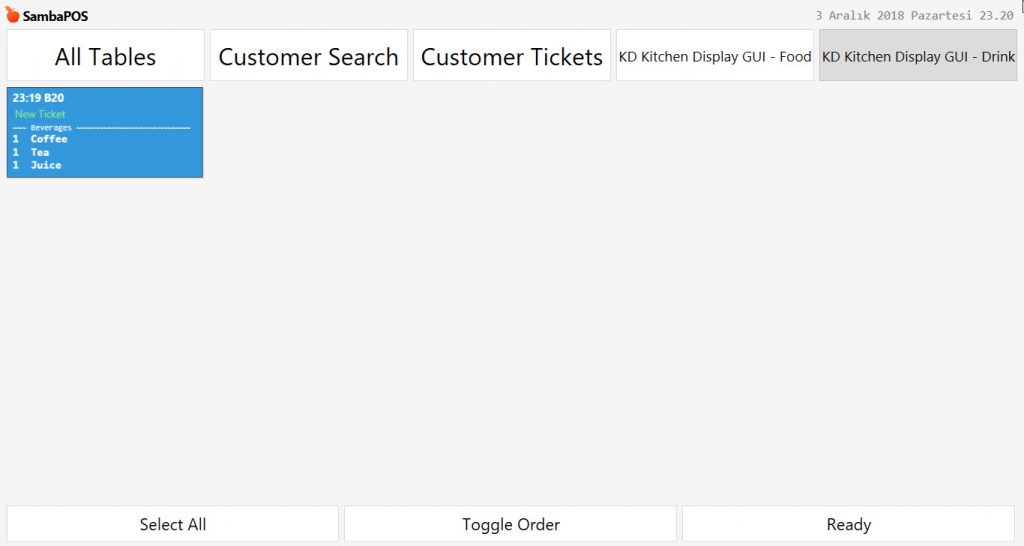
Main Menu > POS > Kitchen Screen Drink > When you are on this screen, right click on mouse and activate the Design Mode again right click on mouse, select Add Widget and then select Task Editor.
When the Design Mode is active, select Task Editor, right click on mouse and select Settings and configure it as shown in the below image.
Task Type Name Value: KD Task GUI - Drink
Don’t Create Task History: Must be selected.
Sort Order: Ascending
Task Commands:
Select All=Select All
Toggle Order=Toggle
Ready=Complete
Display Active Items: Must be selected.
Duration Format:
0-7: <color LightGreen><size 15>New Ticket</size></color> |
Completed Task Color: #00FFFFFF
Border Color: #FF404040
When the Design Mode is active, select Task Editor, right click mouse and select Properties and then configure settings as shown in the below image.
Name: KD Task Editor Widget GUI - Drink
1.6. Adding Printers
1.6.1. Adding Food Printer
Main Menu > Manage > Printing > Printers > here, click on Add Printer.
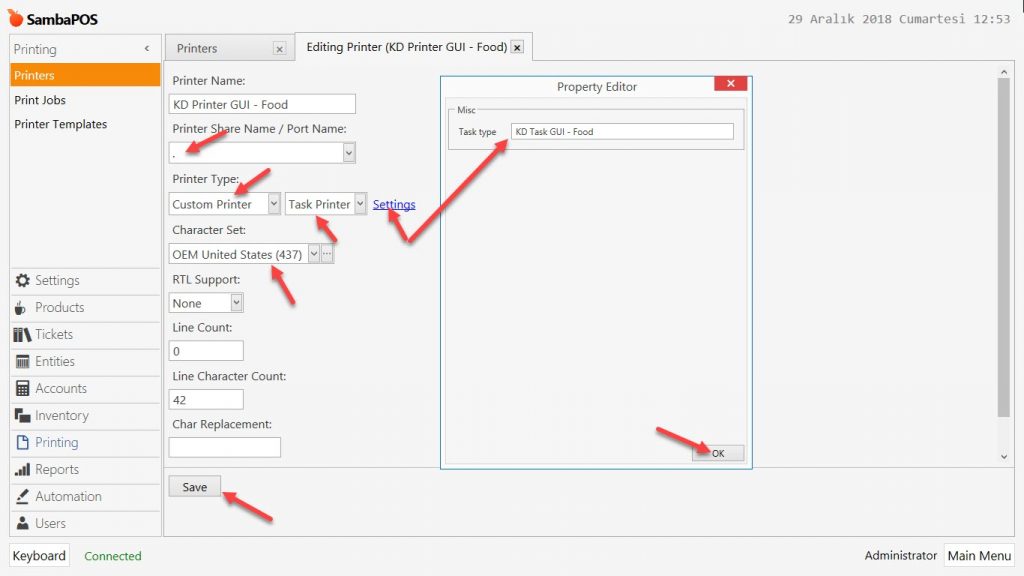
Printer Name: KD Printer GUI - Food
Printer Share Name / Port Name: . (Period)
Printer Type: Custom Printer / Task Printer
In here click on Settings and write into field KD Task GUI - Food
After completing necessary editings, click on Save button.
1.6.2. Adding Drink Printer
Main Menu > Manage > Printing > Printers > here, click on Add Printer.
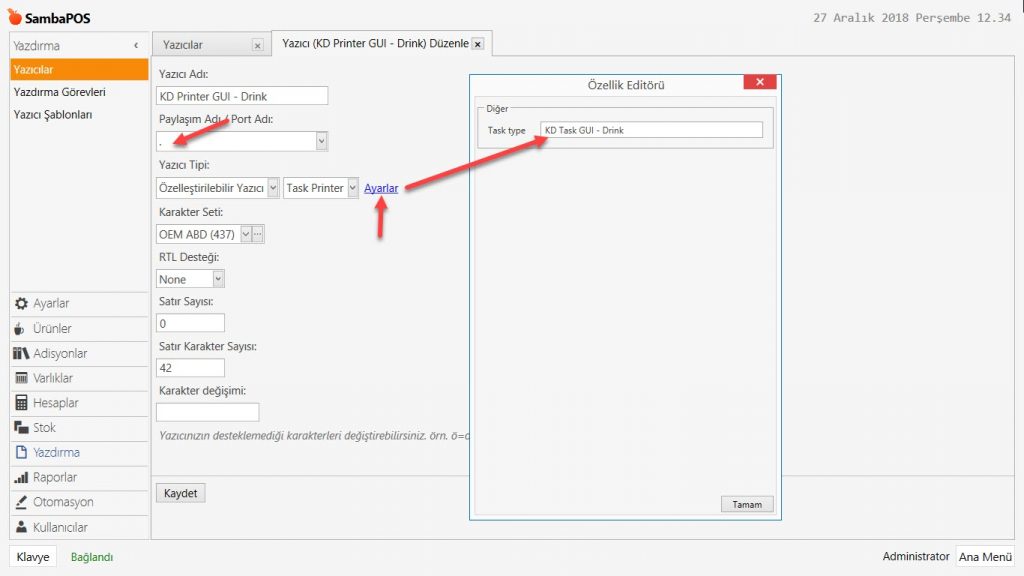
Printer Name: KD Printer GUI - Drink
Printer Share Name / Port Name: . (Period)
Printer Type: Custom Printer / Task Printer
In here click on Settings and write into field KD Task GUI - Drink
After completing necessary editings, click on Save button.
1.7. Adding Printer Templates
1.7.1. Adding Food Printer Template
Main Menu > Manage > Printing > Printer Templates > here, click on Add Printer Template.
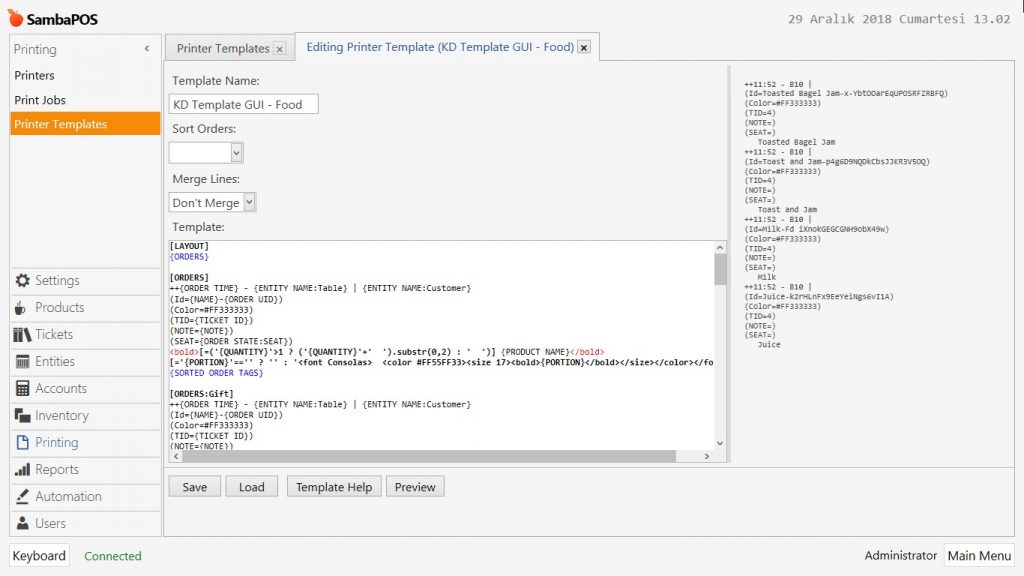
Template Name: KD Template GUI - Food
Sort Orders: Blank
Merge Lines: Don’t Merge
Template:
Copy below code group and paste it into Template field;
[LAYOUT]{ORDERS}
|
After completing necessary editings, click on Save button.
1.7.2. Adding Drink Printer Template
Main Menu > Manage > Printing > Printer Templates > here, click on Add Printer Template.
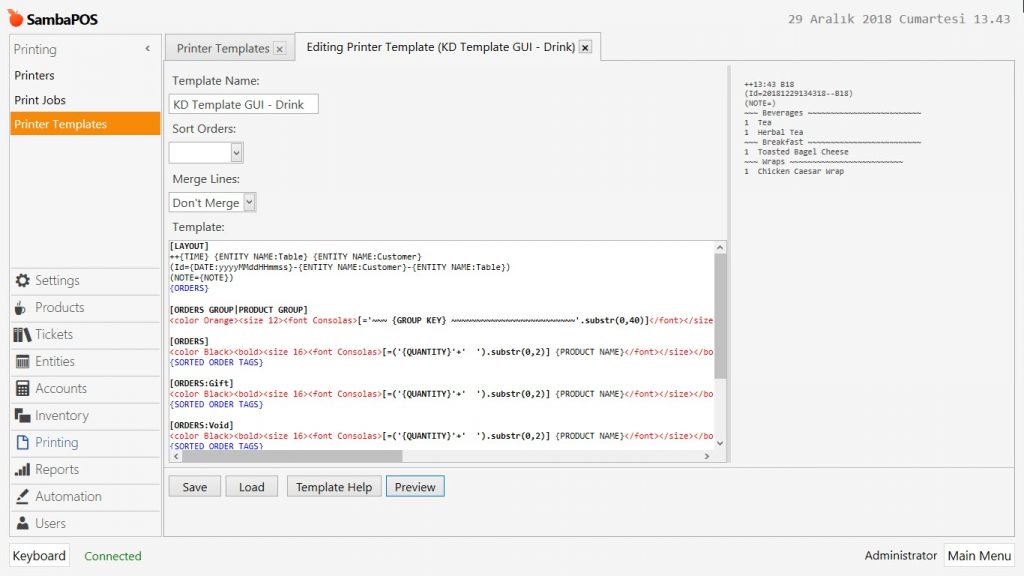
Template Name: KD Template GUI - Drink
Sort Orders: Blank
Merge Lines: Don’t Merge
Template:
Copy below code group and paste it into Template field;
[LAYOUT][ORDERS GROUP|PRODUCT GROUP]
|
After completing necessary editings, click on Save button.
1.8. Adding Print Job
Main Menu > Manage > Printing > Printing Jobs > here, click on Add Printing Job.
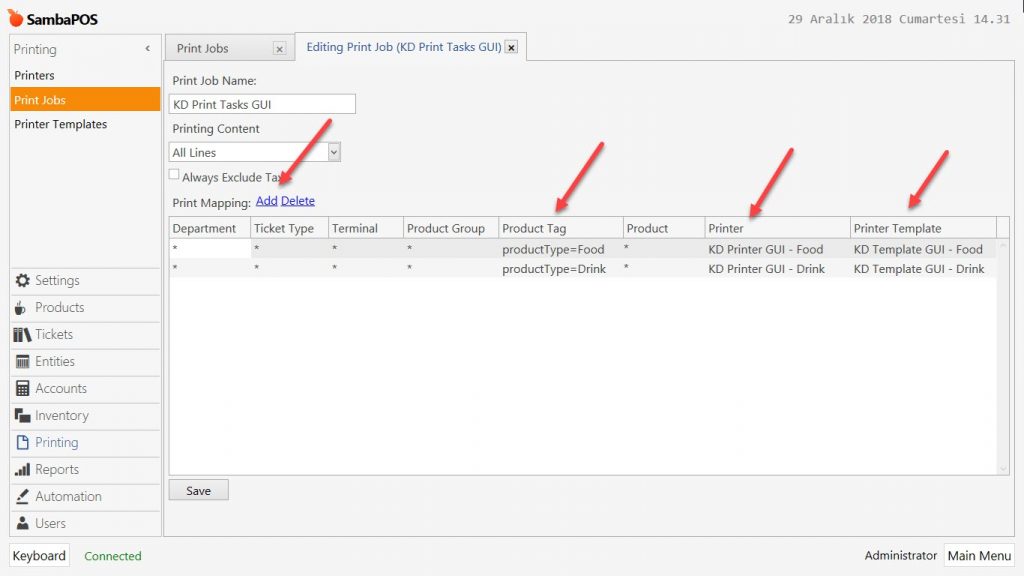
Print Job Name: KD Print Tasks GUI
Printing Content: All Lines
Add 2 lines by clicking on Add and configure settings according to above image.
Product Type Column:
For Line 1: productType=Food
For Line 2: productType=Drink
After completing necessary editings, click on Save button.
1.9. Adding Automation Command
Main Menu > Manage > Automation > Automation Commands > here, click on Add Automation Command.
General Settings Section;
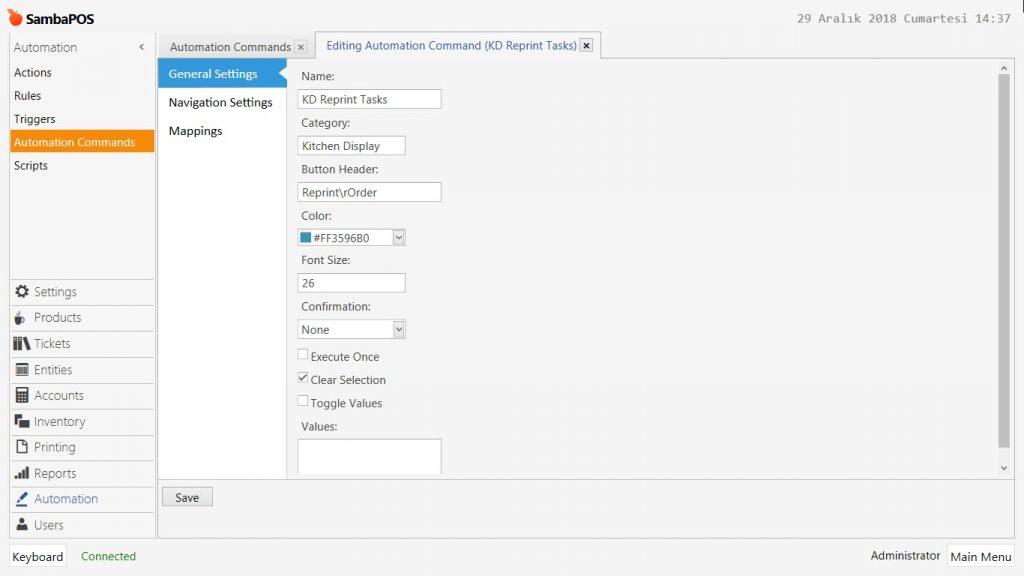
Name: KD Reprint Tasks
Category: Kitchen Display
Button Header: Reprint\rOrder
Clear Selection: Must be selected.
Mappings Section;
In here, add a line by clicking on Add and configure the settings as shown in below image.
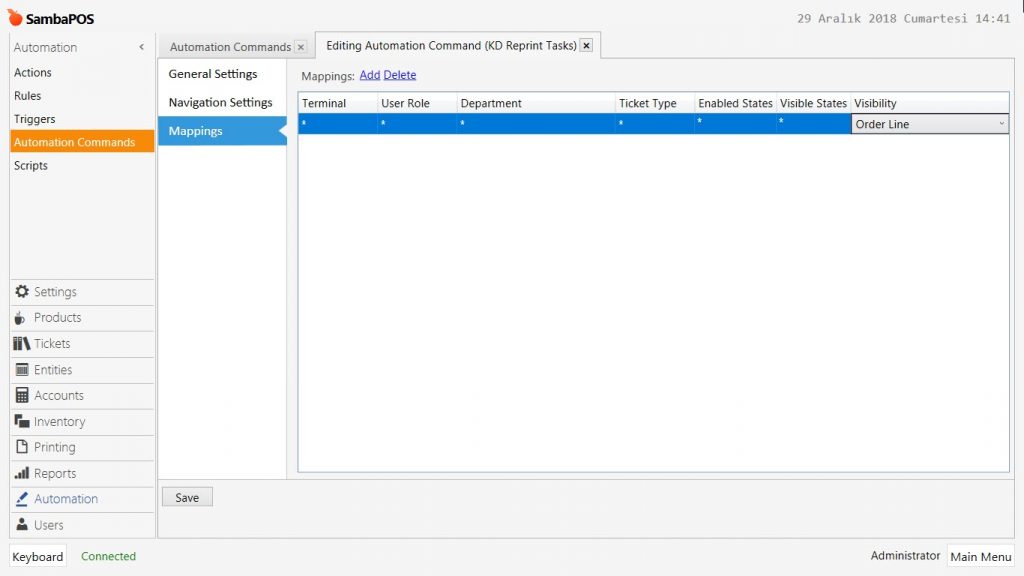
Visibility: Order Line
After completing necessary editings, click on Save button.
2. Adding Actions
2.1. Adding Execute Print Job GUI Action
Main Menu > Manage > Automation > Actions > here, click on Add Action.
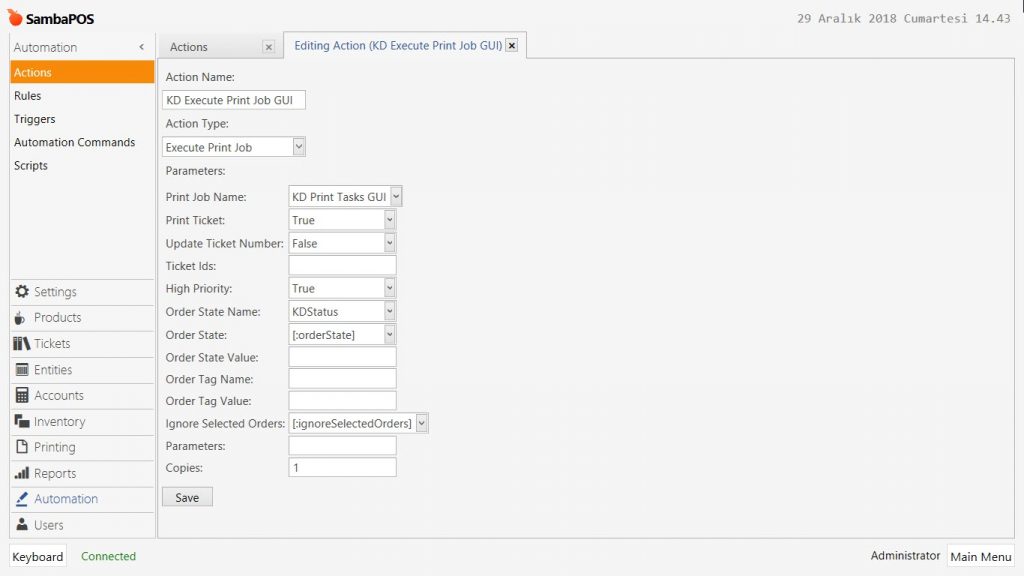
Action Name: KD Execute Print Job GUI
Action Type: Execute Print Job
Parameters:
Print Job Name: KD Print Tasks GUI
Print Ticket: True
Update Ticket Number: False
High Priority: True
Order State Name: KDStatus
Order State: [:orderState]
IgnorecSelectedcOrders: [:ignoreSelectedOrders]
Copy: 1
After completing necessary editings, click on Save button.
2.2. Adding Show Screen Action
Main Menu > Manage > Automation > Actions > here, click on Add Action.
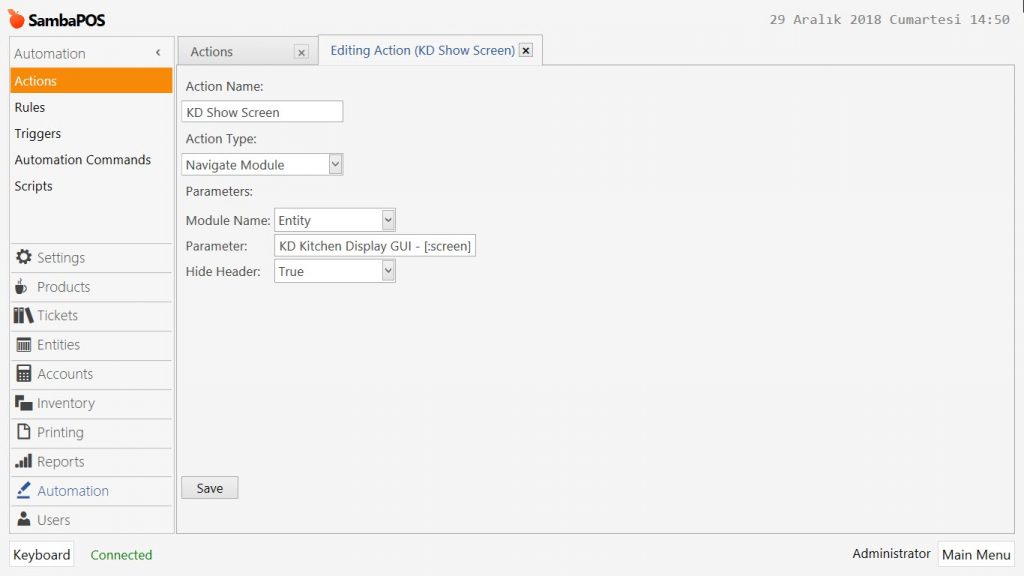
Eylem Adı: KD Show Screen
Eylem Tipi: Navigate Module
Parameteters:
Module Name: Entity
Parameter: KD Kitchen Display GUI - [:screen]
Hide Header: True
After completing necessary editings, click on Save button.
2.3. Adding Refresh Widgets Action
Main Menu > Manage > Automation > Actions > here, click on Add Action.
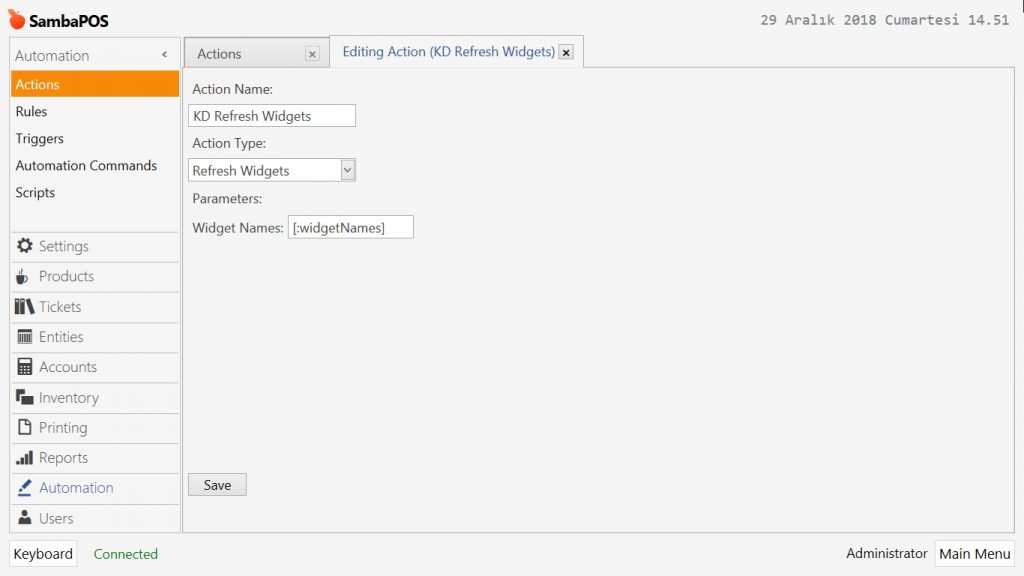
Action Name: KD Refresh Widgets
Action Type: Refresh Widgets
Parameters: [:widgetNames]
After completing necessary editings, click on Save button.
2.4. Adding Update Order State KDStatus Action
Main Menu > Manage > Automation > Actions > here, click on Add Action.
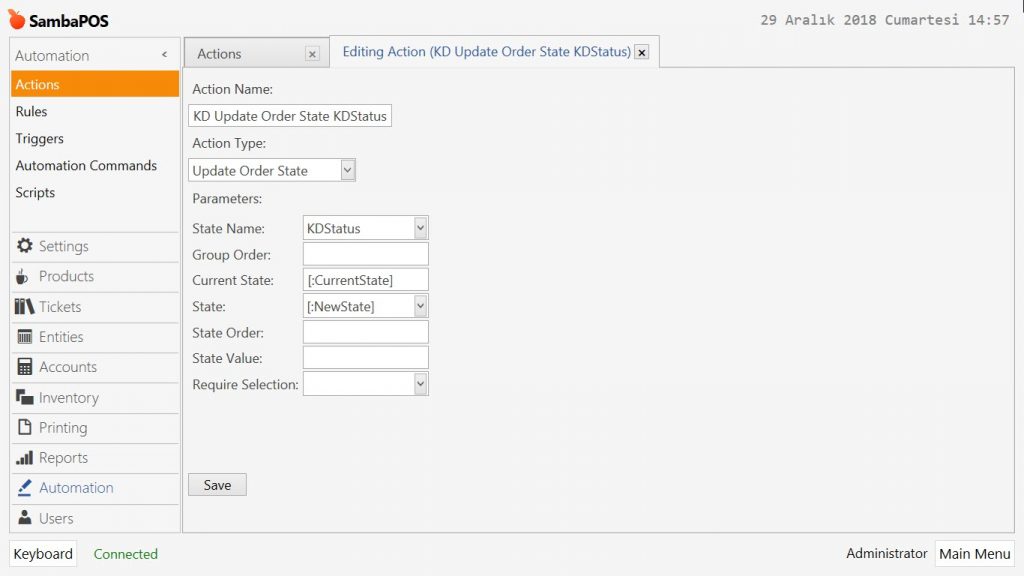
Action Name: KD Update Order State KDStatus
Action Type: Update Order State
Parameters:
State Name: KDStatus
Current State: [:CurrentState]
State: [:NewState]
After completing necessary editings, click on Save button.
3. Adding Rules
3.1. Adding Show Screen Rule
Main Menu > Manage > Automation > Rules > here, click on Add Rule.
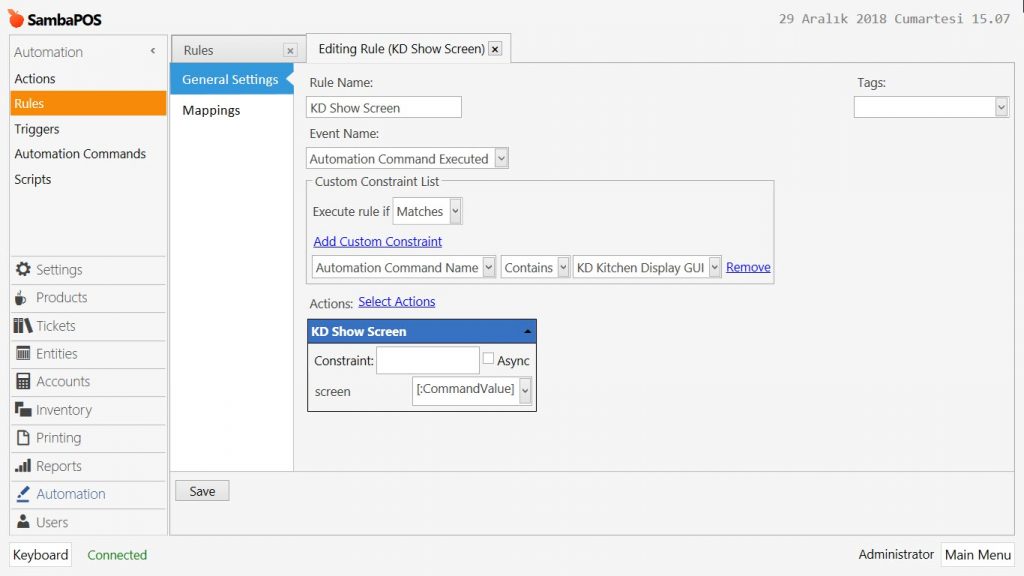
Rule Name: KD Show Screen
Event Name: Automation Command Executed
Execute Rule If: Matches
Add Custom Constraint:
Automation Command Name|Contains|KD Kitchen Display GUI
Select Action:
Action: KD Show Screen
screen: [:CommandValue]
After completing necessary editings, click on Save button.
3.2. Adding Void or Cancel Void – Set KDStatus to NotPrinted Rule
Main Menu > Manage > Automation > Rules > here, click on Add Rule.
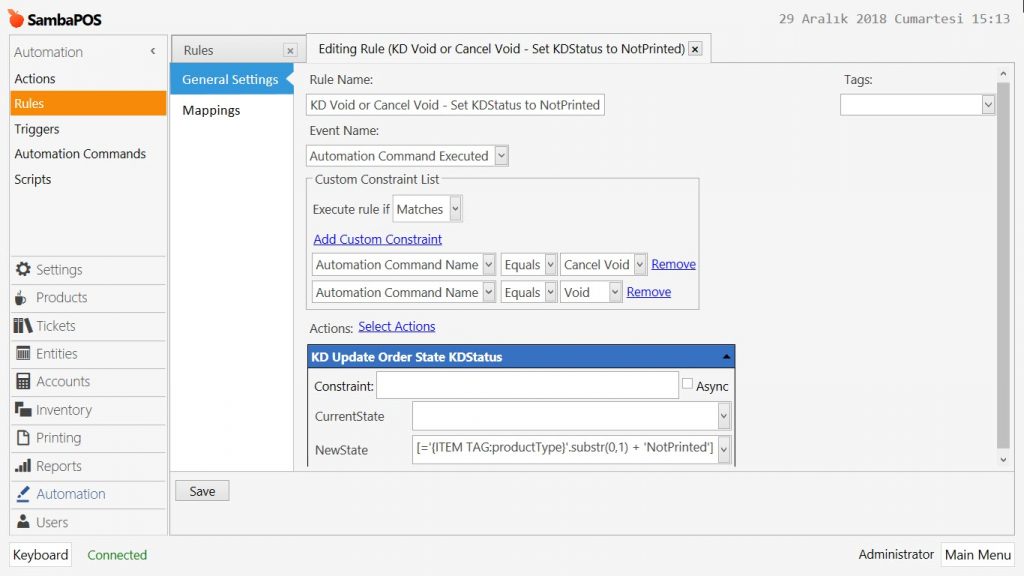
Rule Name: KD Void or Cancel Void – Set KDStatus to NotPrinted
Event Name: Automation Command Executed
Execute Rule If: Matches
Add Custom Constraint:
Automation Command Name|Equals|Cancel Void
Automation Command Name|Equals|Void
Select Actions:
Action: KD Update Order KDStatus
NewState: [='{ITEM TAG:productType}'.substr(0,1) + 'NotPrinted']
After completing necessary editings, click on Save button.
3.3. Adding Reprint Tasks Rule
Main Menu > Manage > Automation > Rules > here, click on Add Rule.
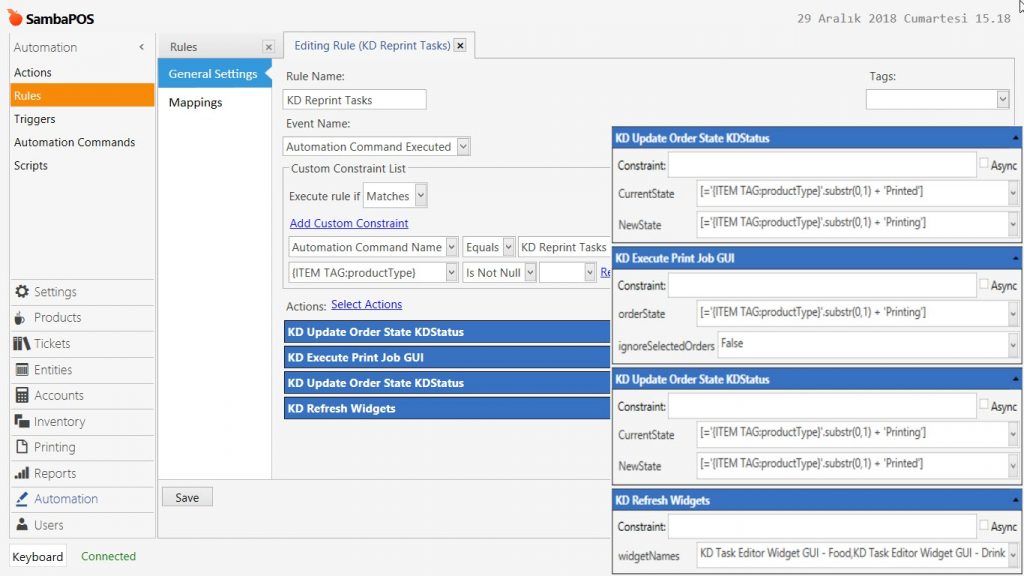
Rule Name: KD Reprint Tasks
Event Name: Automation Command Executed
Execute Rule If: Matches
Add Custom Constraint:
Automation Command Name|Equals|KD Reprint Tasks
{ITEM TAG:productType}|Is Not Null|
Select Actions:
Action-1: KD Update Order State KDStatus
CurrentState: [='{ITEM TAG:productType}'.substr(0,1) + 'Printed']
NewState: [='{ITEM TAG:productType}'.substr(0,1) + 'Printing']
Action-2: KD Execute Print Job GUI
orderState: [='{ITEM TAG:productType}'.substr(0,1) + 'Printing']
IgnoreSelected Orders: False
Action-3: KD Update Order State KDStatus
CurrentState: [='{ITEM TAG:productType}'.substr(0,1) + 'Printing']
NewState: [='{ITEM TAG:productType}'.substr(0,1) + 'Printed']
Action-4: KD Rehfresh Widgets
widgetNames: KD Task Editor Widget GUI - Food,KD Task Editor Widget GUI - Drink
After completing necessary editings, click on Save button.
3.4. Adding Set KDStatus to Printing Rule
Main Menu > Manage > Automation > Rules > here, click on Add Rule.
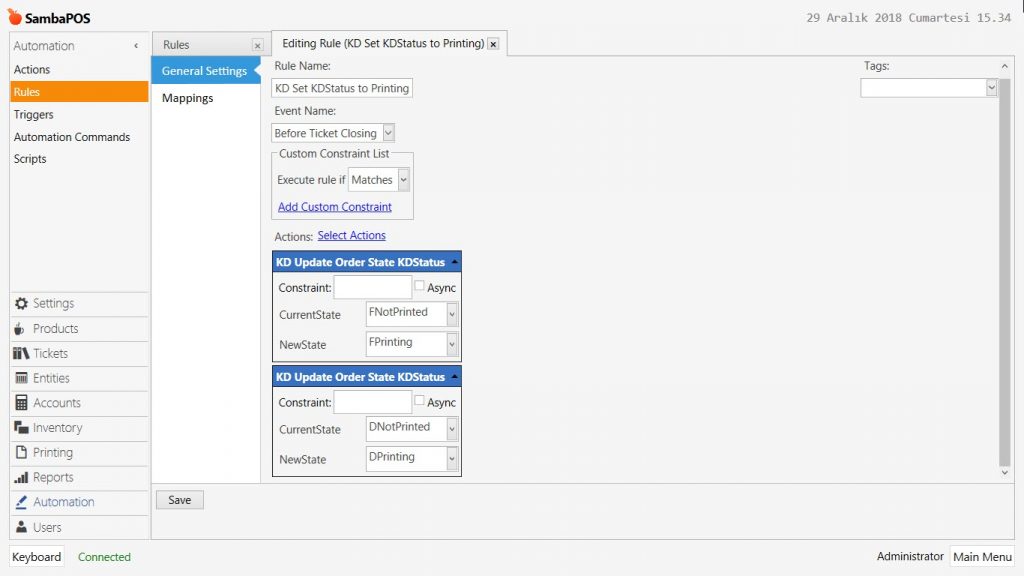
Rule Name: KD Set KDStatus to Printing
Event Name: Before Ticket Closing
Execute Rule If: Matches
Select Action:
Action-1: KD Update Order KDStatus
CurrentState: FNotPrinted
NewState: FPrinting
Action-2: KD Update Order KDStatus
CurrentState: DNotPrinted
NewState: DPrinting
After completing necessary editings, click on Save button.
3.5. Adding Set KDStatus to NotPrinted Rule
Main Menu > Manage > Automation > Rules > here, click on Add Rule.
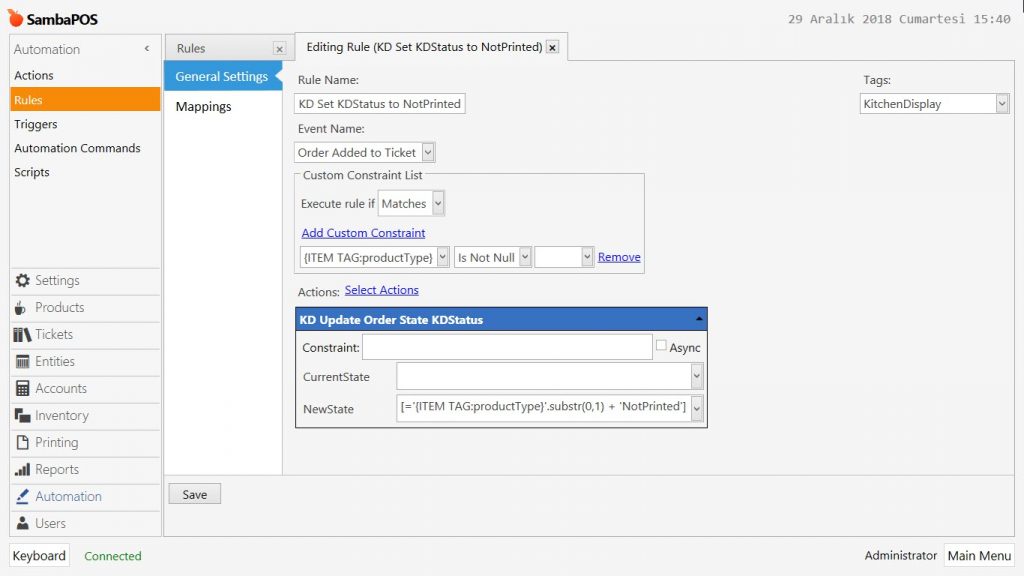
Rule Name: KD Set KDStatus to NotPrinted
Event Name: Order Added to Ticket
Execute Rule If: Matches
Add Custom Constraint:
{ITEM TAG:productType}|Is Not Null|
Select Actions:
Action: KD Update Order State KDStatus
NewState: [='{ITEM TAG:productType}'.substr(0,1) + 'NotPrinted']
After completing necessary editings, click on Save button.
3.6. Adding Print Order and set KDStatus to Printed Rule
Main Menu > Manage > Automation > Rules > here, click on Add Rule.
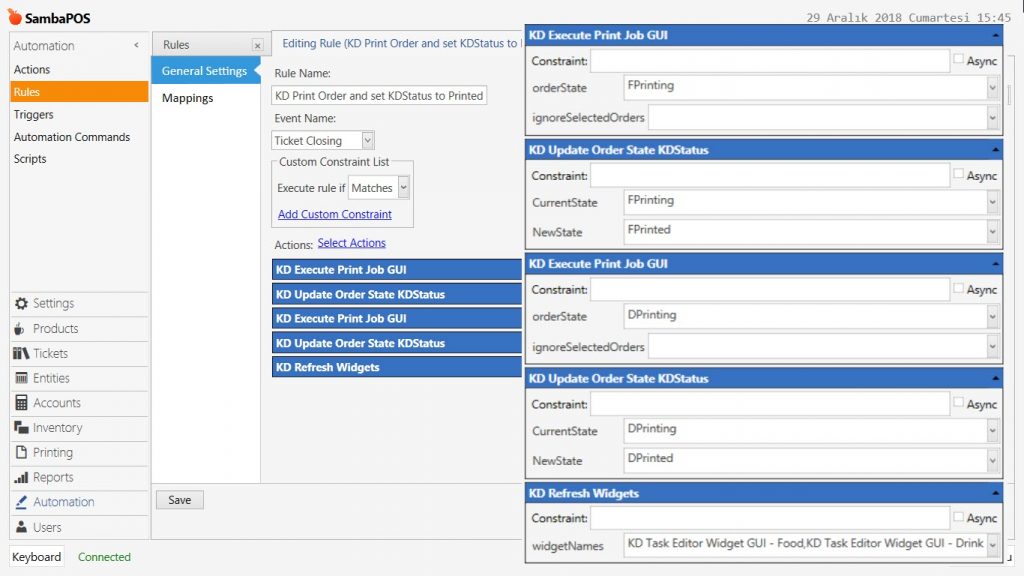
Rule Name: KD Print Order and set KDStatus to Printed
Event Name: Ticket Closing
Execute Rule If: Matches
Select Actions:
Action-1: KD Execute Print Job GUI
orderState: FPrinting
Action-2: KD Update Order State KDStatus
CurrentState: FPrinting
NewState: FPrinted
Action-3: KD Execute Print Job GUI
orderState: DPrinting
Action-4: KD Update Order State KDStatus
CurrentState: DPrinting
NewState: DPrinted
Eylem-5: KD Refresh Widgets
WidgetNames: KD Task Editor Widget GUI - Food,KD Task Editor Widget GUI - Drink
After completing necessary editings, click on Save button.