4.18. How to Recall and Clone Customer’s Last Ticket?
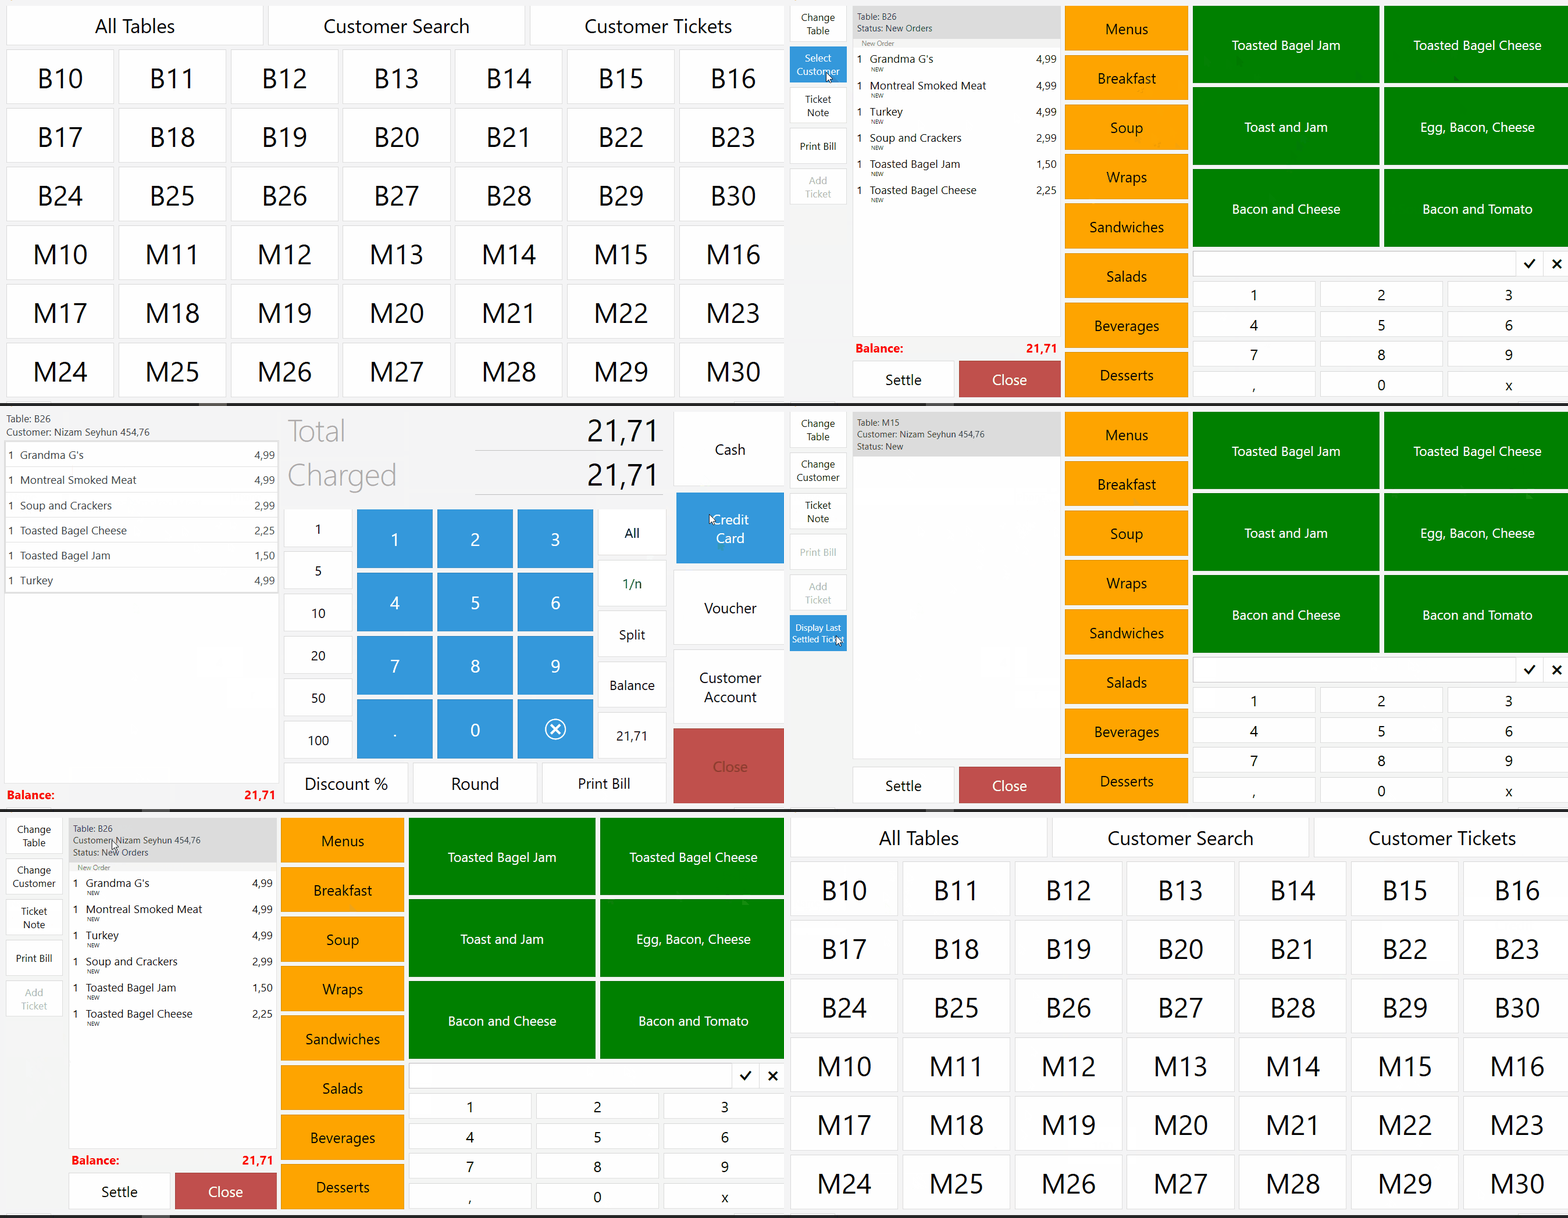
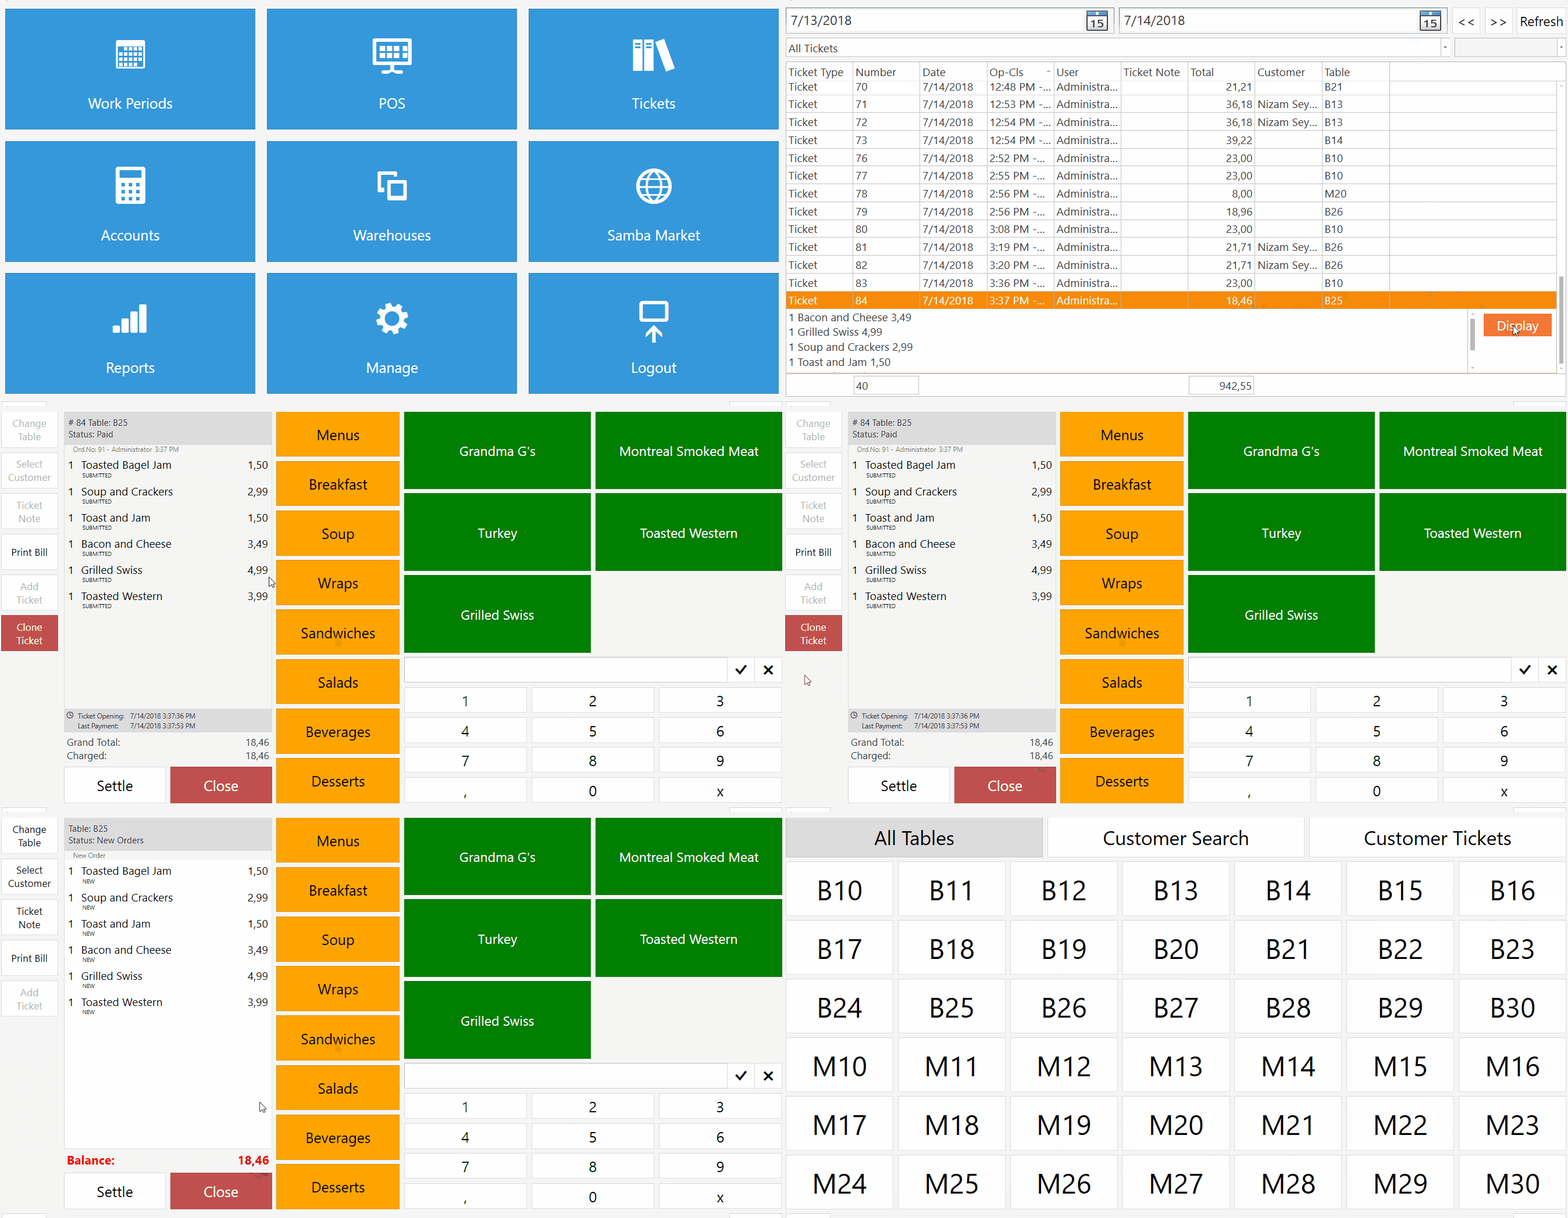
In this document, it will be explained how you can store, recall, and clone a previous Ticket. It works from the Ticket Explorer, or in the case of a Customer Entity, it will allow for cloning of that Customer’s last Ticket.
How It Works;
Displaying & Cloning a Ticket That Has Customer Entity:
Cloning a Ticket That Has No Customer Entity:
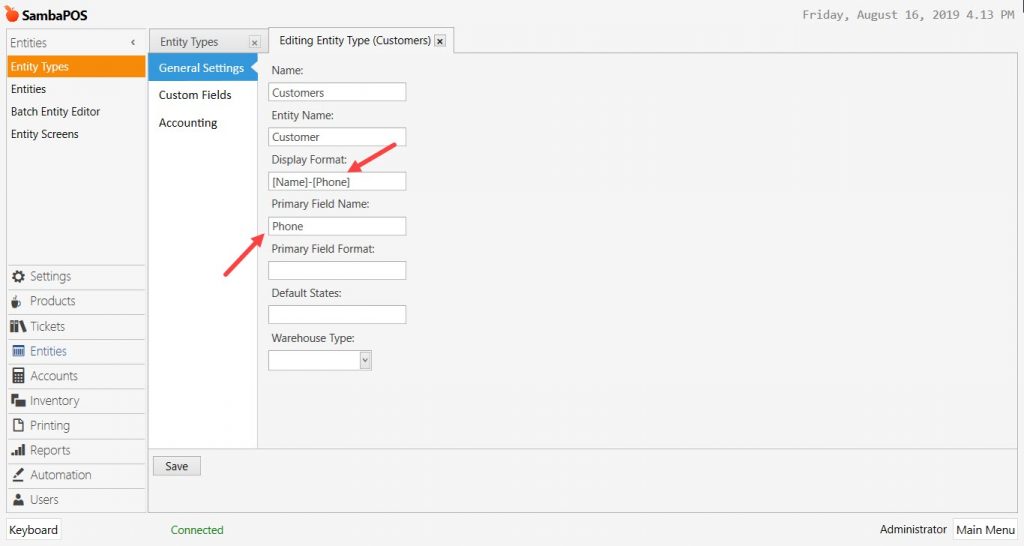
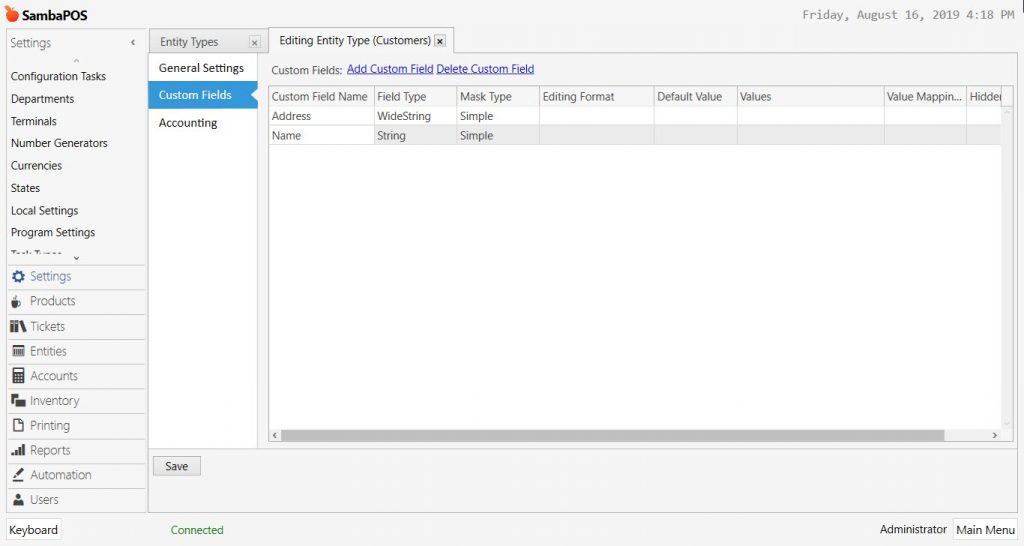
NOTE: If you selected Primary Field of Customers Entity Type as Phone then you should apply below changes;
Main Menu > Manage > Entities > Entity Types > Customers
After completing necessary editings, click on Save button.
1.Adding Automation Commands
1.1. Display Last Settled Ticket
Go to Main Menu > Manage > Automations > Automation Commands > in here click on Add Automation Command link.
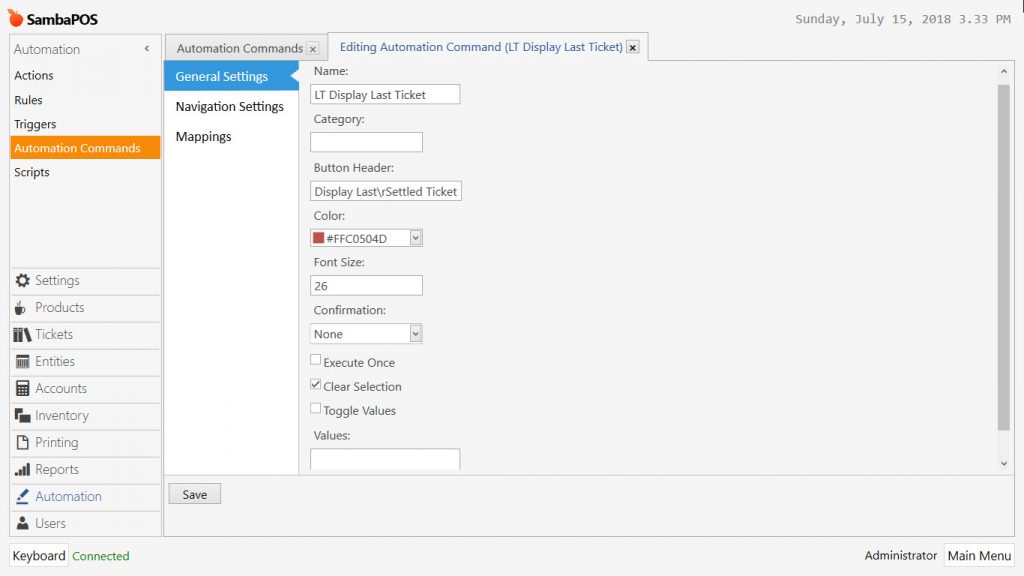
General Settings Section;
Name: LT Display Last Ticket
Category: Blank
Button Header: Display Last\rSettled Ticket
Color: #FFC0504D
Confirmation: None
Clear Selection: Click on this box.
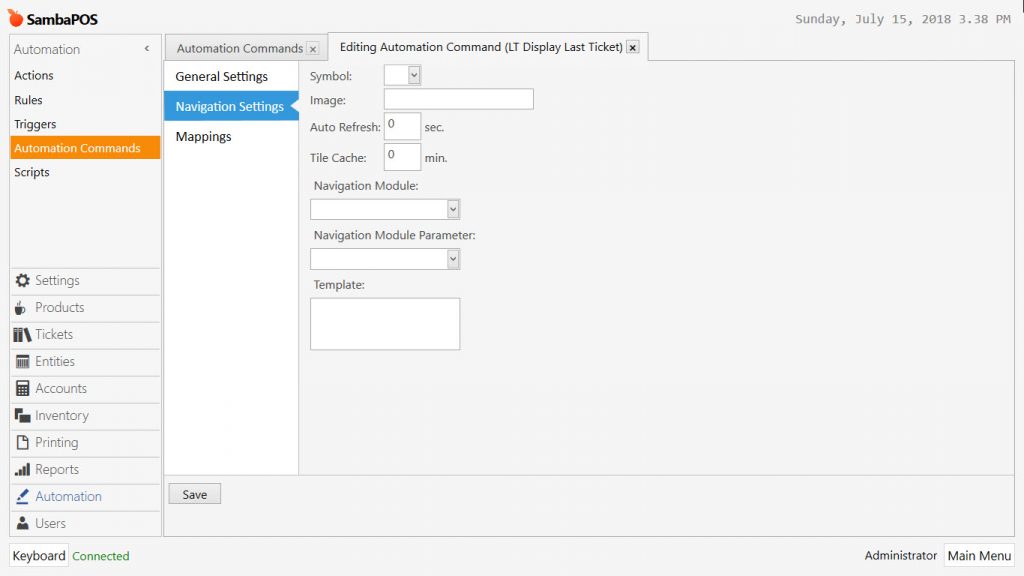
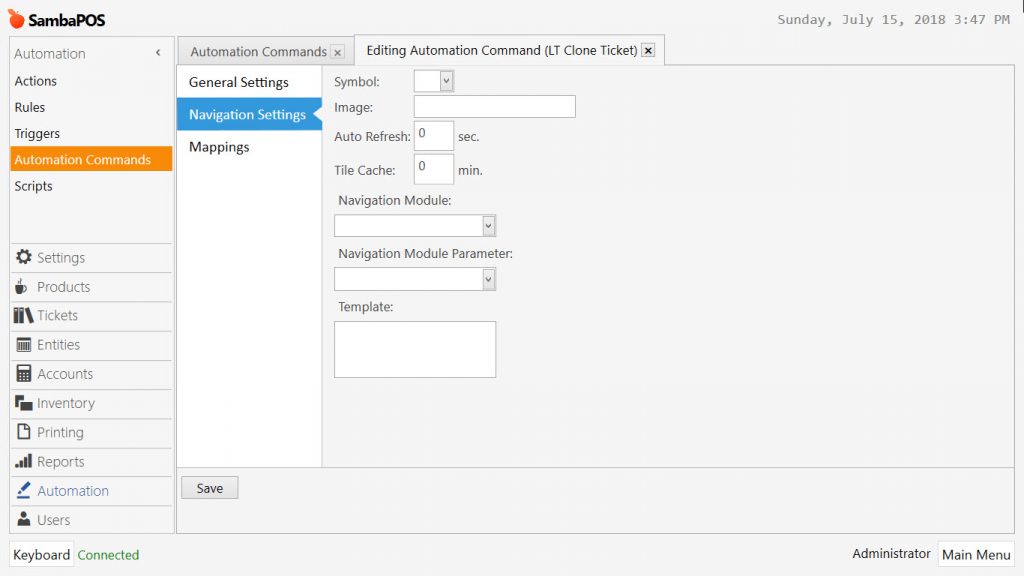
Navigation Settings Section;
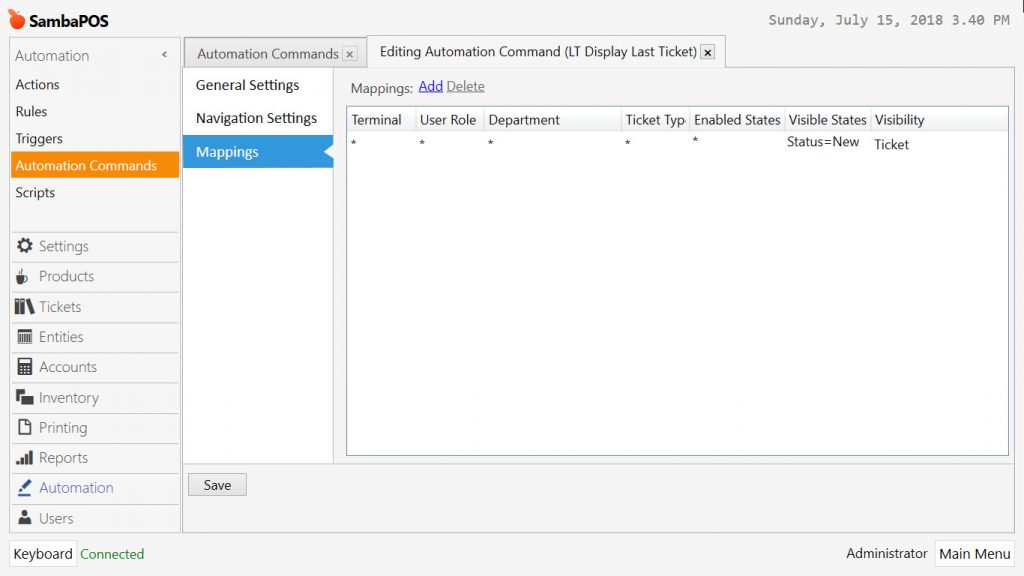
Mappings Section;
Add a row by clicking on Add button and configure settings as shown in the image;
Visible States: Status=New
Visibility: Ticket
After completing necessary editings, click on Save button.
1.2. Clone Ticket
Go to Main Menu > Manage > Automations > Automation Commands > in here click on Add Automation Command link.
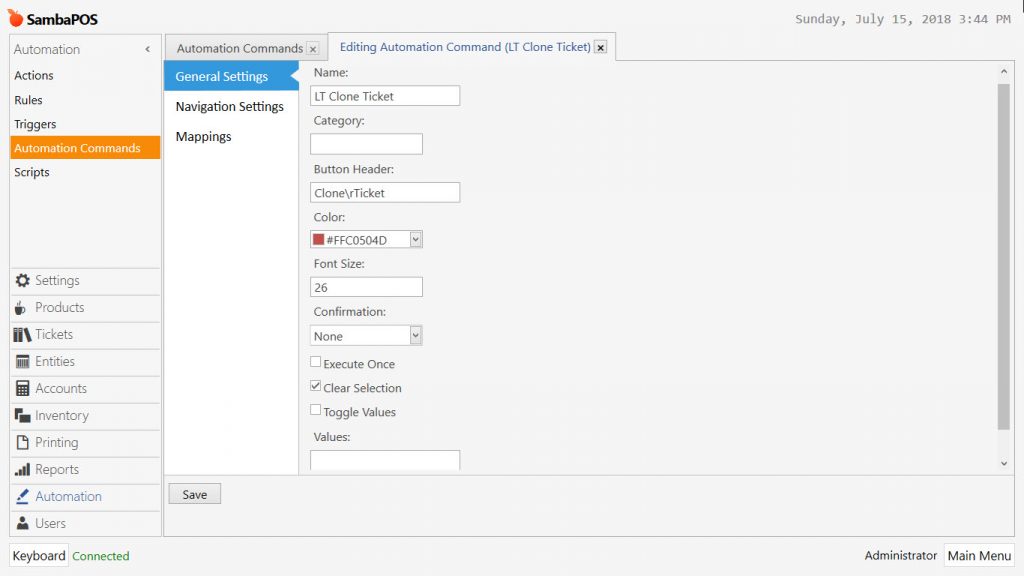
General Settings Section;
Name: LT Clone Ticket
Category: Blank
Button Header: Clone\r Ticket
Color: #FFC0504D
Confirmation: None
Clear Selection: Click on this box.
Navigation Settings Section;
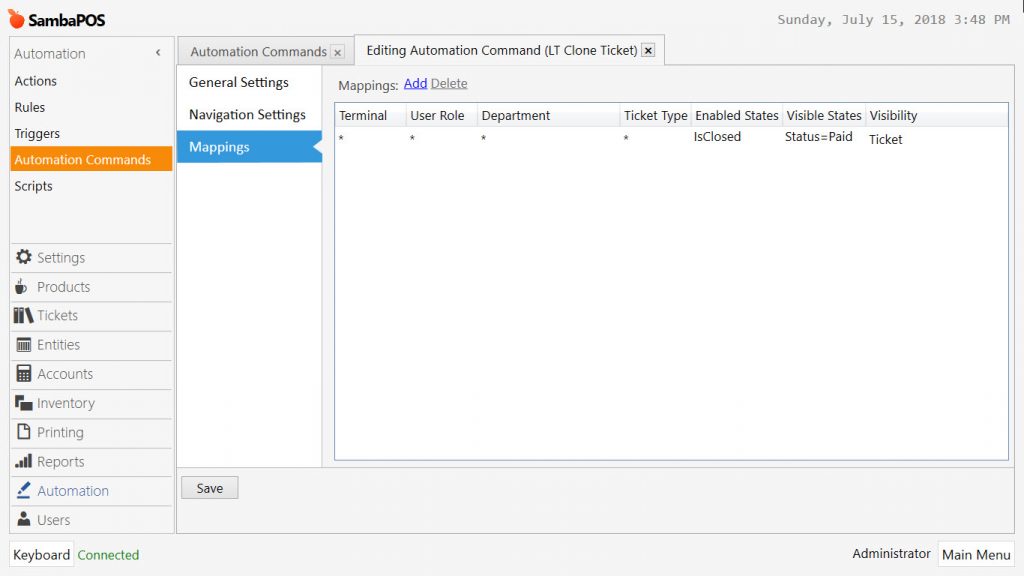
Mappings Section;
Add a row by clicking on Add button and configure settings as shown in the image;
Enabled States: IsClosed
Visible States: Status=Paid
Visibility: Ticket
After completing necessary editings, click on Save button.
2. Adding Actions
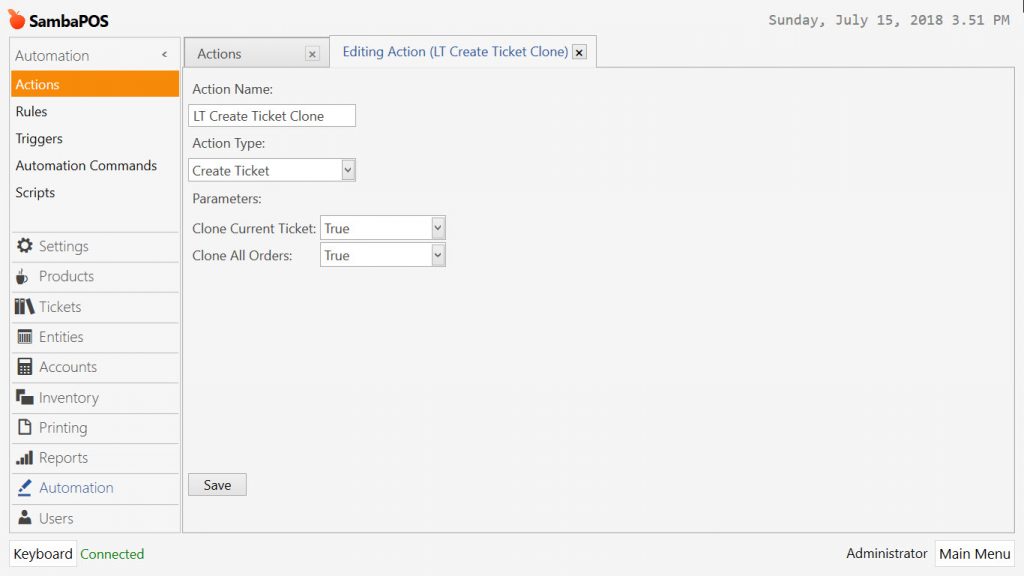
2.1. Create Ticket Clone Action
Go to Main Menu > Manage > Automation > Actions > in here click on Add Action link.
Action Name: LT Create Ticket Clone
Action Type: Create Ticket
Parameters:
Clone Current Ticket: True
Clone All Orders: True
After completing necessary editings, click on Save button.
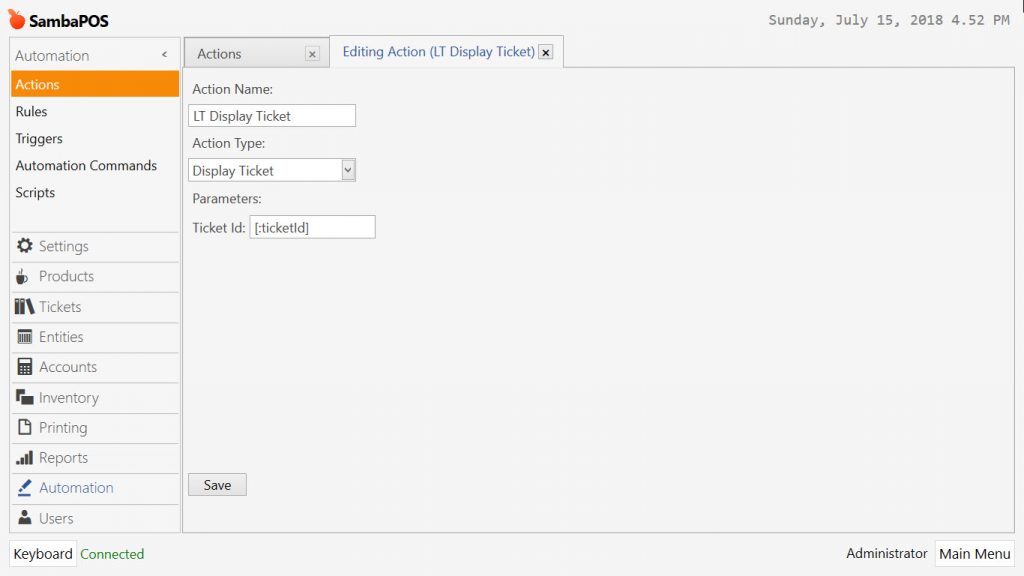
2.2. Display Ticket Action
Go to Main Menu > Manage > Automation > Actions > in here click on Add Action link.
Action Name: LT Display Ticket
Action Type: Display Ticket
Parameters:
Ticket Id: [:ticketId]
After completing necessary editings, click on Save button.
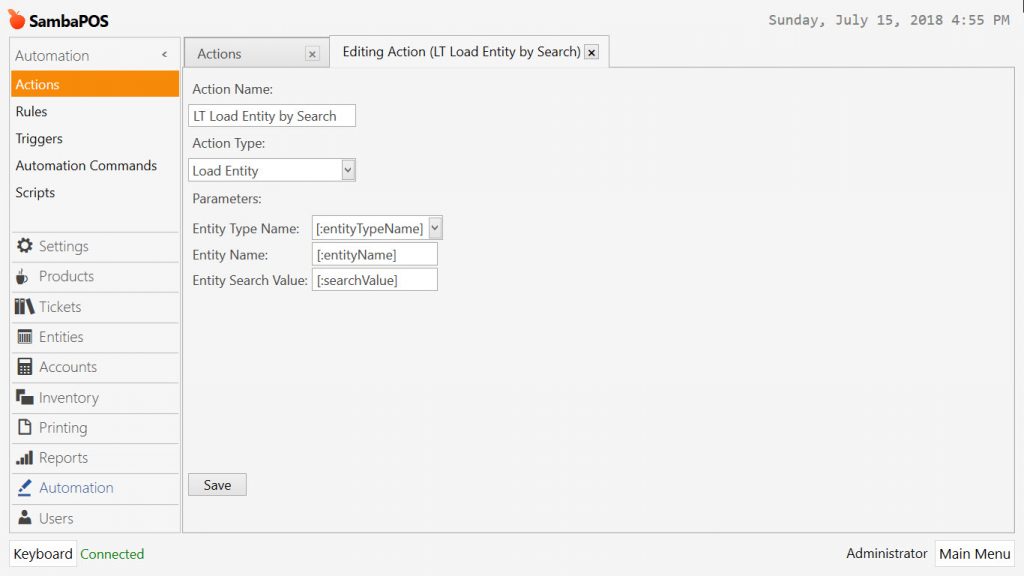
2.3. Load Entity By Search Action
Go to Main Menu > Manage > Automation > Actions > in here click on Add Action link.
Action Name: LT Load Entity by Search
Action Type: Load Entity
Parameters:
Entity Type Name: [:entityTypeName]
Entity Name: [:entityName]
Entity Search Value: [:searchValue]
After completing necessary editings, click on Save button.
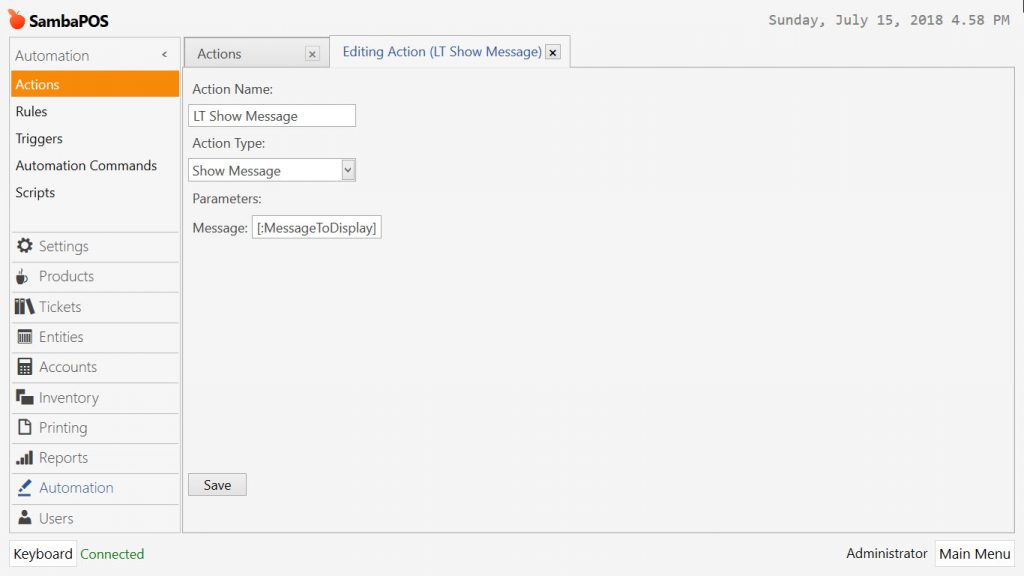
2.4. Show Message Action
Go to Main Menu > Manage > Automation > Actions > in here click on Add Action link.
Action Name: LT Show Message
Action Type: Show Message
Parameters:
Message: [:MessageToDisplay]
After completing necessary editings, click on Save button.
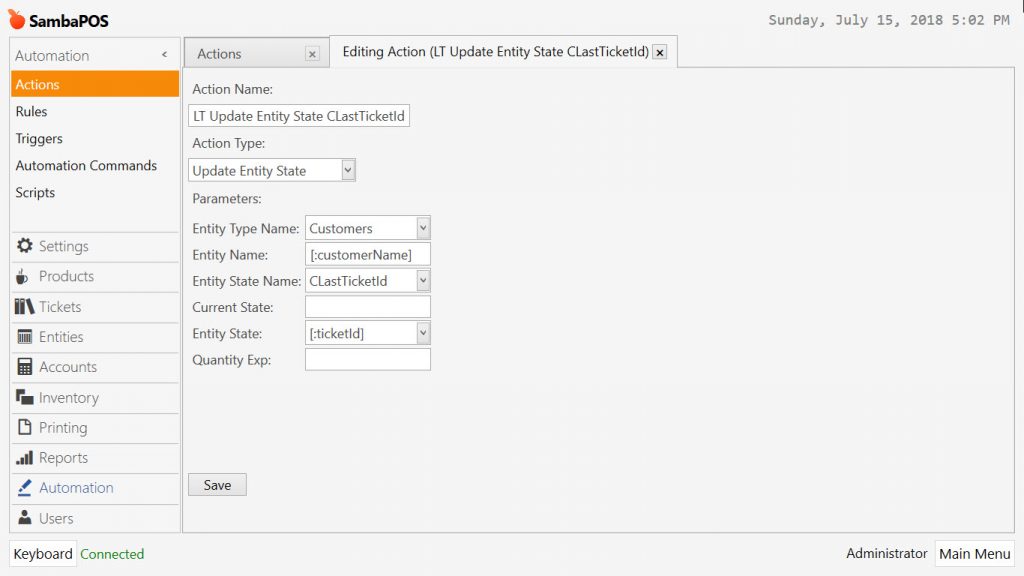
2.5. Update Entity State CLastTicketId Action
Go to Main Menu > Manage > Automation > Actions > in here click on Add Action link.
Action Name: LT Update Entity State CLastTicketId
Action Type: Update Entity State
Parameters:
Entity Type Name: Customers
Entity Name: [:customerName]
Entity State Name: CLastTicketId
Entity State: [:ticketId]
After completing necessary editings, click on Save button.
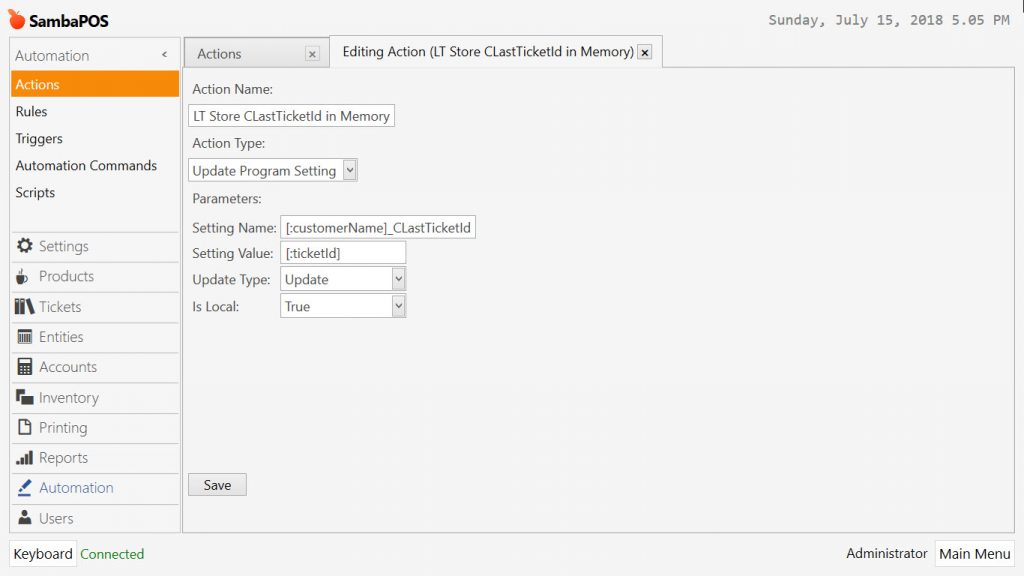
2.6. Store CLastTicketId in Memory Action
Go to Main Menu > Manage > Automation > Actions > in here click on Add Action link.
Action Name: LT Store CLastTicketId in Memory
Action Type: Update Program Setting
Parameters:
Setting Name: [:customerName]_CLastTicketId
Setting Value: [:ticketId]
Update Type: Update
Is Local: True
After completing necessary editings, click on Save button.
3. Adding Rules
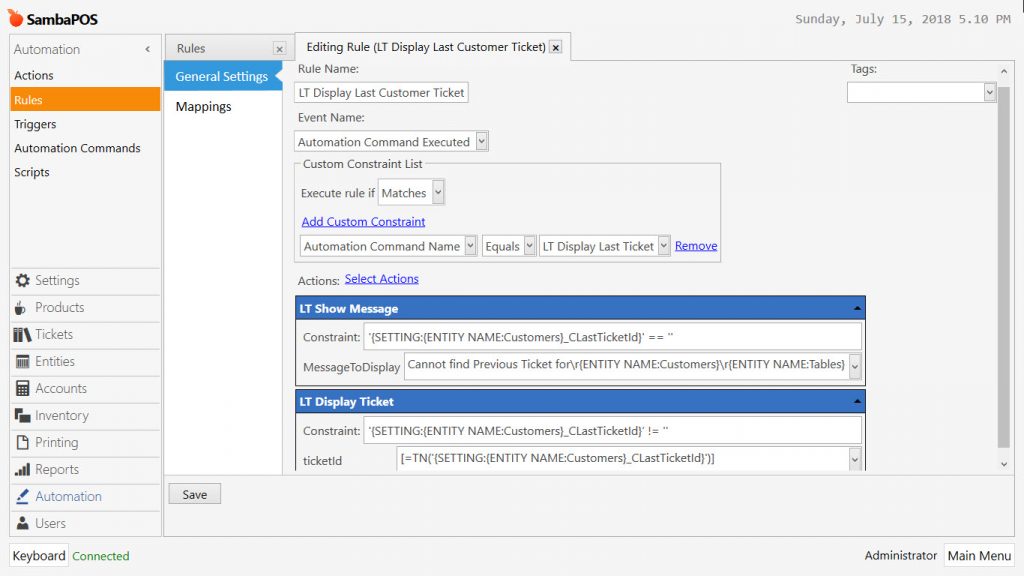
3.1. Display Last Customer Ticket Rule
Go to Main Menu > Manage > Automation > Rules > in here click on Add Rule link.
Rule Name: LT Display Last Customer Ticket
Event Name: Automation Command Executed
Execute Rule If: Matches
Add Custom Constraint:
Automation Command Name | Equals | LT Display Last Ticket
Select Actions:
Action 1: LT Show Message
Constraint: '{SETTING:{ENTITY NAME:Customers}_CLastTicketId}' == ''
Message To Display: Cannot find Previous Ticket for\r{ENTITY NAME:Customers}\r{ENTITY NAME:Tables}
Action 2: LT Display Ticket
Constraint: '{SETTING:{ENTITY NAME:Customers}_CLastTicketId}' != ''
ticketId: [=TN('{SETTING:{ENTITY NAME:Customers}_CLastTicketId}')]
After completing necessary editings, click on Save button.
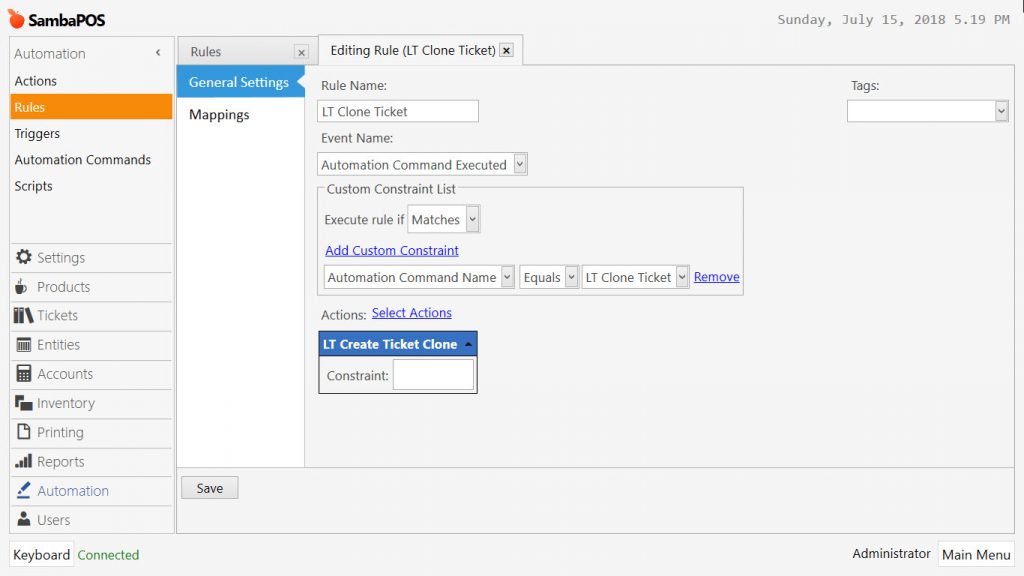
3.2. Clone Ticket Rule
Go to Main Menu > Manage > Automation > Rules > in here click on Add Rule link.
Rule Name: LT Clone Ticket
Event Name: Automation Command Executed
Execute Rule If: Matches
Add Custom Constraint:
Automation Command Name | Equals | LT Clone Ticket
Select Actions:
LT Create Ticket Clone
Constraint: Blank
After completing necessary editings, click on Save button.
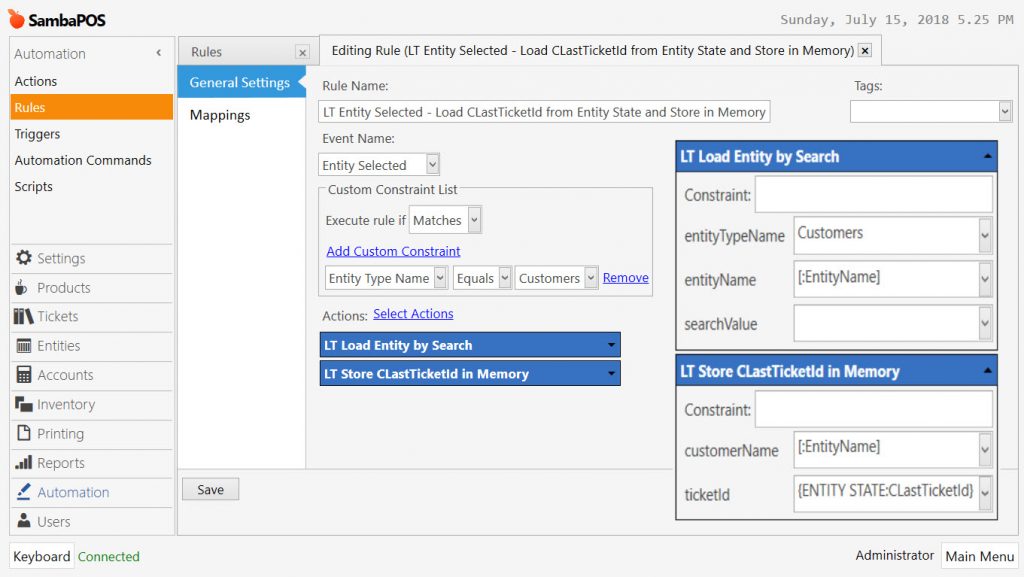
3.3. Entity Selected – Load CLastTicketId from Entity State and Store in Memory Rule
Go to Main Menu > Manage > Automation > Rules > in here click on Add Rule link.
Rule Name: LT Entity Selected – Load CLastTicketId from Entity State and Store in Memory
Event Name: Entity Selected
Execute Rule If: Matches
Add Custom Constraint:
Entity Type Name | Equals | Customers
Select Actions:
Action 1: LT Load Entity by Search
entityTypeName: Customers
entityName: [:EntityName]
Action 2: LT Store CLastTicketId in Memory
customerName: [:EntityName]
ticketId: {ENTITY STATE:CLastTicketId}
After completing necessary editings, click on Save button.
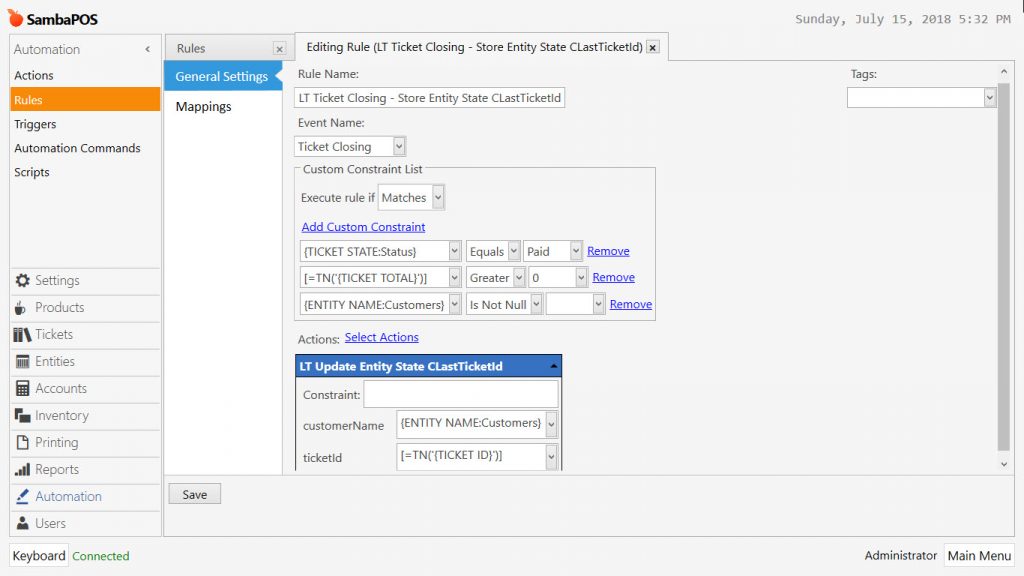
3.4. Ticket Closing – Store Entity State CLastTicketId Rule
Go to Main Menu > Manage > Automation > Rules > in here click on Add Rule link.
Rule Name: LT Ticket Closing – Store Entity State CLastTicketId
Event Name: Ticket Closing
Execute Rule If: Matches
Add Custom Constraints:
{TICKET STATE:Status} | Equals | Paid |
[=TN('{TICKET TOTAL}')] | Greater | 0 |
{ENTITY NAME:Customers} | Is Not Null | |
Select Actions:
Action: LT Update Entity State CLastTicketId
customerName: {ENTITY NAME:Customers}
ticketId: [=TN('{TICKET ID}')]
After completing necessary editings, click on Save button.

