4.16. How to Configure Product Based Warehouse Tracking?
In this document, it will be shown how to configure product based warehouse tracking.
Scenario;
You have two Kitchens; Chinese Kitchen and Pakistani Kitchen. Both Kitchens have similar Inventory Items like meat, oil, etc… Also you have Chinese Food and Pakistani Food Products.
When you sell Chinese Food, it should consume items from Chinese Kitchen’s Warehouse and when you sell Pakistani food, it should consume meat from Pakistani Kitchen’s Warehouse.
1. Adding Products
You need to add two products
![]()
1.1. Adding Chinese Food Product;
Go to Main Menu > Manage > Products > Product List > in here click on Add Product button.
![]()
Product Name: Chinese Food
Group Code: Menus
Portion Prices:
Add a portion by clicking on Add Portion button.
Portion Name: Normal, Multiplier: 1, Price: 10
After completing necessary editings, click on Save button.
1.2. Adding Pakistani Food Product;
Go to Main Menu > Manage > Products > Product List > in here click on Add Product button.
![]()
Product Name: Pakistani Food
Group Code: Menus
Portion Prices:
Add a portion by clicking on Add Portion button.
Portion Name: Normal, Multiplier: 1, Price: 10
After completing necessary editings, click on Save button.
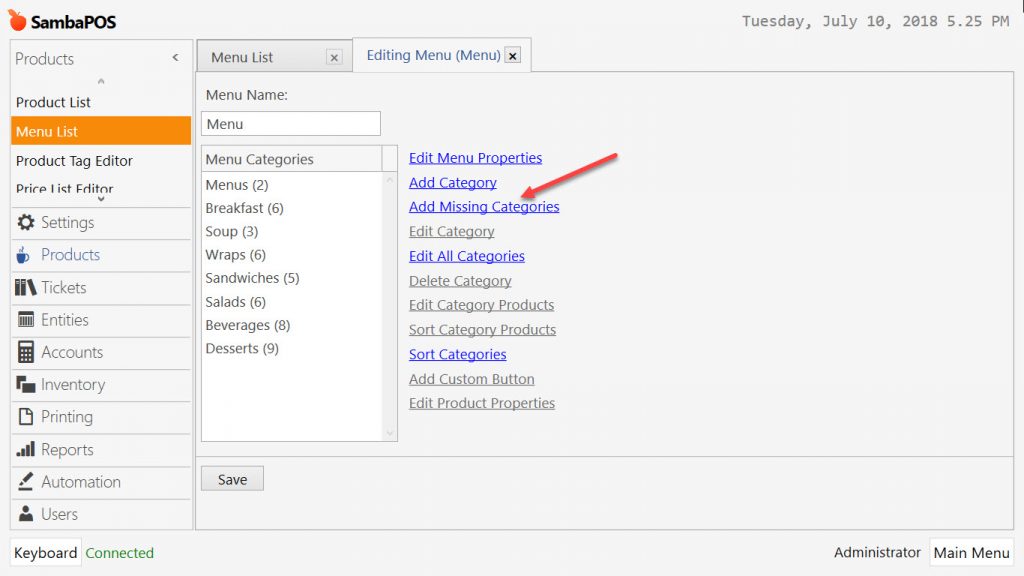
2. Adding Created Products into Menu Categories
It is necessary to add products into Menu Categories.
Go to Main Menu > Manage > Products > Menu List > Menu > in here click on Add Missing Categories link.
After completing necessary editings, click on Save button.
3. Adding Warehouses
You need to add a warehouse for each kitchen.
![]()
3.1. Adding Chinese Kitchen Warehouse
Go to Main Menu > Manage > Inventory > Warehouses > in here click on Add Warehouse button.
![]()
After completing necessary editings, click on Save button.
3.2. Adding Pakistani Kitchen Warehouse
Go to Main Menu > Manage > Inventory > Warehouses > in here click on Add Warehouse button.
![]()
After completing necessary editings, click on Save button.
4. Adding Inventory Items
To make it simple, you can add single ”Meat” inventory item.
Go to Main Menu > Manage > Inventory > Inventory Items > in here click on Add Inventory Item button.
![]()
Inventory Item Name: Meat
Group Code: Meats
Base Unit: GR
Transaction Unit: KG
Multiplier: 1000
After completing necessary editings, click on Save button.
5. Editing Purchase Transaction Type
You need to edit Purchase Transaction Type and clear Default Warehouse setting, to be able to choose warehouse while purchasing items.
Go to Main Menu > Manage > Inventory > Transaction Types > in here select Purchase Transaction Type and clear Default Warehouse setting.
![]()
After completing necessary editings, click on Save button.
6. Purchasing Inventory Items and Adding Recipes
6.1. Purchasing Inventory Items
Go to Main Menu > Warehouses > in here click on Purchase button and add some meat for each kitchen. (In the example 2 KG)
![]()
After completing necessary editings, click on Save button.
6.2. Adding Recipes
6.2.1. Adding Chinese Food Recipe
Go to Main Menu > Manage > Inventory > Recipes > in here click on Add Recipe button.
![]()
Recipe Name: Chinese Food Recipe
Group Code: Food
Product: Chinese Food
Portion: Normal
Fixed Cost: 0
Click on Add Inventory Item;
Item Name: Meat
Quantity: 100 (Type according to your need, in the example 100 GR)
Unit: GR
After completing necessary editings, click on Save button.
6.2.2. Adding Pakistani Food Recipe
Go to Main Menu > Manage > Inventory > Recipes > in here click on Add Recipe button.
![]()
Recipe Name: Pakistani Food Recipe
Group Code: Food
Product: Pakistani Food
Portion: Normal
Fixed Cost: 0
Click on Add Inventory Item;
Item Name: Meat
Quantity: 150 (Type according to your need, in the example 150 GR)
Unit: GR
After completing necessary editings, click on Save button.
7. Adding Custom Product Tag
You need to create a Custom Product tag, to be able to map Warehouses to Products.
Go to Main Menu > Manage > Settings > Program Settings > in here type Warehouse into Product Tag Caption field.
![]()
After completing necessary editings, click on Save button.
8. Editing Chinese and Pakistani Food For Warehouse Setting
8.1. Editing Chinese Food
Go to Main Menu > Manage > Products > Product List > in here select Chinese Food;
![]()
Custom Tags;
Warehouse: Chinese Kitchen
After completing necessary editings, click on Save button.
8.2. Editing Pakistani Food
You can also use Product Tag Editor to batch edit Warehouses.
Go to Main Menu > Manage > Products > Product Tag Editor;
![]()
All items that don’t have a warehouse assignment, will decrease from Local Warehouse.
After completing necessary editings, click on Save button.
9. Adding Actions and Rules
9.1. Adding Action
You need to create an action that updates Order’s Warehouse.
Go to Main Menu > Manage > Automation > Actions > in here click on Add Action button.
![]()
Action Name: Update Order Warehouse
Action Type: Update Order
Warehouse Name: [:Warehouse Name]
After completing necessary editings, click on Save button.
9.2. Adding Rule
When a new order added to Ticket, this rule will execute the above action to update Warehouse. It will use {ITEM TAG:Warehouse} tag to read warehouse assigned to product.
Go to Main Menu > Manage > Automation > Rules > in here click on Add Rule button.
![]()
Rule Name: Update Order Warehouse Rule
Event Name: Order Added to Ticket
Execute Rule If: Matches
Add Custom Constraint:
{ITEM TAG:Warehouse} | Is Not Null | |
Select Action: Update Order Warehouse
Constraint: Blank
Warehouse Name: {ITEM TAG:Warehouse}
After completing necessary editings, click on Save button.
That’s all configuration needed. It has been configured as flexible, so you only need to assign Warehouse for new created products.
Now, you can create a ticket and sell 1 from both products;
![]()
100 GR meat consumed from Chinese Kitchen;
![]()
150 GR meat consumed from Pakistani Kitchen;
![]()