4.14. How to Set Time Clock Implementation?
Document Index
1. Adding PunchIn and PunchOut States
2. Adding Employee Entities
2.1. Adding Employee Entity Type
2.2. Adding Employee Entities
3. Adding Time Clock Entity Screen
4. Adding Automation Commands
4.1. Time Clock Button / Navigation Tile AMC
5. Adding Actions
5.1. Show Time Clock Screen Action
5.2. Execute Automation Command Action
5.3. Show Message Action
5.4 Ask Question Action
5.5. Load Entity Action
5.6. Log Entity State Action
5.7. Update Entity State Action
5.8. Update Program Setting Action
6. Adding Rules
6.1. Show Time Clock Screen Rule
6.2. Load Entity Rule
6.3. Time Clock Punch (Ask) Rule
6.4. Update Entity State Rule
6.5. Log Entity State Rule
7. Adding Reports and Scripts
7.1. Adding Reports
7.1.1. Hourly Report
7.1.2. Report For Employee Nizam
7.1.3. Report For Employee Veysel
7.2. Adding Scripts
7.2.1. Employee Hours Daily
7.2.2. Employee Punch In Latest
7.2.3. Employee Hours TTL
Before Starting to Time Clock Implementation
In this document, it will be explained how to set Basic Time Tracking System for Employees. This implementation will allow Employee Entities, to Clock In and Clock Out.
Before starting Time Clock Implementation process, there are 2 settings to be configured about Navigation Screen Buttons;
1- Allowing Custom Navigation Option
Go to Main Menu > Manage > Settings > Local Settings > Display > In here, select Allow Custom Navigation.
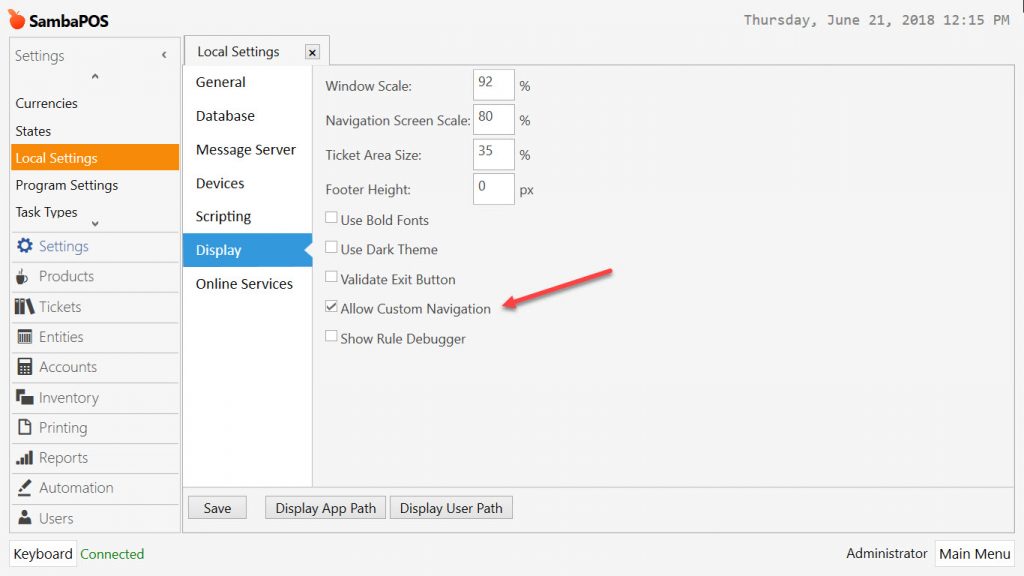
After completing necessary editings, click on Save button.
2- Creating Default Navigation Buttons
Go to Main Menu > Settings > Program Settings > Maintenance > In here click on Create Default Navigation Buttons.
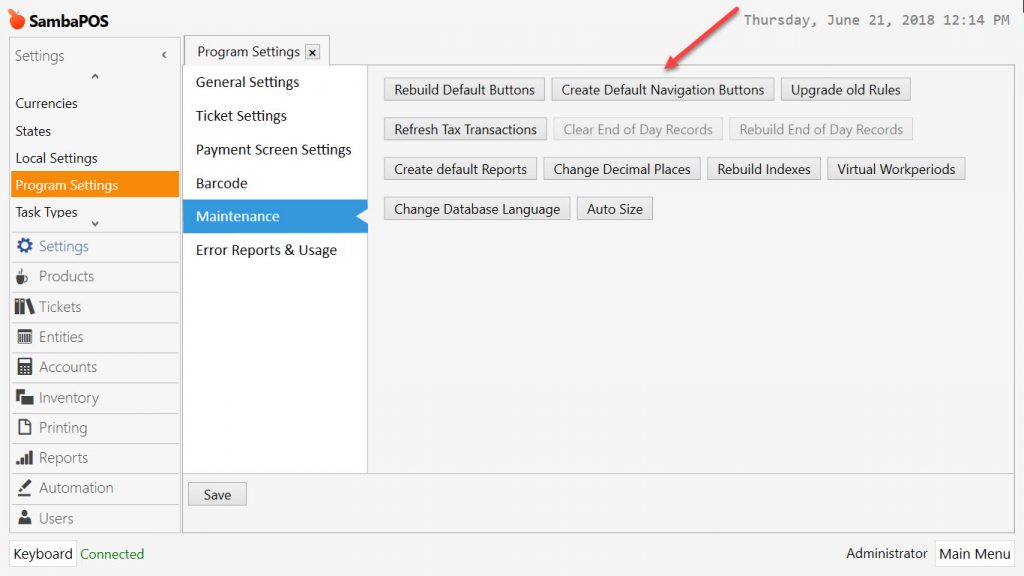
After completing necessary editings, click on Save button.
View of Time Clock Implementation
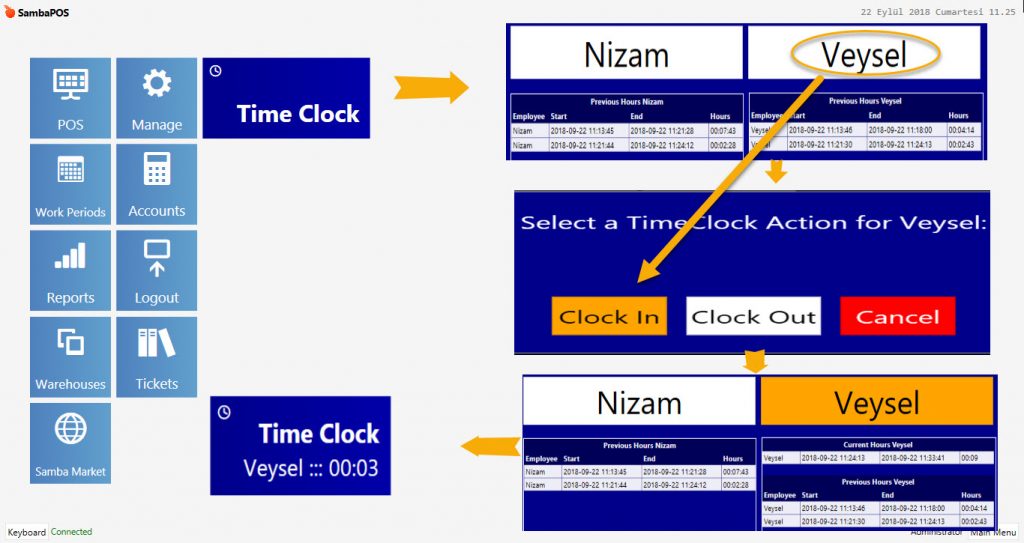
Time Clock Implementation
1. Adding PunchIn and PunchOut States
These States are used to track when an Employee is Clocked In or Clocked Out.
Go to Main Menu > Manage > Settings > States > In here add state for PunchIn by clicking on Add State link. Repeat the same steps for PunchOut state as well.
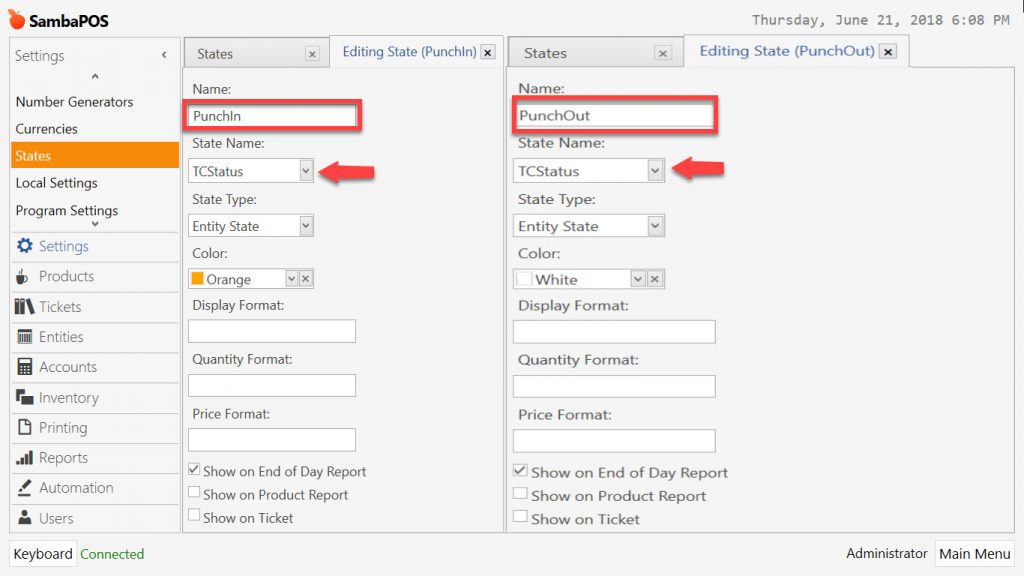
Entity State for Clocked In
Name: PunchIn
State Name: TCStatus
State Type: Entity State
Entity State for Clocked Out
Name: PunchOut
State Name: TCStatus
State Type: Entity State
After completing necessary editings, click on Save button.
2. Adding Employee Entities
2.1. Adding Employee Entity Type
Go to Main Menu >Manage > Entities > Entity Types > In here add an entity type by clicking on Add Entity Type link.
General Settings Section;
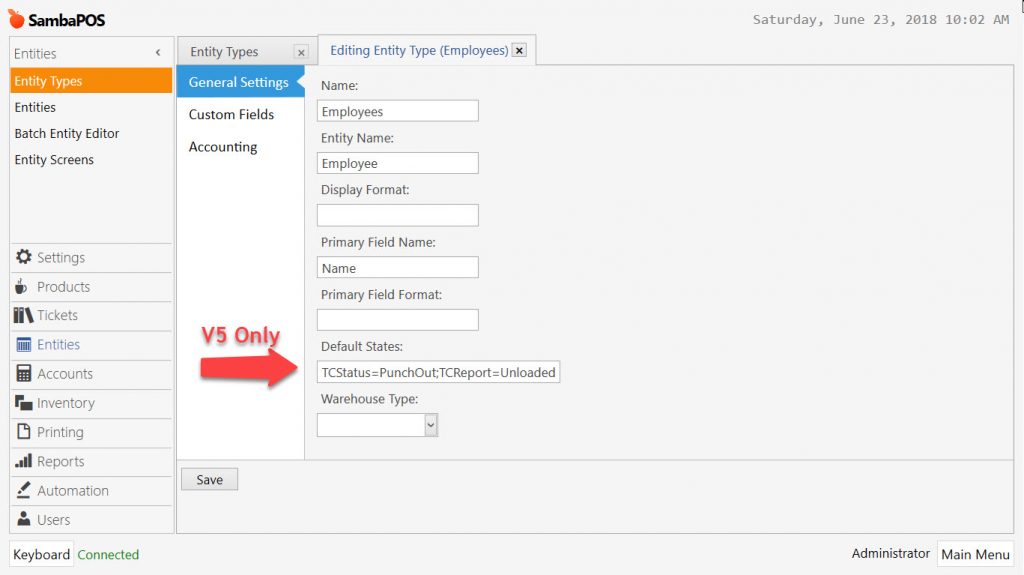
Name: Employees
Entity Name: Employee
Primary Field Name: Name
Default States: TCStatus=PunchOut;TCReport=Unloaded
Version 5 supports Default States for Entity Types. This sets a “starting State” when a new Entity is created. Set the Default States as shown in the image above.
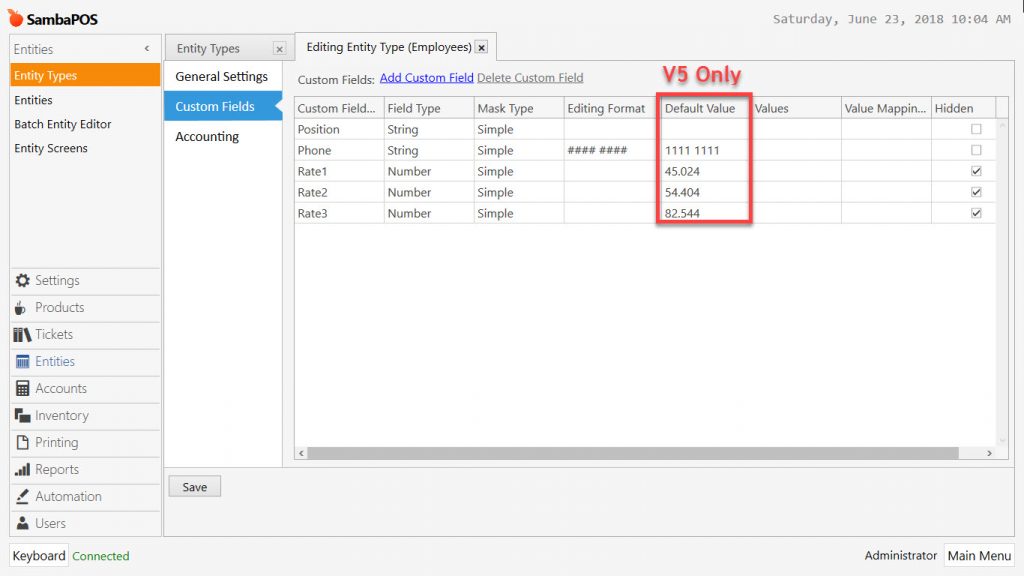
Custom Fields Section;
Accounting Section; (Optional for Payroll)
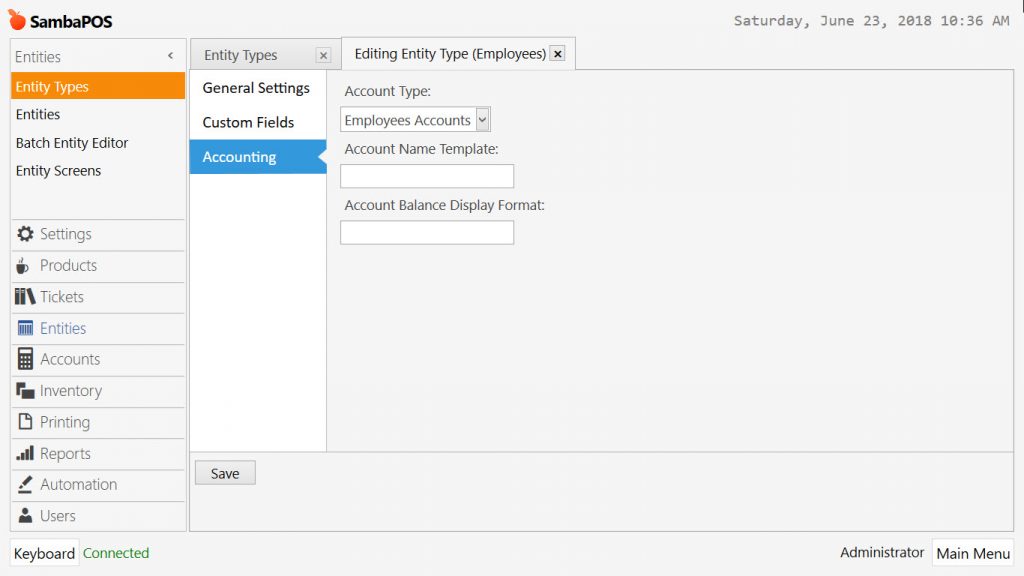
After completing necessary editings, click on Save button.
In order to select Employees Account as account type, you need to create Employees Account Type and Account for Each Employee advance as shown on the images below;
Adding Employees Account Type
Go to Main Menu > Manage > Accounts > Account Types > In here click on Add Account Type link.
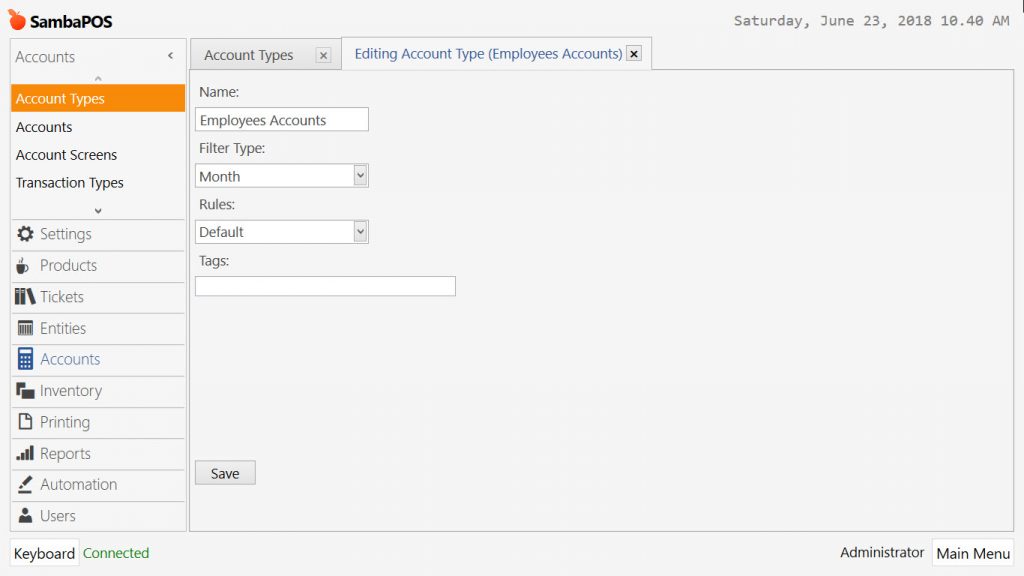
Name: Employees Accounts
Filter Type: Month (Select according to your need)
Rules: Default
After completing necessary editings, click on Save button.
Adding Account for Each Employee
Go to Main Menu > Manage > Accounts > Accounts > In here click on Add Account link.
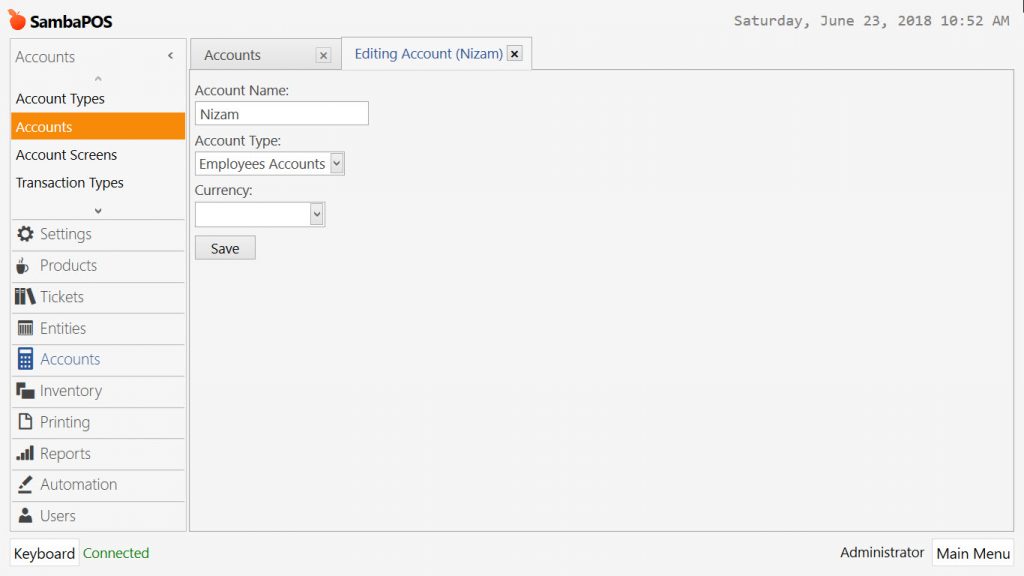
Account Name: Give the name of your employee.
Account Type: Employees Accounts
Currency: Blank
After completing necessary editings, click on Save button.
2.2. Adding Employee Entity
Go to Main Menu > Manage > Entities > Entities > In here click on Add Entity link.
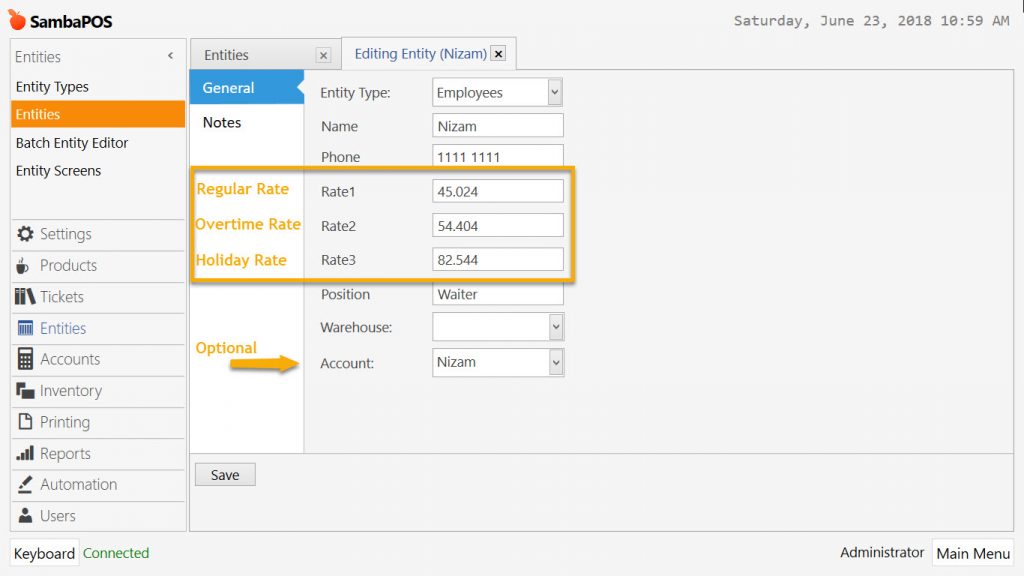
After completing necessary editings, click on Save button.
3. Adding Time Clock Entity Screen
Go to Main Menu > Manage > Entities > Entity Screens > In here click on Add Entity Screen link.
General Settings Section;
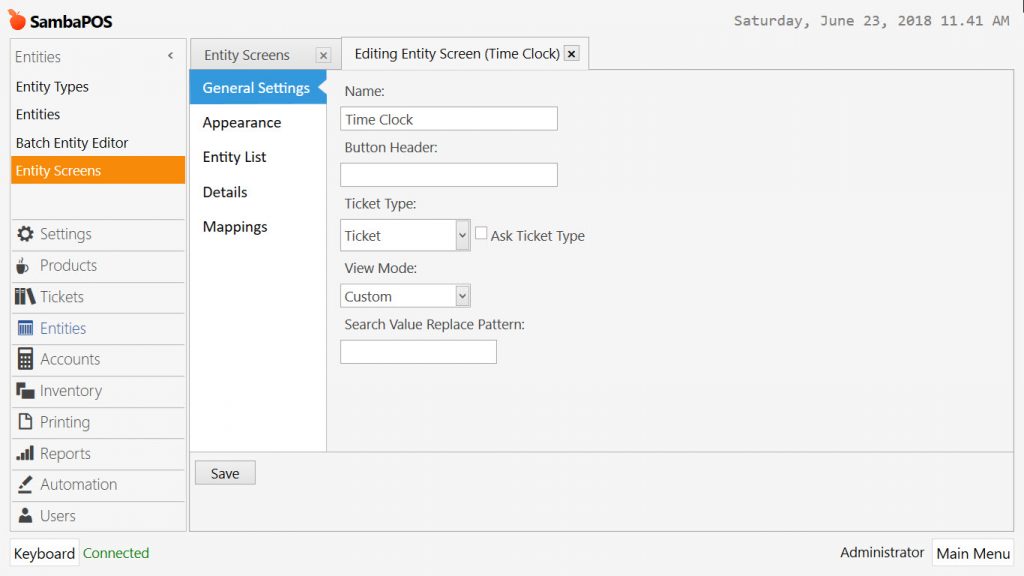
Name: Time Clock
Ticket Type: Ticket
View Mode: Custom
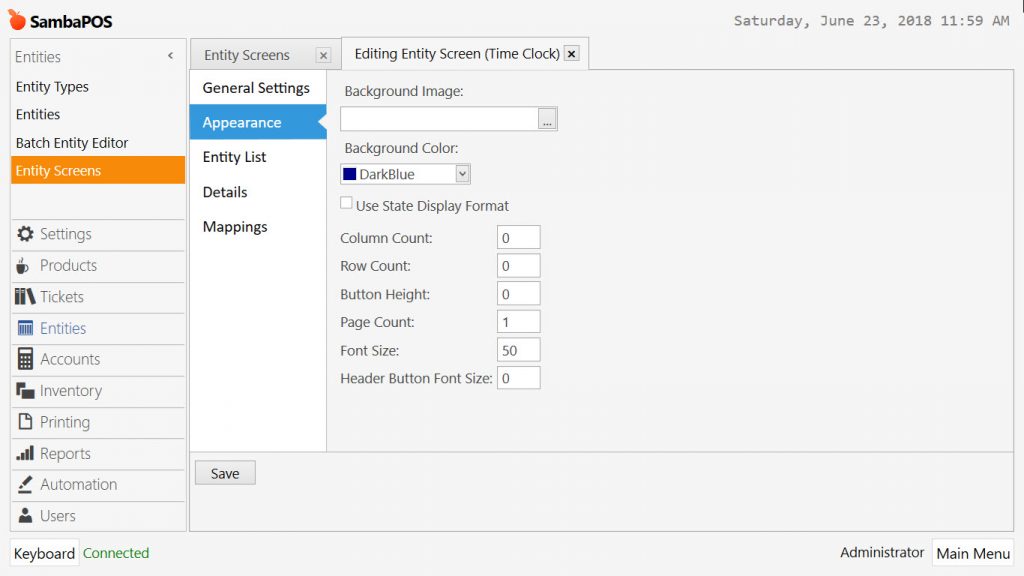
Appearance Section;
Entity List Section;
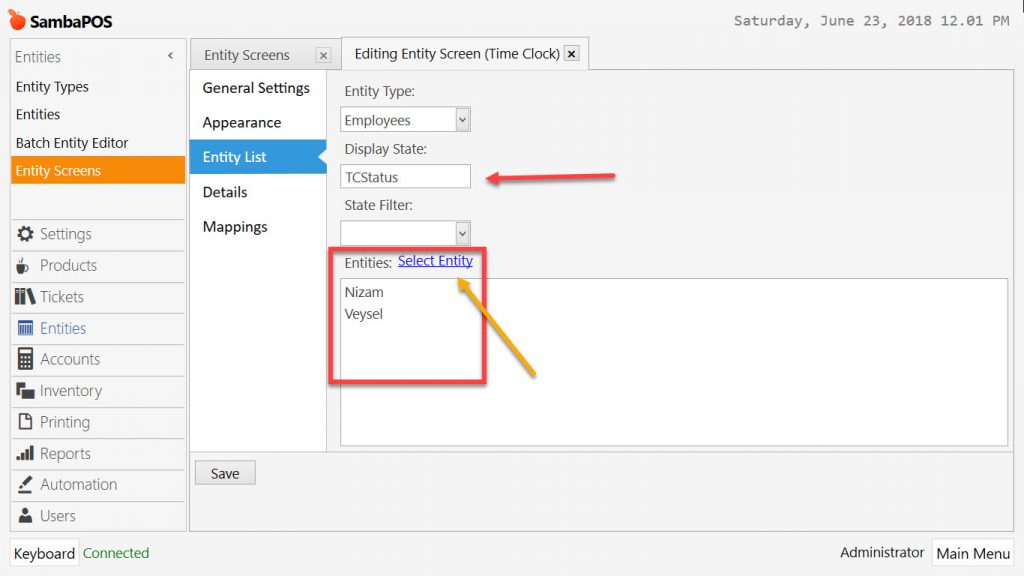
Entity Type: Employees
Display State: TCStatus
State Filter: Blank
Select the Employee Entities you want to appear on the screen by clicking on Select Entity link.
Mappings Section;
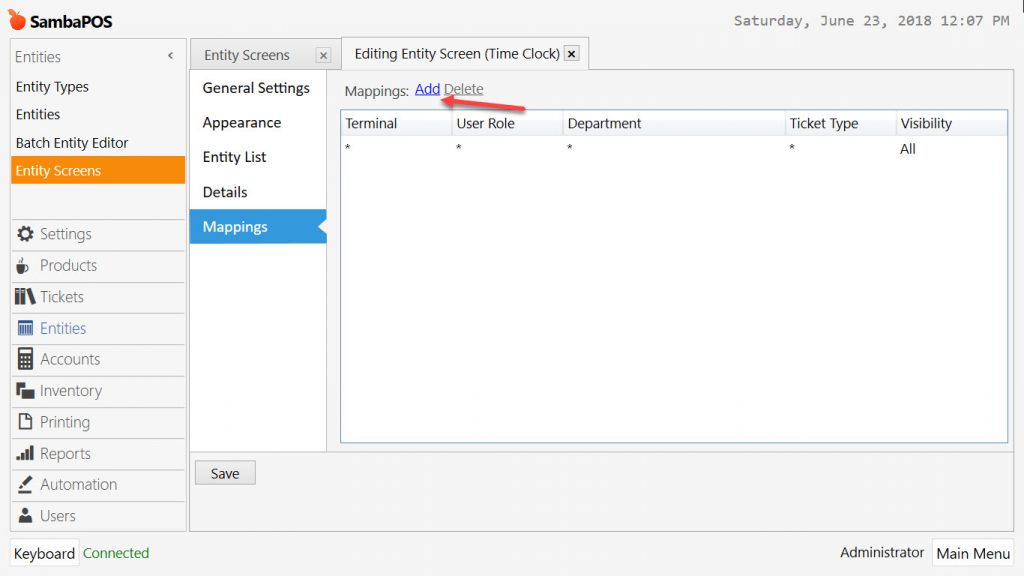
In mappings section, add a row by clicking on Add link.
After completing necessary editings, click on Save button.
Design Mode Configurations
It is necessary to create a single Entity Grid and several Report Viewers (one Report for each Employee) on the Time Clock Entity Screen.
Entity Grid Widget
Entity Grid Properties
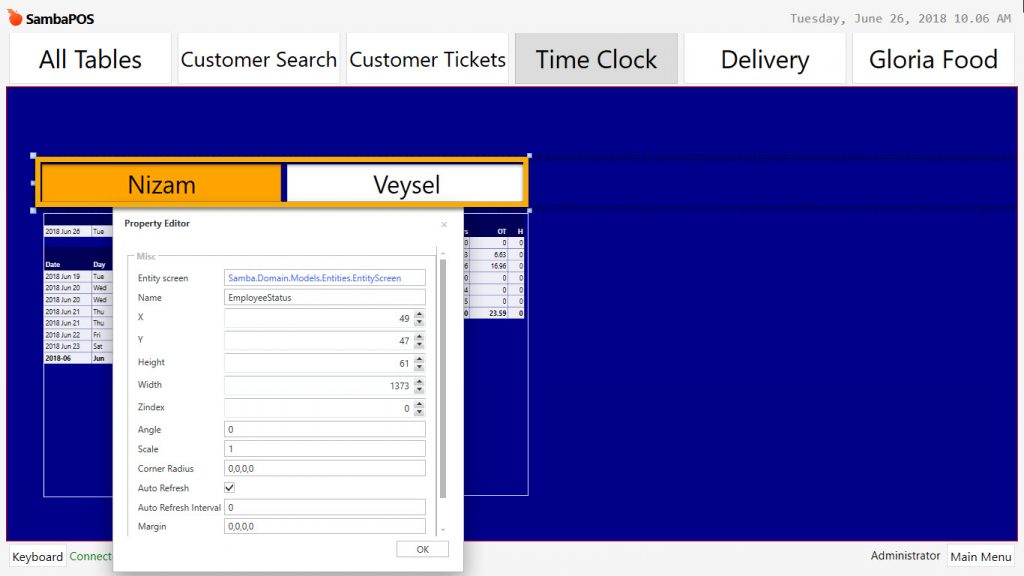
Entity Grid Settings
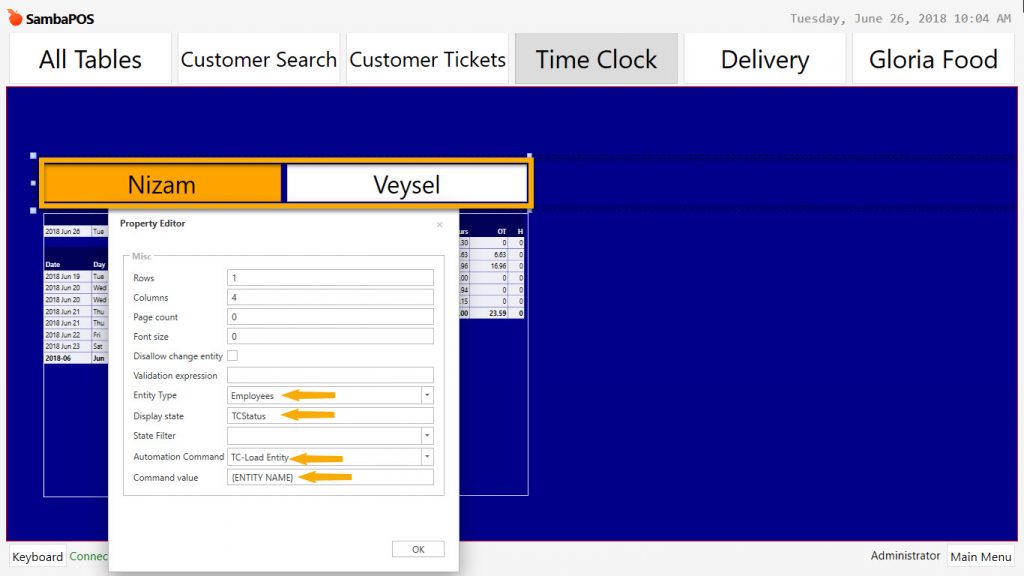
Entity Type: Employees
Display State: TCStatus
Automation Command: TC-Load Entity
Command Value: {ENTITY NAME}
Report Viewer Widgets
Report Viewer Properties; Employee Nizam
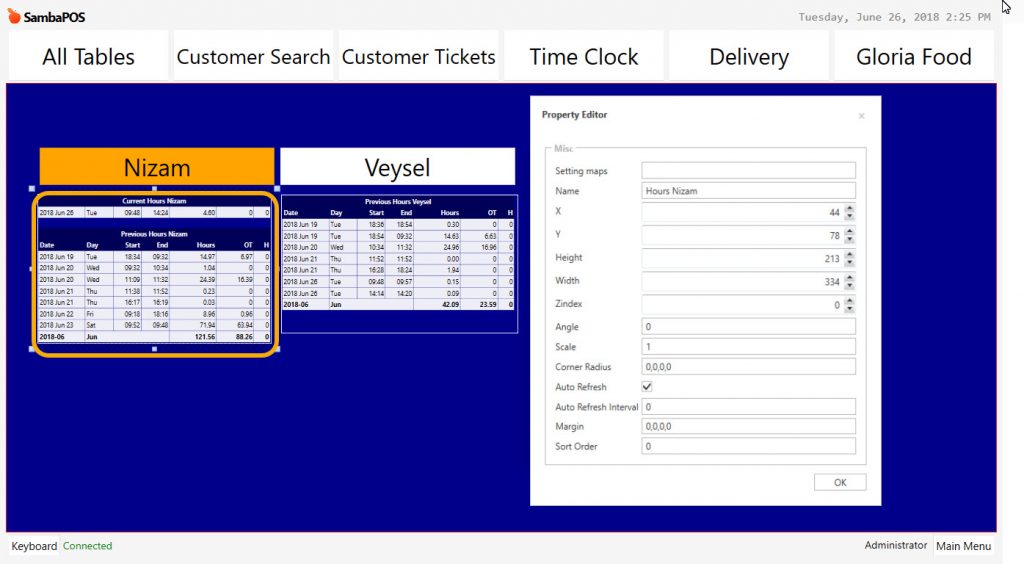
Name: Hours Nizam
Report Viewer Settings; Employee Nizam
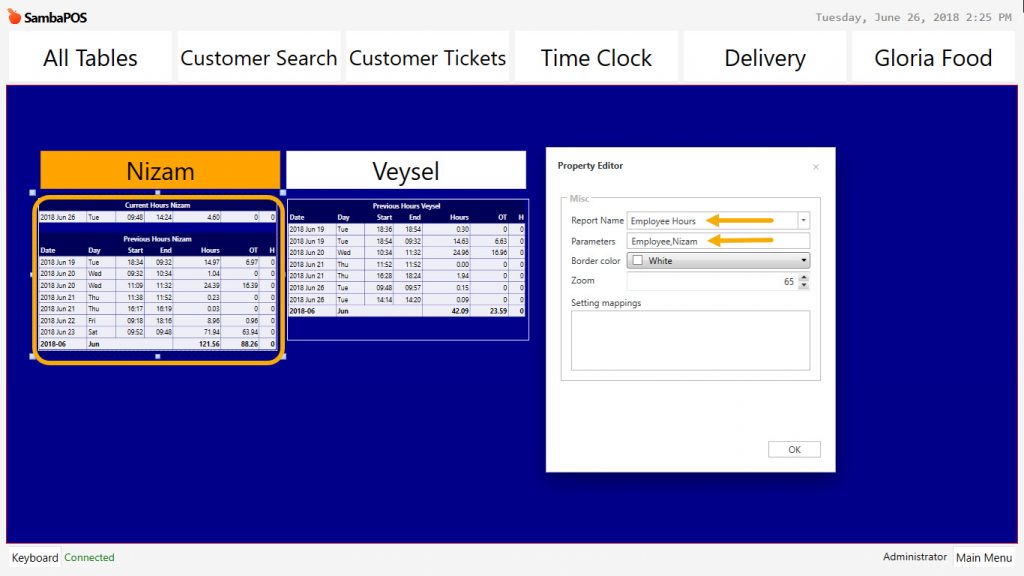
Report Name: Employee Hours
Parameters: Employee,Nizam
Report Viewer Properties; Employee Veysel
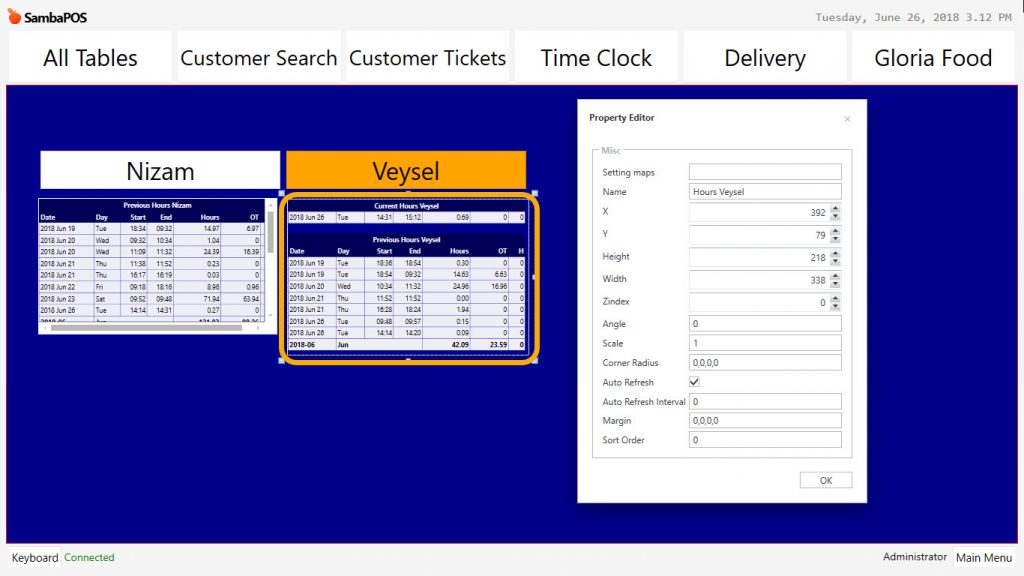
Name: Hours Veysel
Report Viewer Settings; Employee Veysel
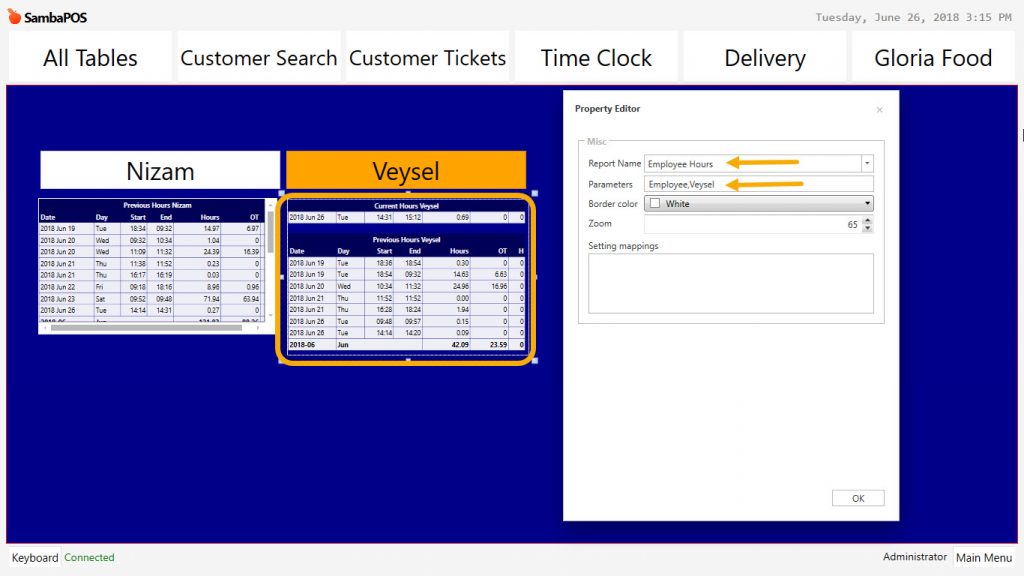
Report Name: Employee Hours
Parameters: Employee,Veysel
4. Adding Automation Commands
4.1. Time Clock Button / Navigation Tile AMC
Go to Main Menu > Manage > Automations > Automation Commands > in here click on Add Automation Command link.
Genereal Settings Section;
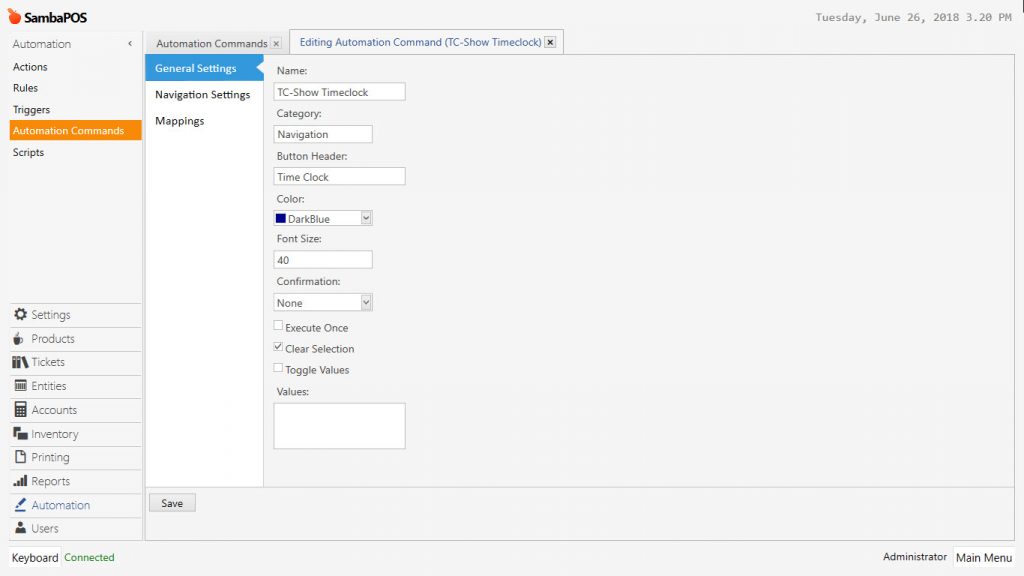
Name: TC-Show Timeclock
Category: Navigation
Button Header: Time Clock
Color: DarkBlue
Font Size: 40
Confirmation: None
Clear Selection: Select this box.
Navigation Settings Section;
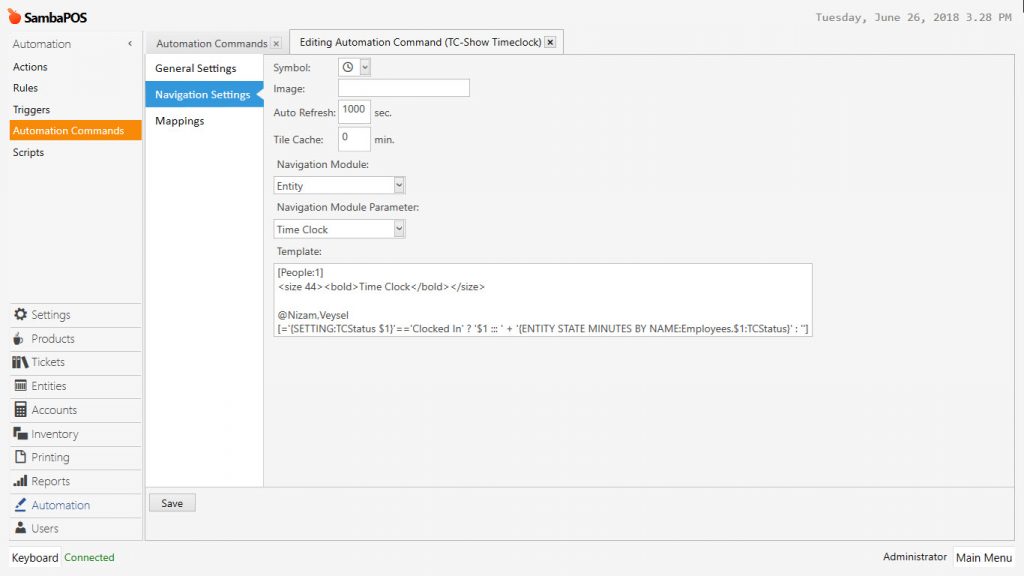
Navigation Module: Entity
Navigation Parameter: Time Clock
Navigation Tile Template:
[People:1]
|
Mappings Section;
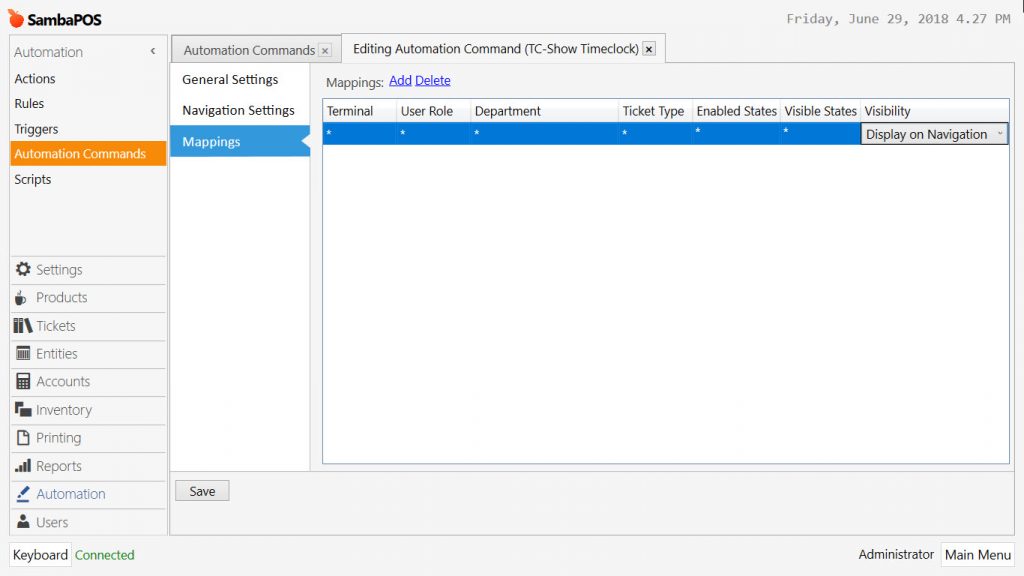
After completing necessary editings, click on Save button.
5. Adding Actions
5.1. Show Time Clock Screen Action
This action is used for refreshing the Time Clock screen.
Go to Main Menu > Manage > Automation > Actions > in here click on Add Action link.
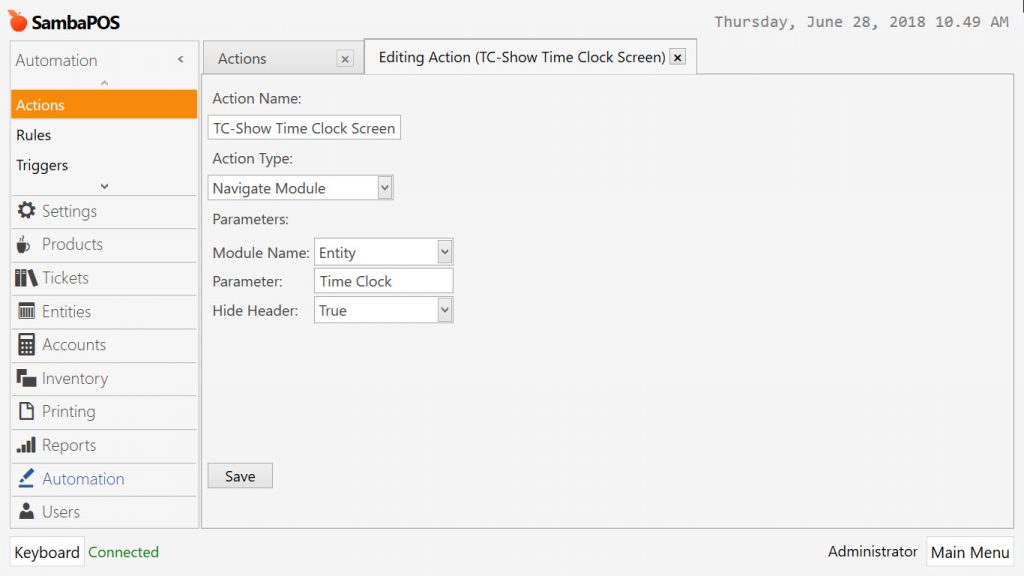
Name: TC-Show Time Clock Screen
Action Type: Navigate Module
Module Name: Entity
Parameter: Time Clock
Hide Header: True
After completing necessary editings, click on Save button.
5.2. Execute Automation Command Action
This action is used for executing other actions.
Go to Main Menu > Manage > Automation > Actions > in here click on Add Action link.
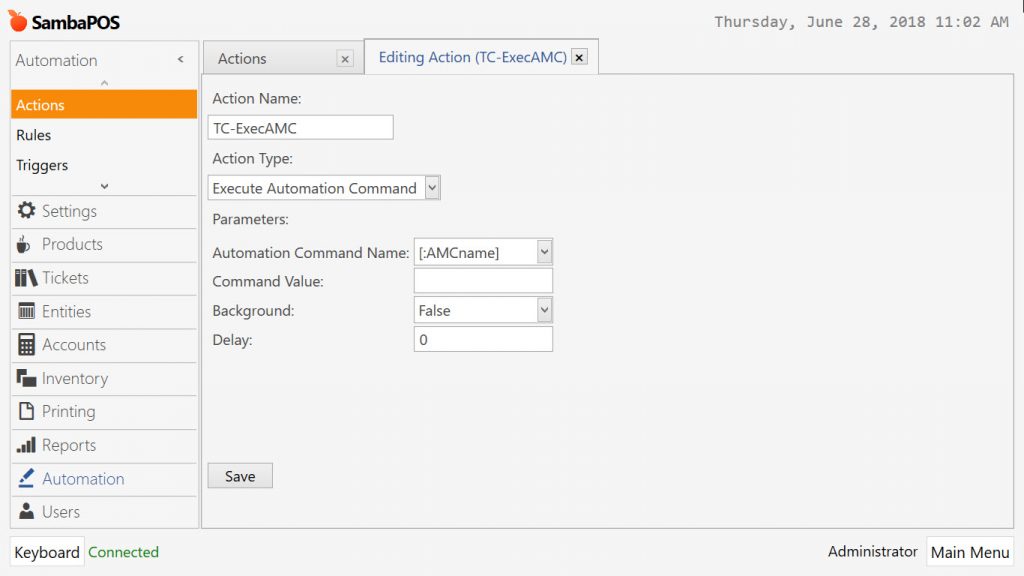
Name: TC-ExecAMC
Action Type: Execute Automation Command
Automation Command Name: [:AMCname]
Command Value:(blank)
Background: False
Delay: 0
After completing necessary editings, click on Save button.
5.3. Show Message Action
This action is used to show messages.
Go to Main Menu > Manage > Automation > Actions > in here click on Add Action link.
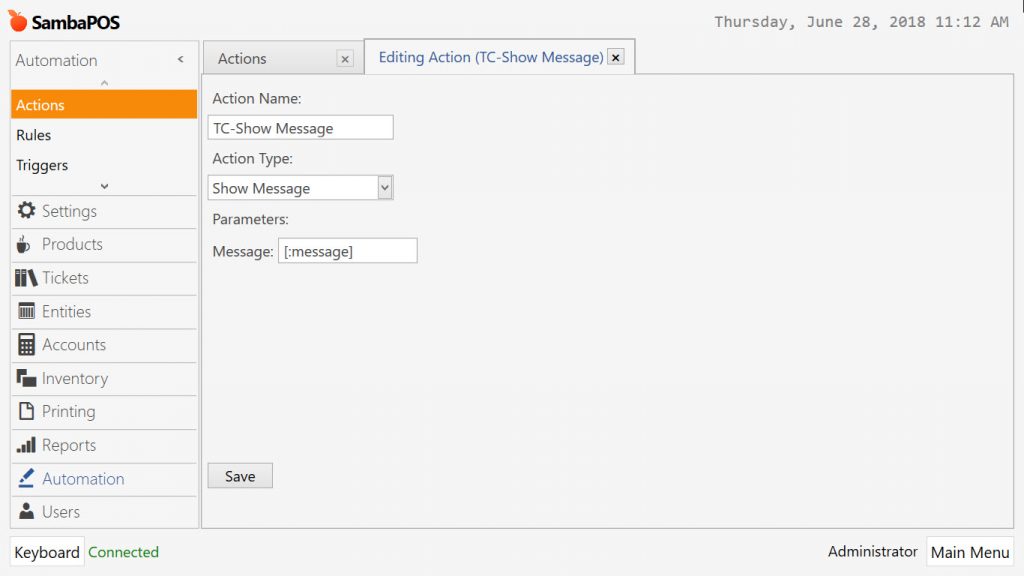
Name: TC-Show Message
Action Type: Show Message
Message: [:message]
After completing necessary editings, click on Save button.
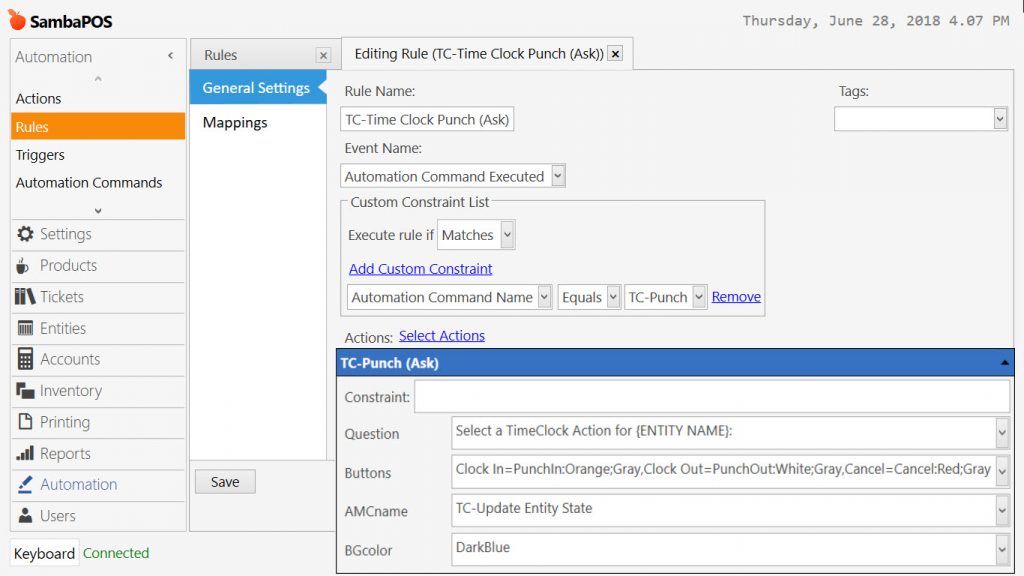
5.4 Ask Question Action
This action is used to ask the user to Clock In or Clock Out.
Go to Main Menu > Manage > Automation > Actions > in here click on Add Action link.

Name: TC-Punch (Ask)
Action Type: Ask Question
Question: [:Question]
Buttons: [:Buttons]
Automation Command Name: [:AMCname]
Background Color: [:BGcolor]
Transparent Color:(blank)
After completing necessary editings, click on Save button.
5.5. Load Entity Action
This action is used to load an Employee Entity so that it is possible to read and set the Entity Data and State.
Go to Main Menu > Manage > Automation > Actions > in here click on Add Action link.
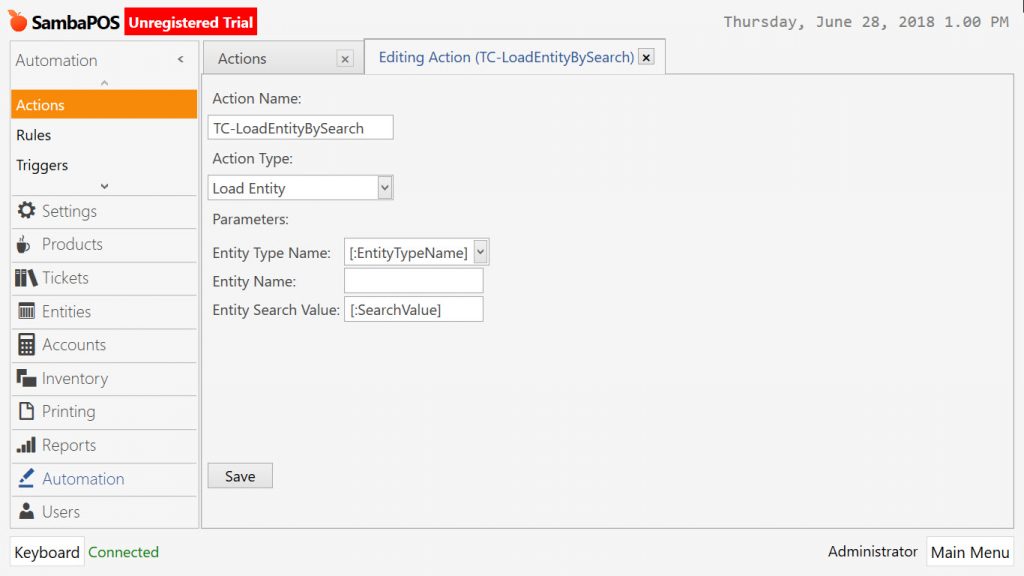
Name: TC-LoadEntityBySearch
Action Type: Load Entity
Entity Type Name: [:EntityTypeName]
Entity Name:(blank)
Entity Search Value: [:SearchValue]
After completing necessary editings, click on Save button.
5.6. Log Entity State Action
This action is used to log the Employee Entity State as PunchIn (Clocked In) or PunchOut (Clocked Out).
Go to Main Menu > Manage > Automation > Actions > in here click on Add Action link.
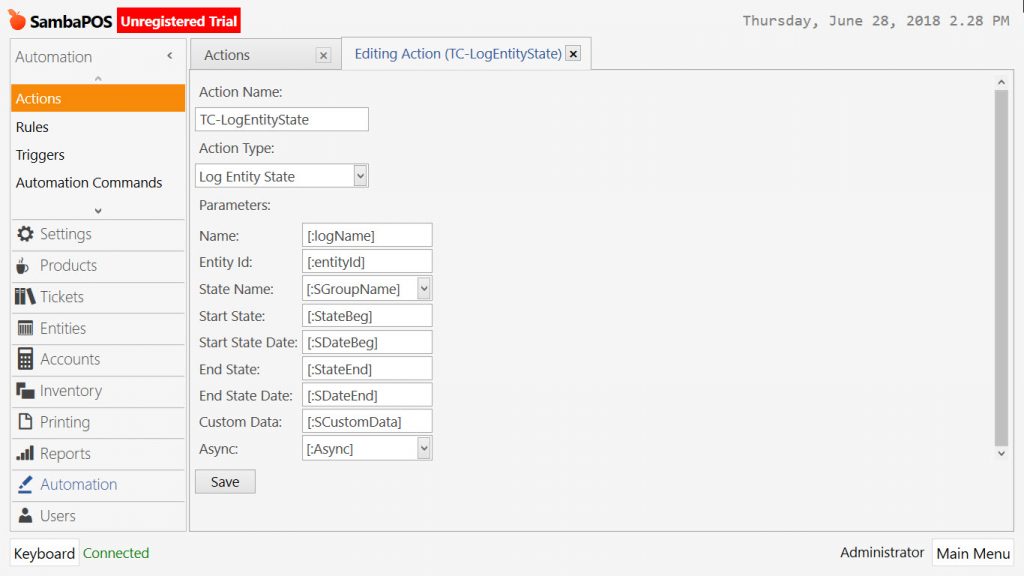
Action Name: TC-LogEntityState
Action Type: Log Entity State
Name: [:logName]
Entity Id: [:entityId]
State Name: [:SGroupName]
Start State: [:StateBeg]
Start State Date: [:SDateBeg]
End State: [:StateEnd]
End State Date: [:SDateEnd]
Custom Data: [:SCustomData]
Async: [:Async]
After completing necessary editings, click on Save button.
5.7. Update Entity State Action
This action is used to set the Employee Entity State to PunchIn or PunchOut.
Go to Main Menu > Manage > Automation > Actions > in here click on Add Action link.
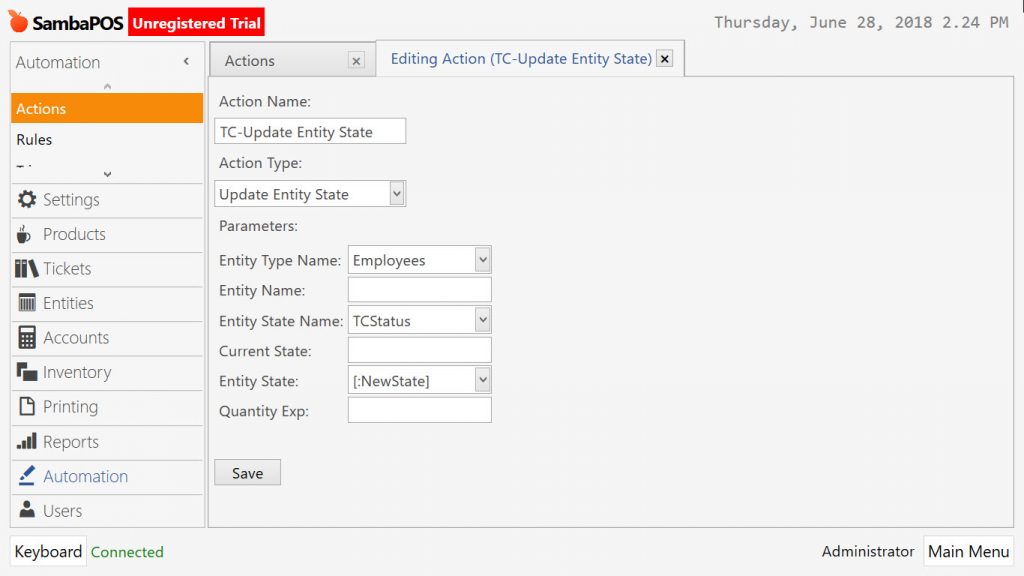
Action Name: TC-Update Entity State
Action Type: Update Entity State
Entity Type Name: Employees
Entity State Name: TCStatus
Entity State: [:NewState]
After completing necessary editings, click on Save button.
5.8. Update Program Setting Action
This action is necessary to update various Program Settings used to track certain parameters.
Go to Main Menu > Manage > Automation > Actions > in here click on Add Action link.
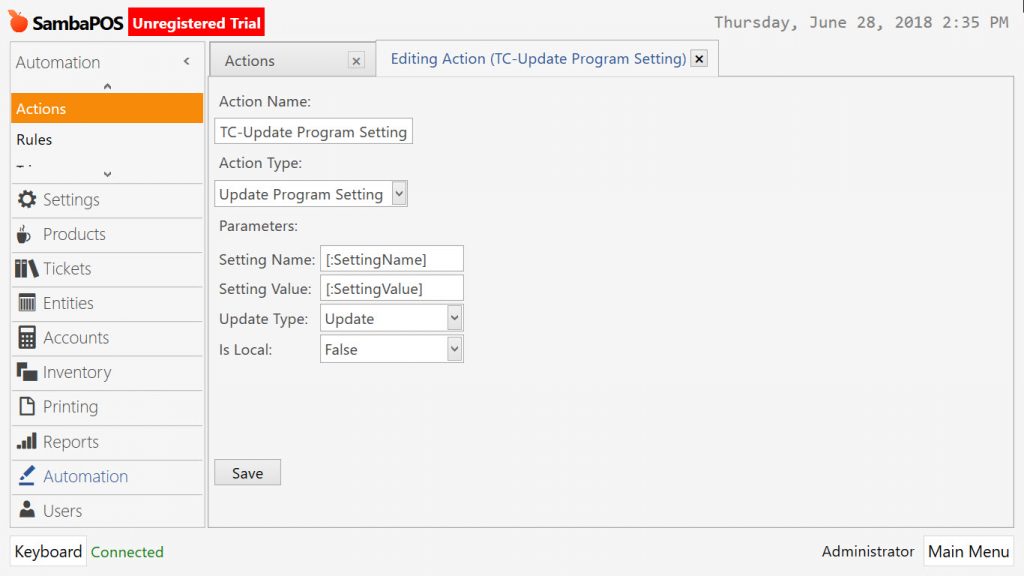
Action Name: TC-Update Program Setting
Action Type: Update Program Setting
Setting Name: [:SettingName]
Setting Value: [:SettingValue]
Update Type: Update
Is Local: False
After completing necessary editings, click on Save button.
6. Adding Rules
6.1. Show Time Clock Screen Rule
Go to Main Menu > Manage > Automation > Rules > in here click on Add Rule link.
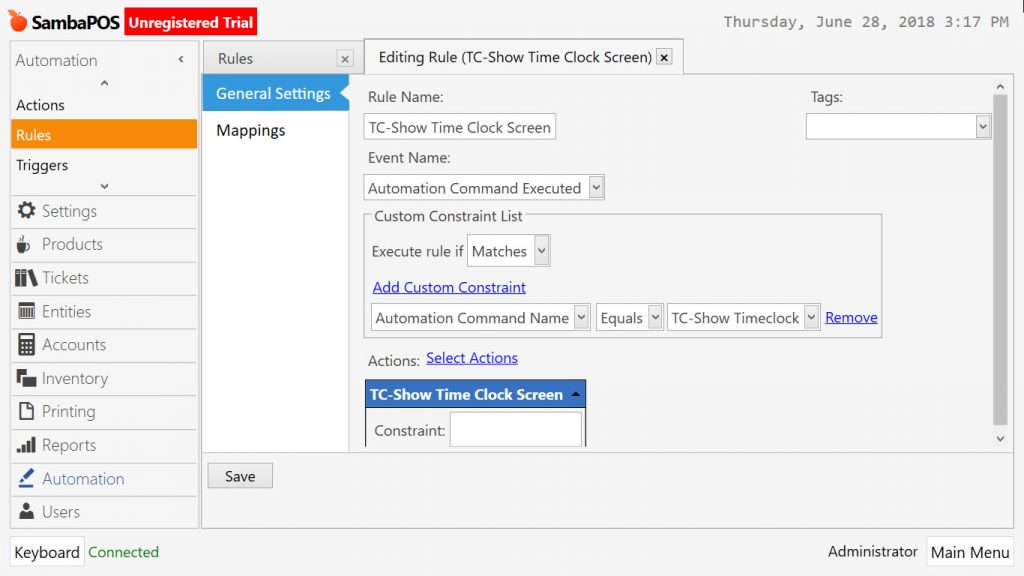
Rule Name: TC-Show Time Clock Screen
Event Name: Automation Command Executed
Execute Rule if: Matches
Add Custom Constraints: Automation Command Name | Equals | TC-Show Timeclock
Action: TC-Show Time Clock Screen
Constraint: Blank
After completing necessary editings, click on Save button.
6.2. Load Entity Rule
Go to Main Menu > Manage > Automation > Rules > in here click on Add Rule link.
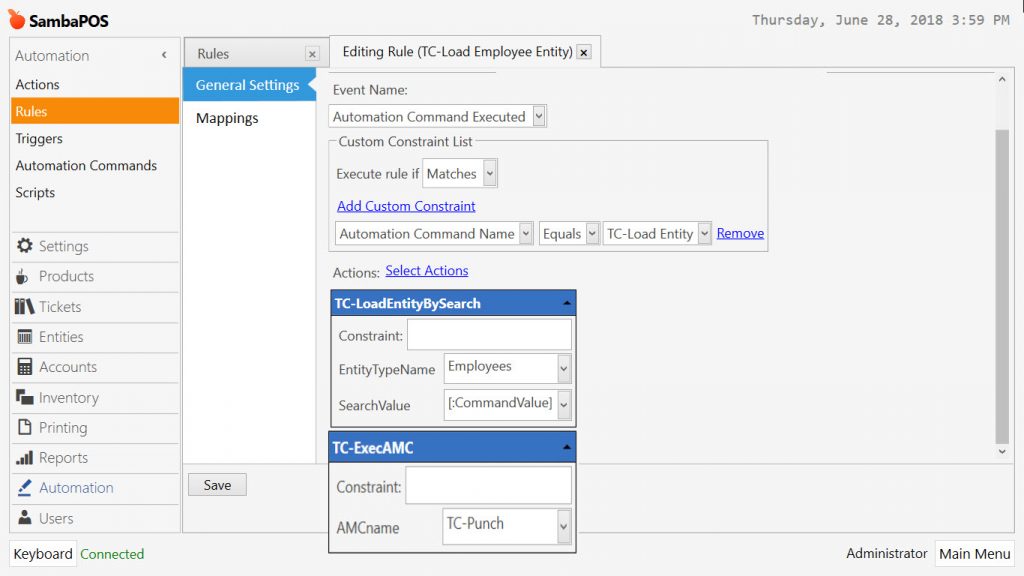
Rule Name: TC-Load Employee Entity
Event Name: Automation Command Executed
Execute Rule if: Matches
Add Custom Constraints: Automation Command Name | Equals | TC-Load Entity
Action: TC-LoadEntityBySearch
Entity Type Name: Employees
Search Value: [:CommandValue]
Action: TC-ExecAMC
Constraint: Blank
AMCname: TC-Punch
After completing necessary editings, click on Save button.
6.3. Time Clock Punch (Ask) Rule
Go to Main Menu > Manage > Automation > Rules > in here click on Add Rule link.
Rule Name: TC-Time Clock Punch (Ask)
Event Name: Automation Command Executed
Execute Rule if: Matches
Add Custom Constraints: Automation Command Name | Equals | TC-Punch
Action: TC-Punch (Ask)
Constraint: Blank
Question: Select a TimeClock Action for {ENTITY NAME}:
Buttons: Clock In=PunchIn:Orange;Gray,Clock Out=PunchOut:White;Gray,Cancel=Cancel:Red;Gray
AMCname: TC-Update Entity State
BGColor: DarkBlue
After completing necessary editings, click on Save button.
6.4. Update Entity State Rule
Go to Main Menu > Manage > Automation > Rules > in here click on Add Rule link.
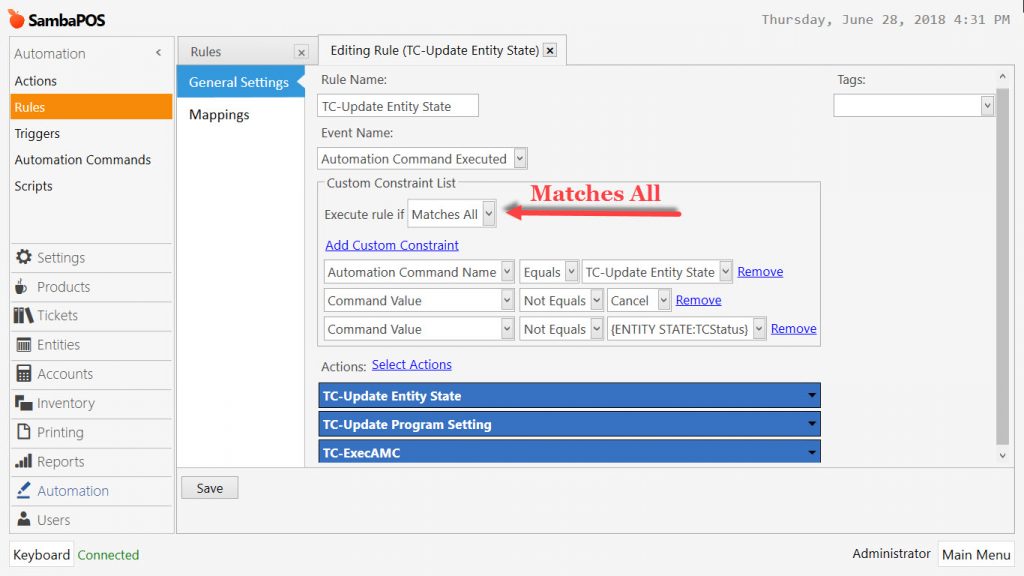
Rule Name: TC-Update Entity State
Event Name: Automation Command Executed
Execute Rule if: Matches All
Add Custom Constraints:
Automation Command Name | Equals | TC-Update Entity State
Command Value | Not Equals | Cancel
Command Value | Not Equals | {ENTITY STATE:TCStatus}
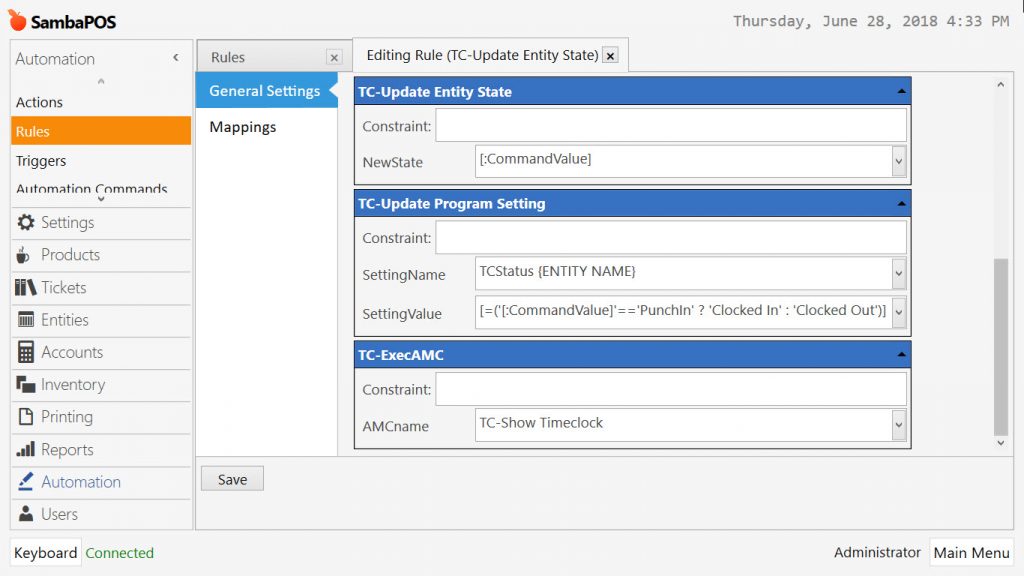
Action: TC-Update Entity State
Constraint: Blank
NewState: [:CommandValue]
Action: TC-Update Program Setting
Constraint: Blank
SettingName: TCStatus {ENTITY NAME}
SettingValue: [=('[:CommandValue]'=='PunchIn' ? 'Clocked In' : 'Clocked Out')]
Action: TC-ExecAMC
Constraint: Blank
AMCname: TC-Show Timeclock
After completing necessary editings, click on Save button.
6.5. Log Entity State Rule
Go to Main Menu > Manage > Automation > Rules > in here click on Add Rule link.
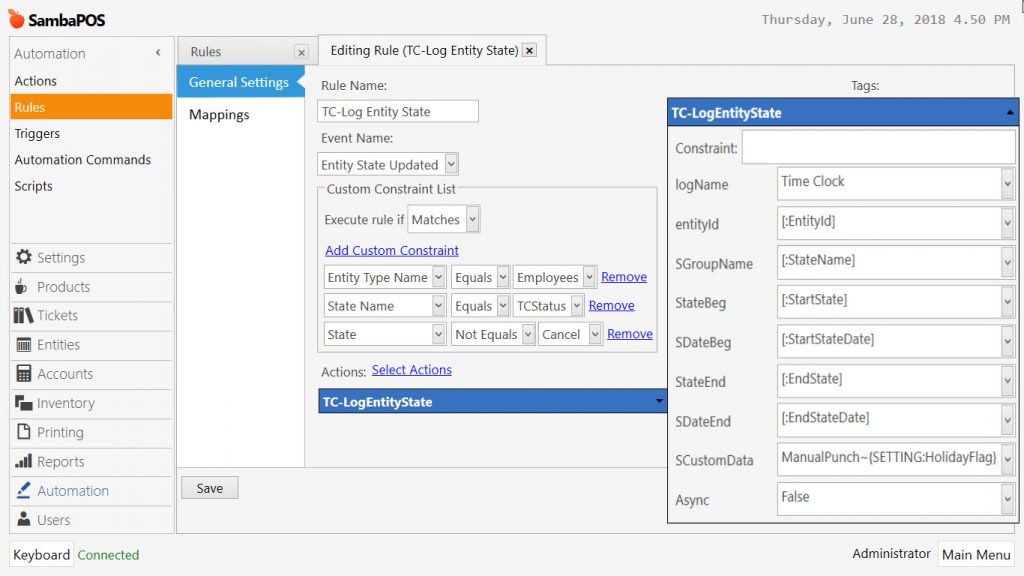
Rule Name: TC-Log Entity State
Event Name: Entity State Updated
Execute Rule if: Matches
Add Custom Constraints:
Entity Type Name | Equals | Employees
State Name | Equals | TCStatus
State | Not Equals | Cancel
Action: TC-LogEntityState
Constraint: Blank
logName: Time Clock
entityId: [:EntityId]
SGroupName: [:StateName]
StateBeg: [:StartState]
SDateBeg: [:StartStateDate]
StateEnd: [:EndState]
SDateEnd: [:EndStateDate]
SCustomData: ManualPunch~{SETTING:HolidayFlag}
Async: False
After completing necessary editings, click on Save button.
7. Adding Reports and Scripts
7.1. Adding Reports
7.1.1. Adding Hourly Report
Go to Main Menu > Manage > Reports > Reports > in here click on Add Report link.
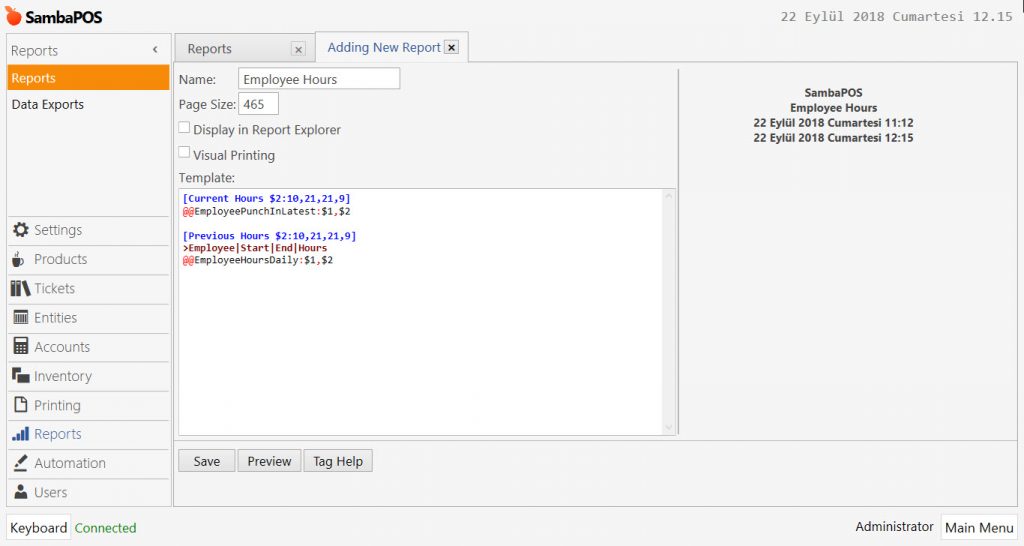
Copy and paste below code group into template area;
[Current Hours $2:10,21,21,9][Previous Hours $2:10,21,21,9]>Employee|Start|End|Hours |
The $ variables in the Report are passed from the Report Viewer Widget Parameter list. The Parameters are assigned as follows:
| $1 : Entity Type (Employee)
$2 : Employee Name (i.e. Nizam or Veysel or …) $3 : Date Filter Start (optional) $4 : Date Filter End (optional) $5 : unused |
After completing necessary editings, click on Save button.
In the report template area, you need to replace $1 value with Employee, and $2 value with Employee Name. After that the report will be seen like in the image below.
After completing necessary editings, click on Save button.
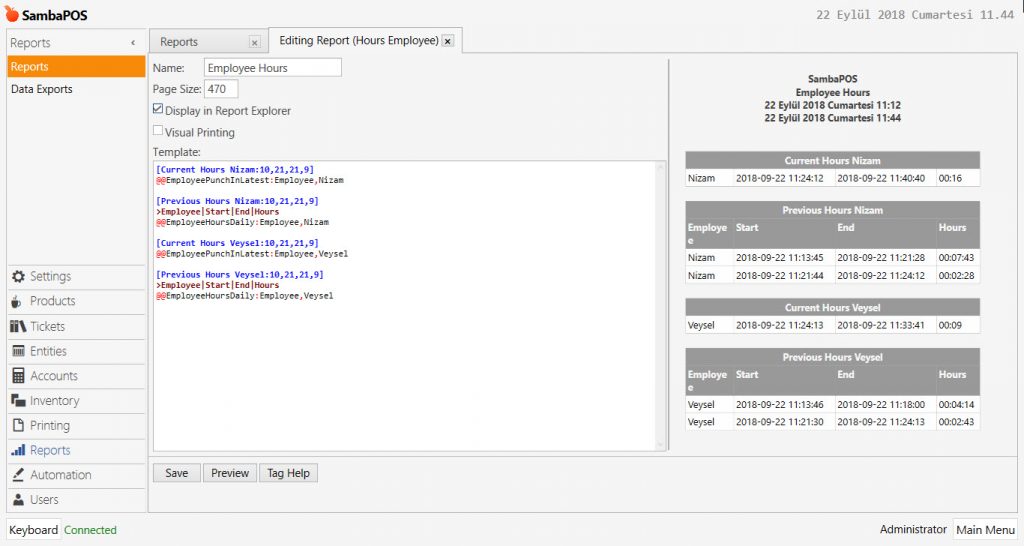
7.1.2. Adding Report For Employee Nizam
Go to Main Menu > Manage > Reports > Reports > in here click on Add Report link.
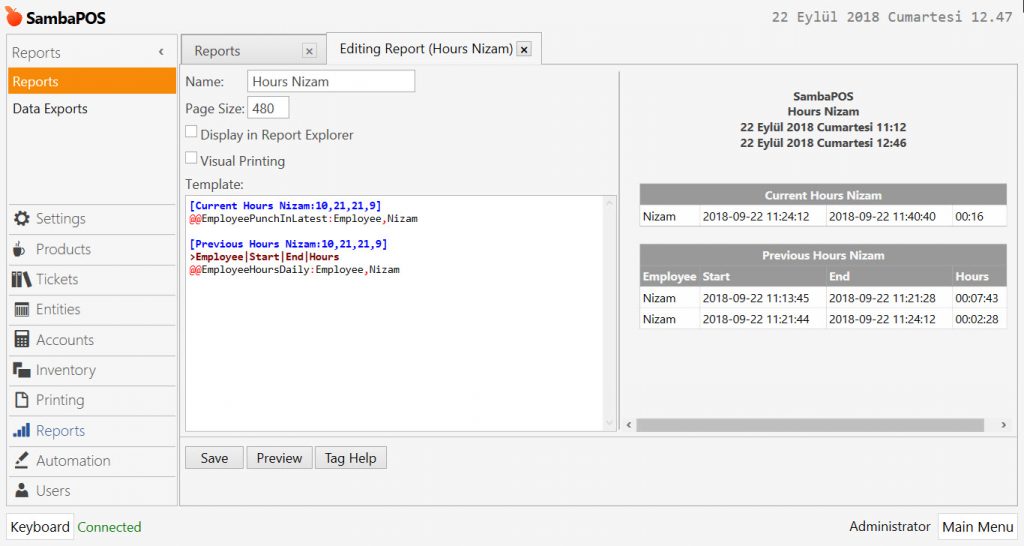
After completing necessary editings, click on Save button.
7.1.3. Adding Report For Employee Veysel
Go to Main Menu > Manage > Reports > Reports > in here click on Add Report link.
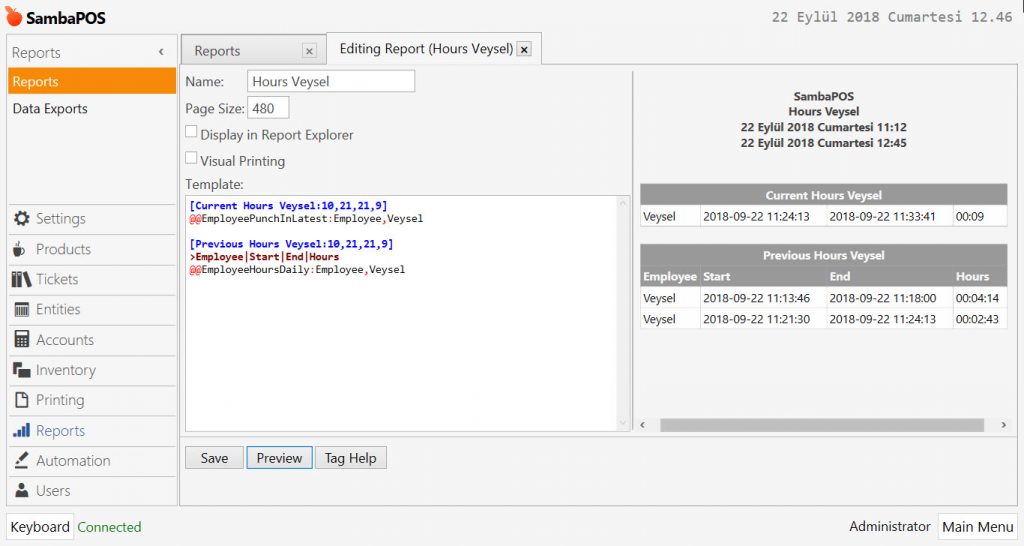
After completing necessary editings, click on Save button.
7.2. Adding Scripts
The SQL Scripts are called from within the Report shown above.
7.2.1. Employee Hours Daily
Go to Main Menu > Manage > Automation > Scripts > in here click on Add Script link.
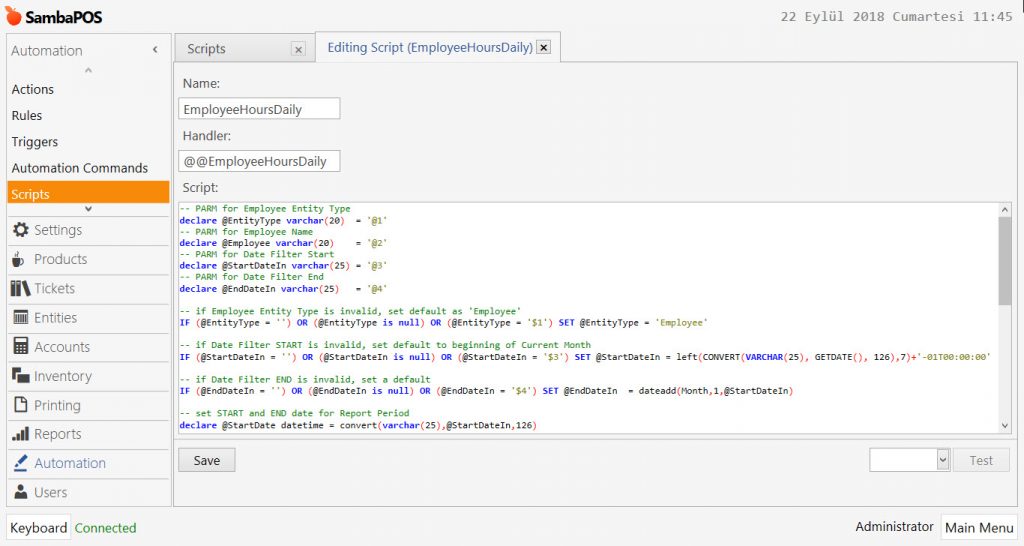
Script Name: EmployeeHoursDaily
Handler: @@EmployeeHoursDaily
Script: Copy and paste below code group into script field;
-- if Date Filter START is invalid, set default to beginning of Current Month-- if Date Filter END is invalid, set a default-- set START and END date for Report Period-- set name of HolidayFlag-- set name of Clock-In State-- set Overtime Hour Limit-- NOTHING TO SET BEYOND HERE)SELECTe.Name,StartStateDate,EndStateDate,CONVERT(VARCHAR(8),(EndStateDate-StartStateDate),108) as TotalHoursFROM [EntityStateLogs] sl |
After completing necessary editings, click on Save button.
7.2.2. EmployeePunchInLatest
Go to Main Menu > Manage > Automation > Scripts > in here click on Add Script link.

Script Name: EmployeePunchInLatest
Handler: @@EmployeePunchInLatest
Script: Copy and paste below code group into script field;
-- PARM for Employee Entity Type-- if Employee Entity Type is invalid, set default as 'Employee'-- if Date Filter START is invalid, set default to beginning of Current Month-- if Date Filter END is invalid, set a default-- set START and END date for Report Period-- set name of HolidayFlag-- set name of Clock-In State-- set Overtime Hour Limit
|
After completing necessary editings, click on Save button.
7.2.3. EmployeeHoursTTL
Go to Main Menu > Manage > Automation > Scripts > in here click on Add Script link.
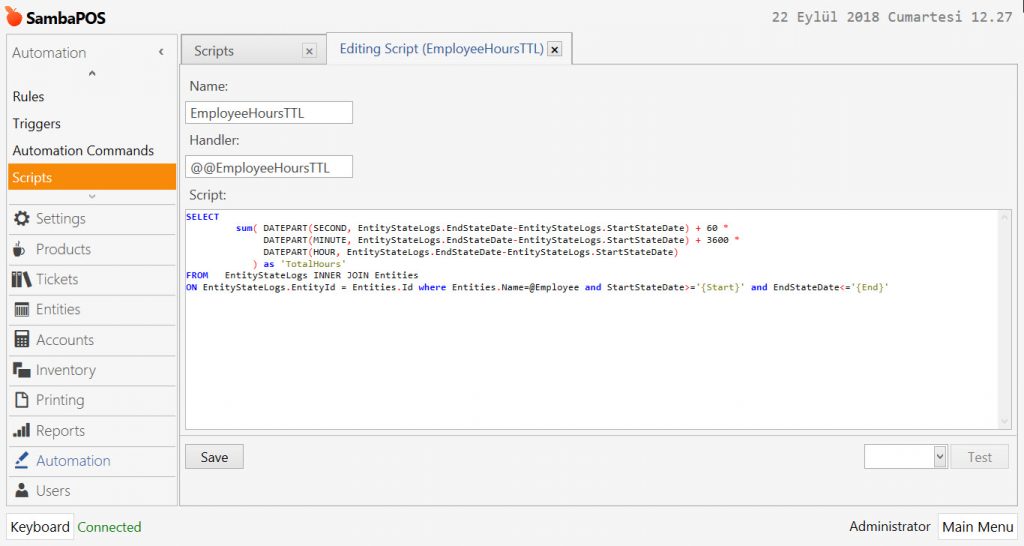
Script Name: EmployeeHoursTTL
Handler: @@EmployeeHoursTTL
Script: Copy and paste below code group into script field;
SELECT |
After completing necessary editings, click on Save button.