2.3.2.a. What is Entity?
Generally income providing things such as tables, customers, deliverers, game groups, messengers, members, membership cards, staff are called Entity.
First Description: The phrase which has the income relation between assigned document types.
Second Description: The Income phrase that is created for assignment of document types.
- Entities are income center for document types.
- It is possible to assign more than one document type to a single document.
- For table entity type when you design a sample entity workflow process, entity status must be like this; Ready, New Orders, Locked, Unpaid, Paid.
- Entity Types: It is designed in advance according to workflow process(status), account system of document types.
Tables and customers entity types come as predefined when SambaPOS first installed. In case of necessity, it is possible to create entity types according to workflow process of document types.
In SambaPOS, entities are prepared under 4 main titles.
- Entity Types
- Entities
- Batch Entity Editor
- Entity Screens
1- Adding Entity Types
The field for creating general structure of the entities which will be added. Determine each entity’s behavior type firstly from information on the entity type. In SambaPOS it is possible to add unlimited Entity Types according to need. Configure customer details and view format in this field.
1-1- Adding Entity Type
The field that is used for adding new entity type. To add new entity type go to Manage > Entities > Entity Types and click on Add Entity Type link.
General Settings Section;
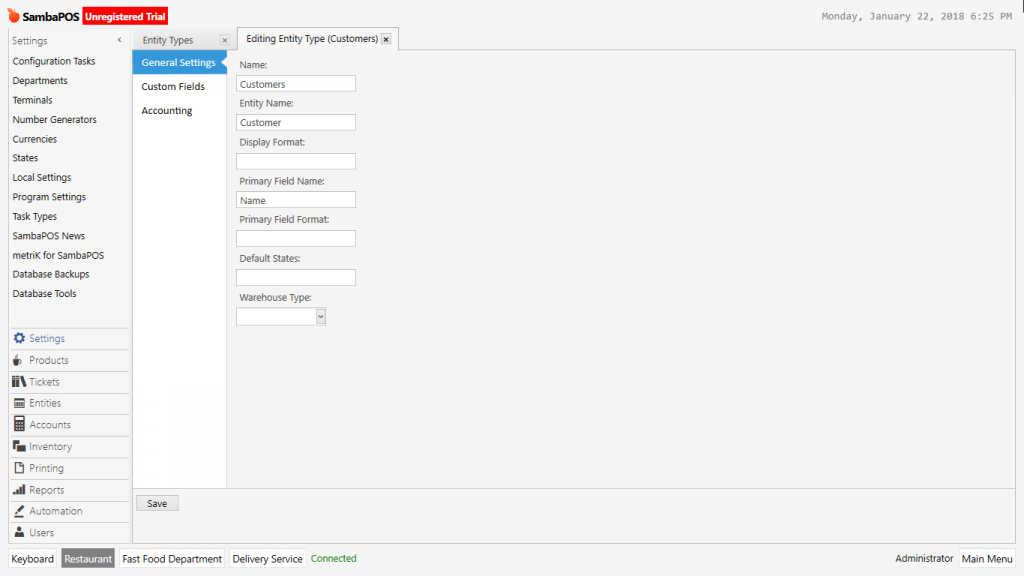
- Name: The field that name of entity type will be written.
- Entity Name: The field that name of entity will be written.
- Primary Field Name: The field that primary field name will be written.
- Warehouse Types: Warehouse that the inbound products will be affecting when you make purchase and sale with the entity type. Should be blank for some entity types such as table, staff, customer. As a sample usage place, currents entity which including product providing wholesalers.
Custom Field Section;
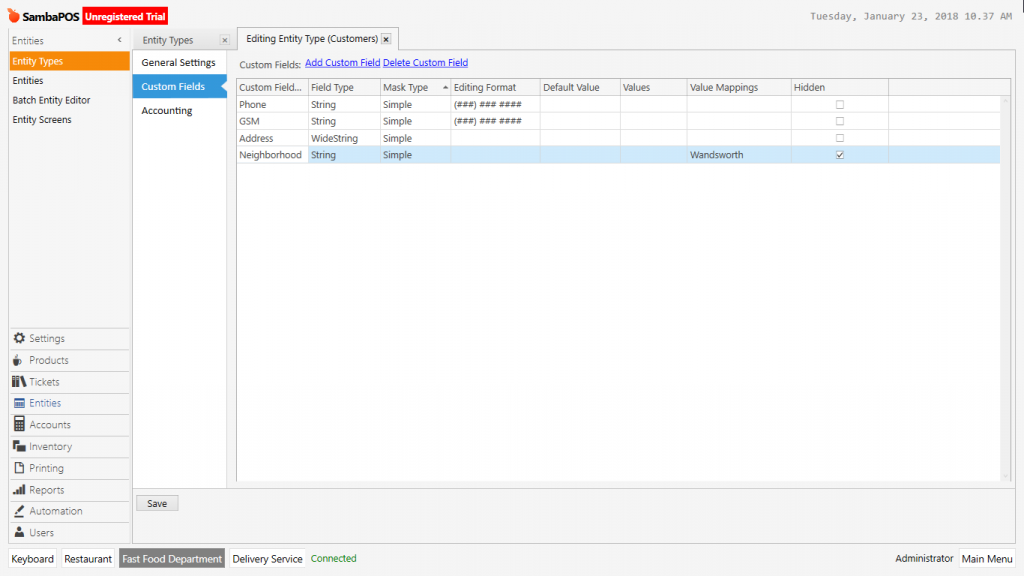
- Custom Field Name: The place where name of custom field will be written.
- Field Type: In this section 5 different values can be selected. These are;
- String: The field that is possible to save data into a single row as Numeric, Alpha Numeric and Symbol.
- WideString: The field that is possible to save data into multiple rows as Numeric, Alpha Numeric and Symbol.
- Number: Data field that Numeric characters will be written as a row.
- Query: The field that database queries will be entered.
- Date: Data field that numeric characters will be entered as date format.
- Editing Format: Settings of information which will be entered into custom field can be configured from here. It supports Windows digit format. For example for phone section (###) ### #### format will be keeping phone number like this (555) 555 5555 even if we write it plain.
- Values: This is used when you want to enter information not manually but by selecting from a list. For example for customer entities if you open Gender section you can provide selecting one of two values by writing Man, Women and separate them with a comma.
- Hidden: It is used for not showing the private field during the entity search. When it is selected it hides that field on the screen. For example for Staff Entities when you open salary section it hides this information on the searching screen.
Accounting Section;
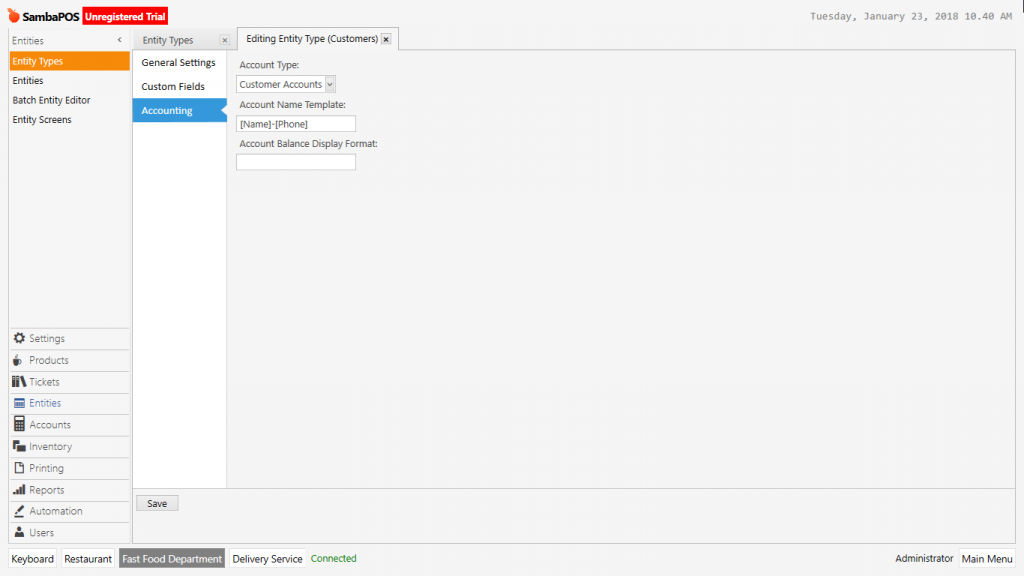
- Account Type: The account system template that you will be using for added entities when you want to open an account record in the account system.
- Account Name Template: Field that saving format will be determined for entity during the account addition. The values in these symbols [ ] are description values of entities. For example in the customers entity type, when its given like this [Name] -[Phone] it will open account automatically in this format Name Surname-5554443322.
2- Entities
The field that entities are listed. In the entities section you can configure these; add new entity, editing entity, batch create entities.
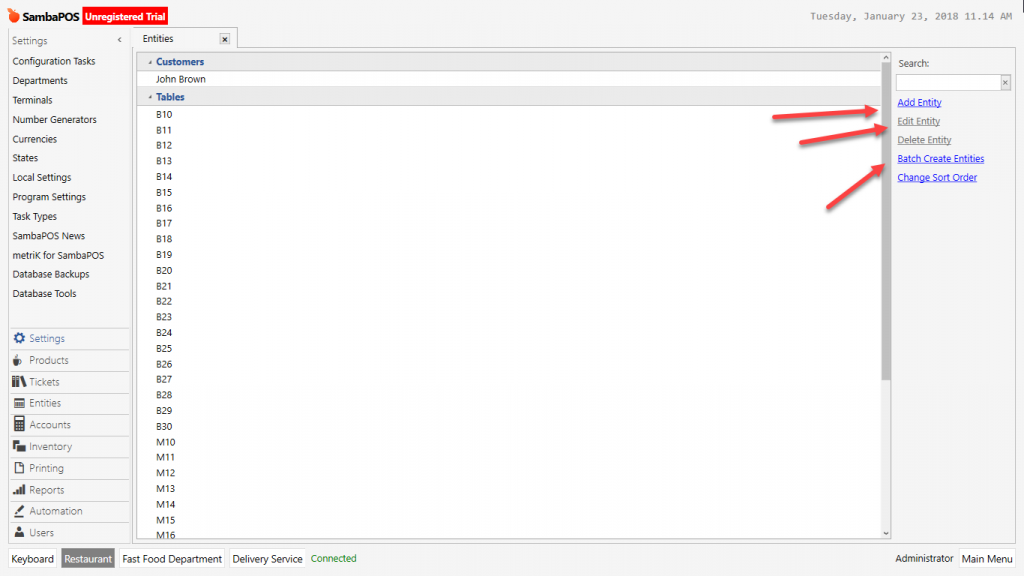
2-1- Add Entity
The field that new entity will be added with its custom fields according to selected entity type.

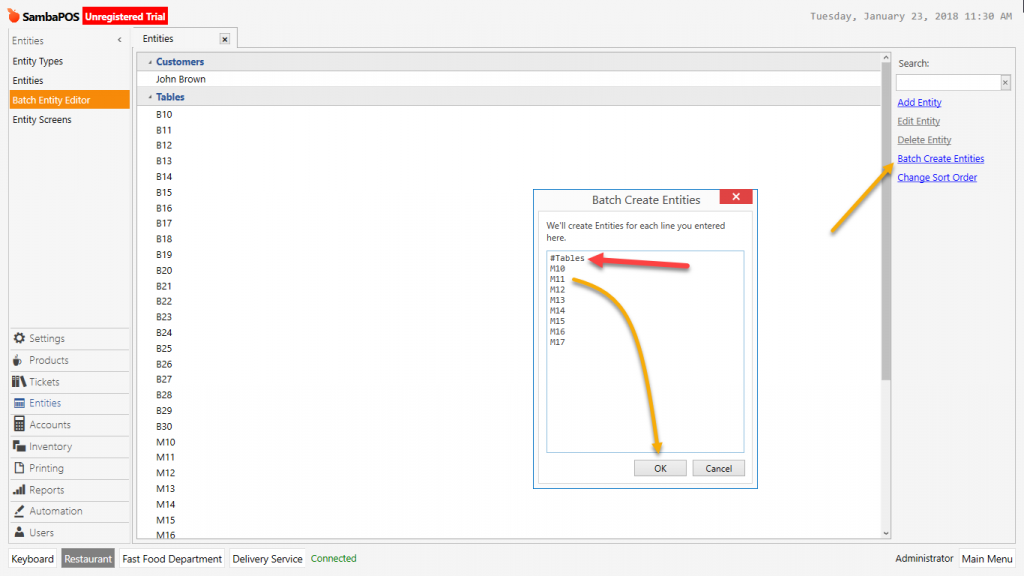
2-2- Batch Create Entities
In the batch create entities window put # symbol in front of entity type name. By writing each entity name in each row, you can add as much entities as you want.
3- Batch Entity Editor
The field that created entities will be edited from single screen. Click on the each entities under the entity types and after configuring related edition, complete the process by clicking on Save Changes button.

4- Entity Screens
If created entities will be used on POS screen, when you click on POS button on navigation screen, viewing mode is created and edited from here.
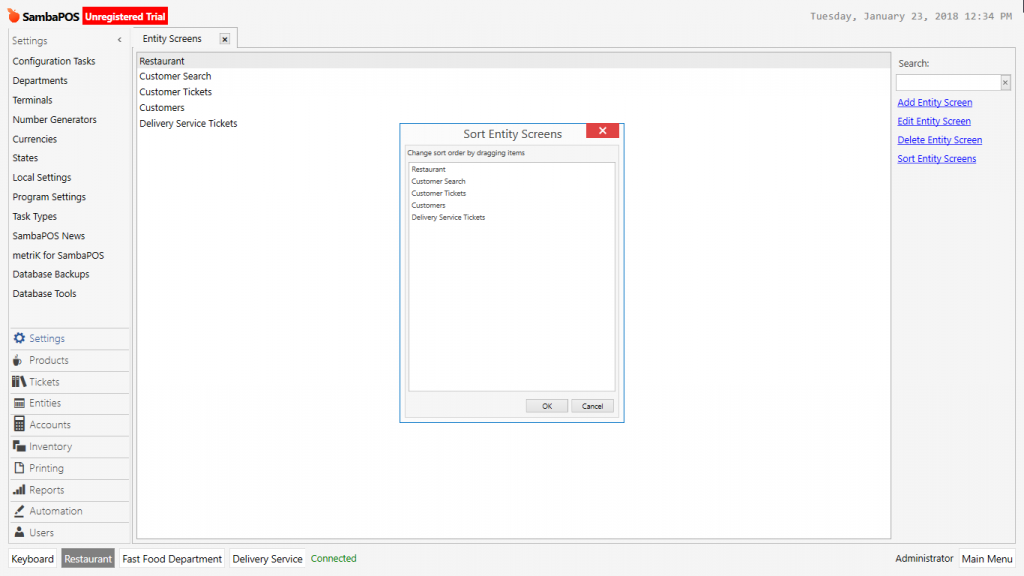
4-1- Sort Entity Screen
In this field, sorting on screen is determined in case of using more than single entity screens in a department. You can configure sorting of entity screens by drag and drop method.
4-2- Add Entity Screen
Field that is used for adding new entity screen. This field consists of 5 titles.
General Settings Section;
Field that basic settings of entity screen is configured.

- Name: Field that name of Entity Screen will be written.
- Ticket Type: Field that document type will be selected.
- Ask Ticket Type: Provides to select different document type for each screen when you working on entity screen.
- View Mode: Field that view mode of entities is determined on the POS screen. Consists of 4 options.
- Automatic: Option that sorting all entities into one screen automatically as boxes.
- Search: If you select this option on POS screen a search will be seen, in here write entity name and search.
- Custom: It makes possible to put entities into POS Screen according to desired shape, angle view on the POS screen. Also you can add variety of widgets and customize them.
- Layout: The field that entity screens layout style is determined.
Appearance Section;
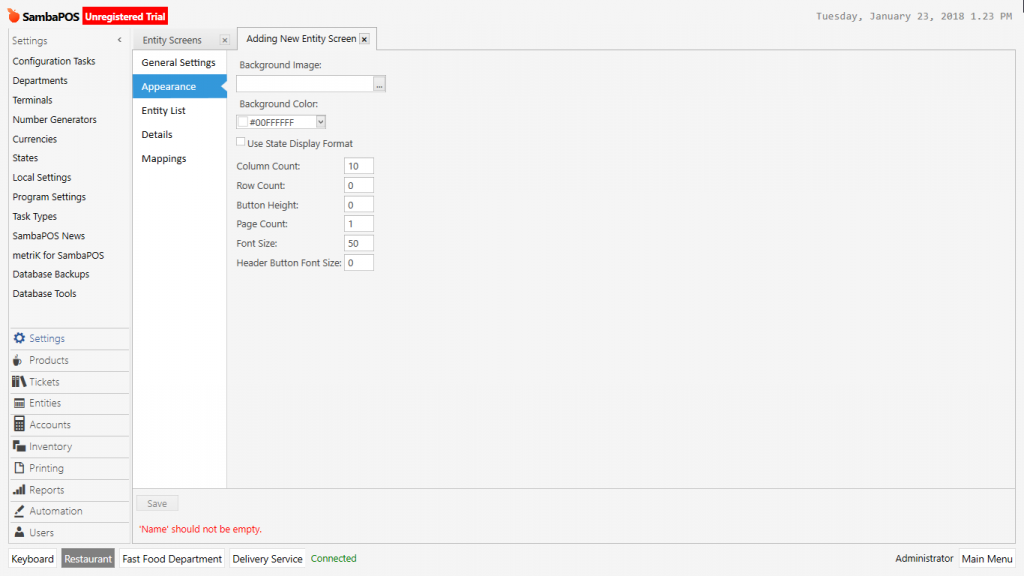
Field which putting floor plan into the POS screen is possible. Configure the scheme or font size from here.
- Background Color: In this field you can select background picture for customized table views. The picture should be in JPG or PNG format.
- Column Count: On Automatic View Mode field for determining number of desired entity count in a column.
- Row Count: Field that desired row count is determined on Automatic View Mode.
- Button Height: Pixel value for heights of buttons.
- Page Count: When entities are too many, it might be necessary to divide into parts in order to select easier. If it needs to be divided into pages, type the page number in here.
- Font Size: The field that determining for font size of entity names which will be written on button.
- Header Button Font Size: Field that font size of headers is determined.
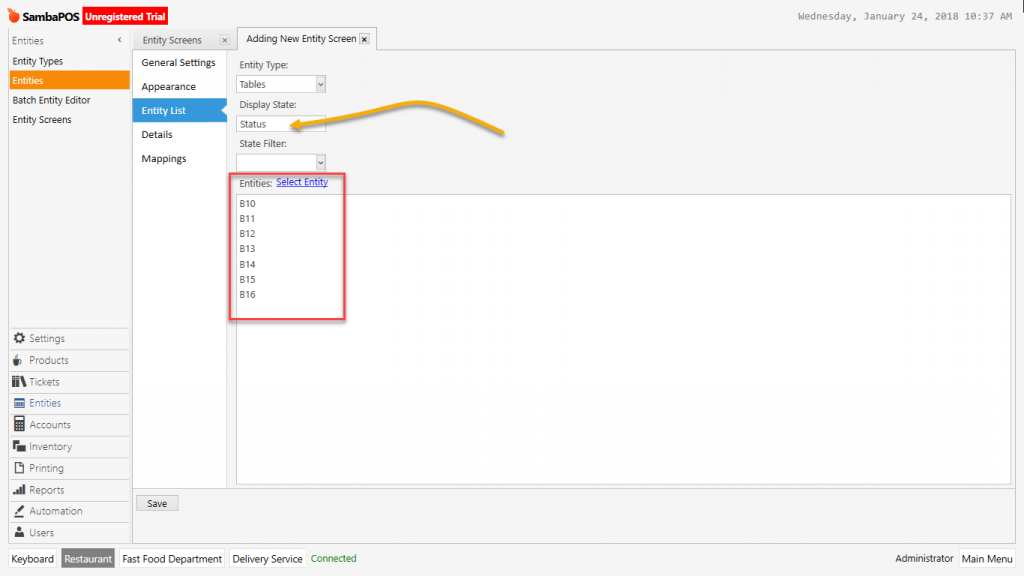
Entity List Section:
Field for selecting desired Entities which will be in the entity screen.
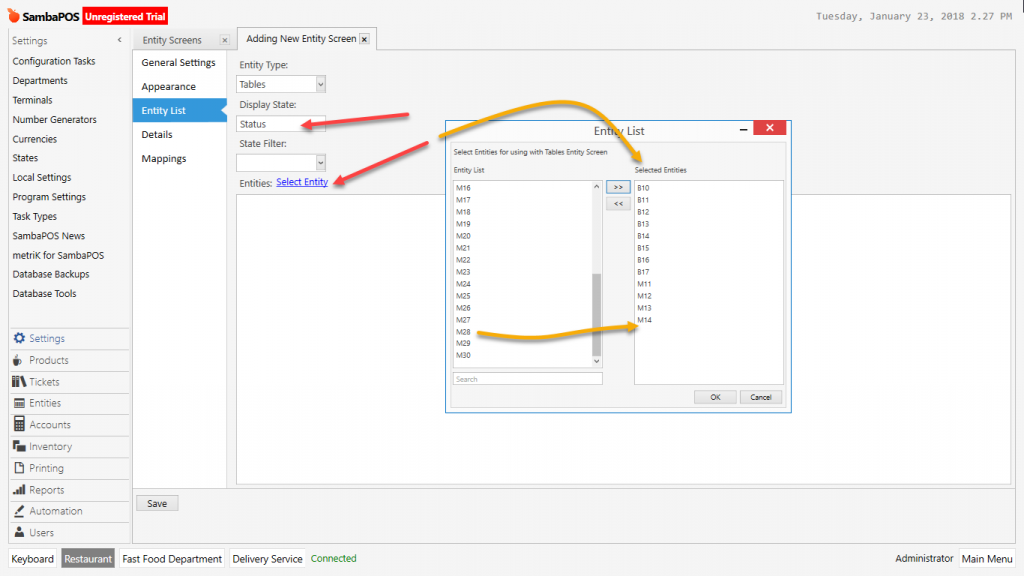
- Entity Type: Field for selecting entity type which will be shown on entity screen.
- Display State: The field that Status which desired to be used and configured for Entity Type is written.
- State Filter: Field that is used in case of a sub status will be shown by filtered in the selected status. For example; name of entity states comes in default setup as Status. If it is selected in state filter “Sent” then it only shows the orders that has been sent to the kitchen.
- Entities: The field that entities will be selected to be shown on entity screen.
Mappings Section:

Field that determination of created entity screen will be visible for whom and in which situations. To make it visible for all roles open at least one row by clicking on add button and put * for column values.